
Some times I get crazy ideas, and this might be one of them! 😀 I am embarking on a huge project to create a life size metal peacock sculpture! I am building it out of a mix of media from copper, brass, wood, stainless steel and more. Each feather will be a separate piece and either painted, patinaed, enameled, carved or otherwise formed to best serve the project.
I am working from a lot different reference material, but this image on the left shows the ultimate goal. I have always loved peacocks and have owned some (Indian Blues and Whites) in the past. The colors and form of these amazing birds is unmatched. My goal is to do them justice with my artwork. I’m using a lot of different techniques in this project, and spending countless hours – but it will be worth it in the end!
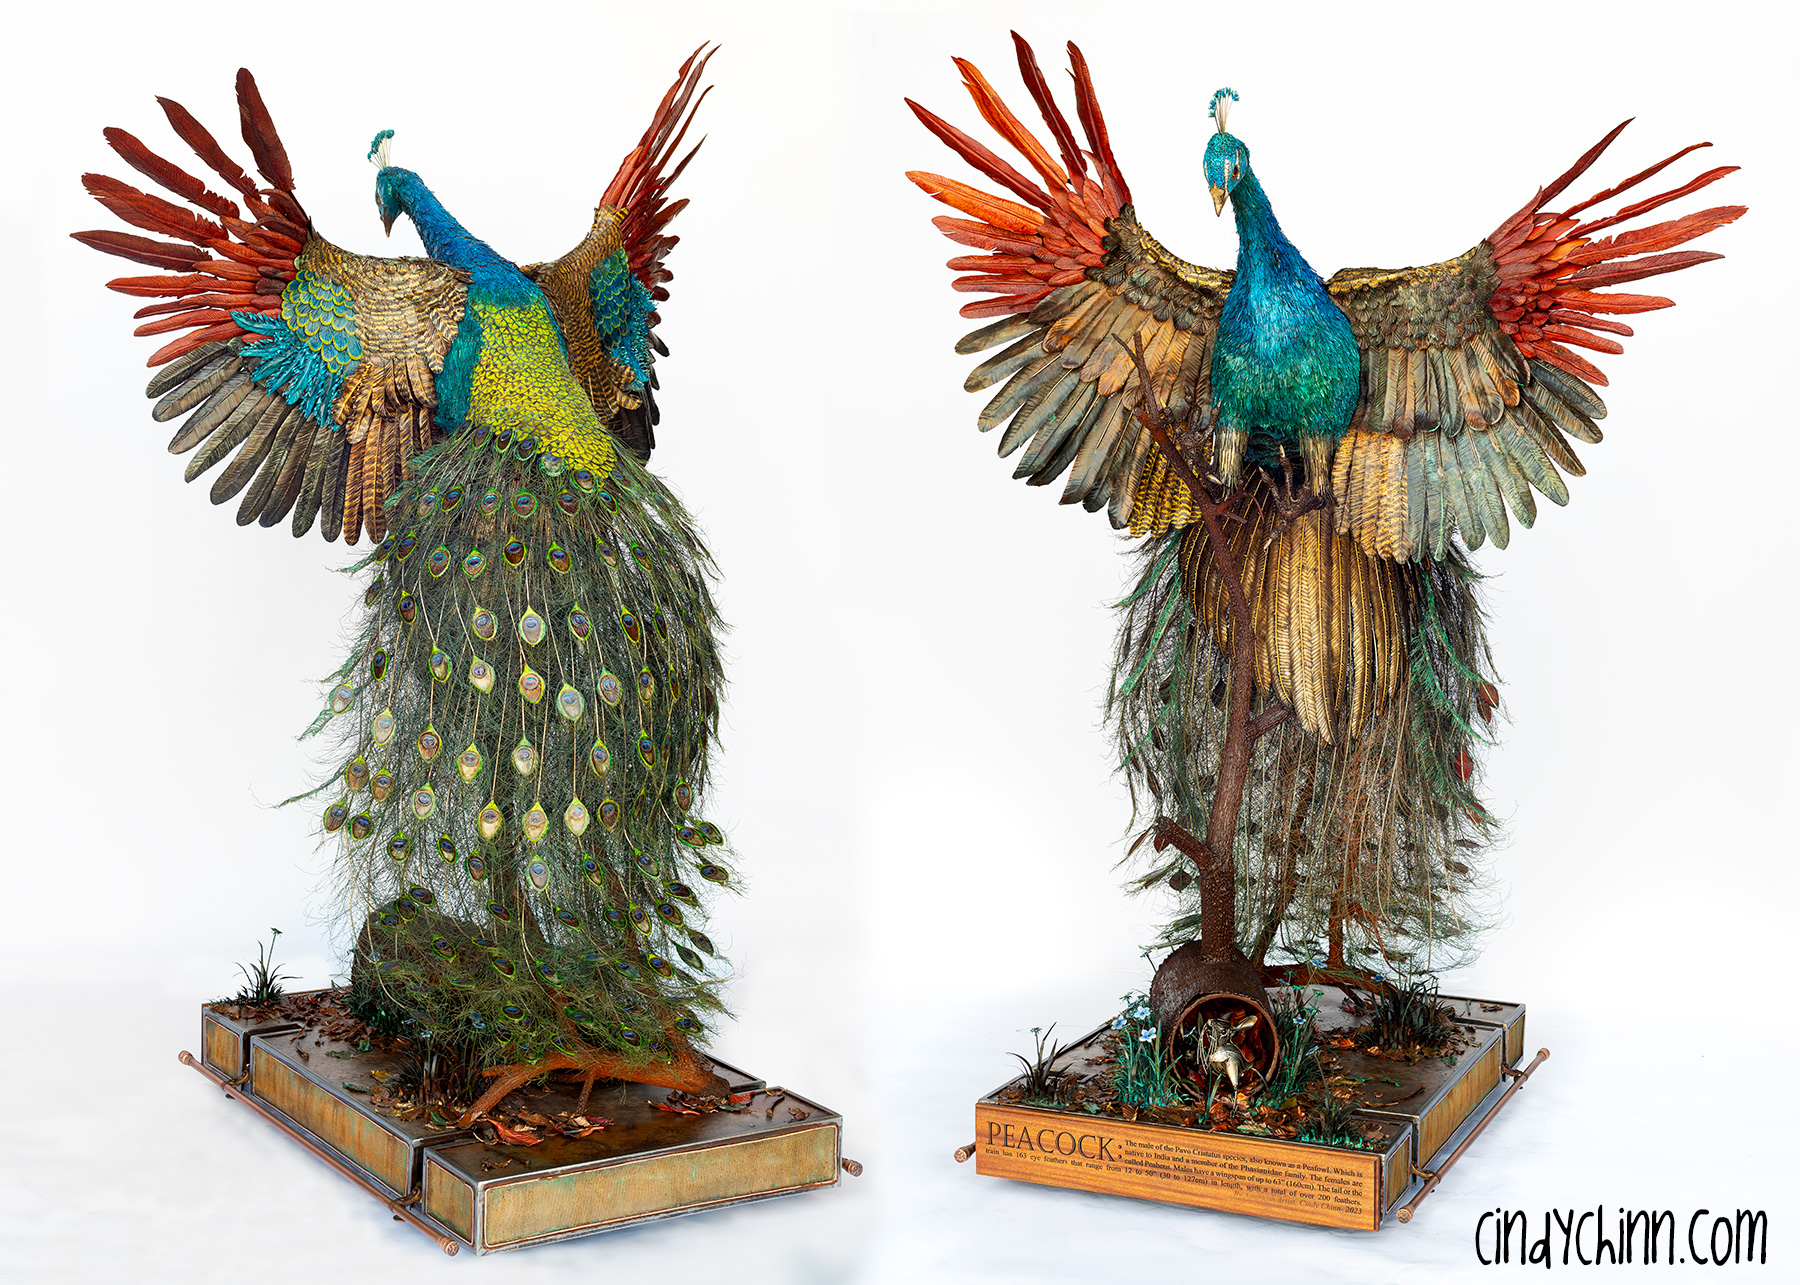
Recent Photo: November 13, 2023 – COMPLETE!! 4 years in the making! Brass- Copper- Stainless Steel- Scrap Metal- Wood- Enameling- and a ton of patina! The Peacock- just over 6.5′ tall and don’t ask what he weighs! CLICK HERE FOR MORE FINAL IMAGES
Metal Peacock Sculpture – The Story in Photos:
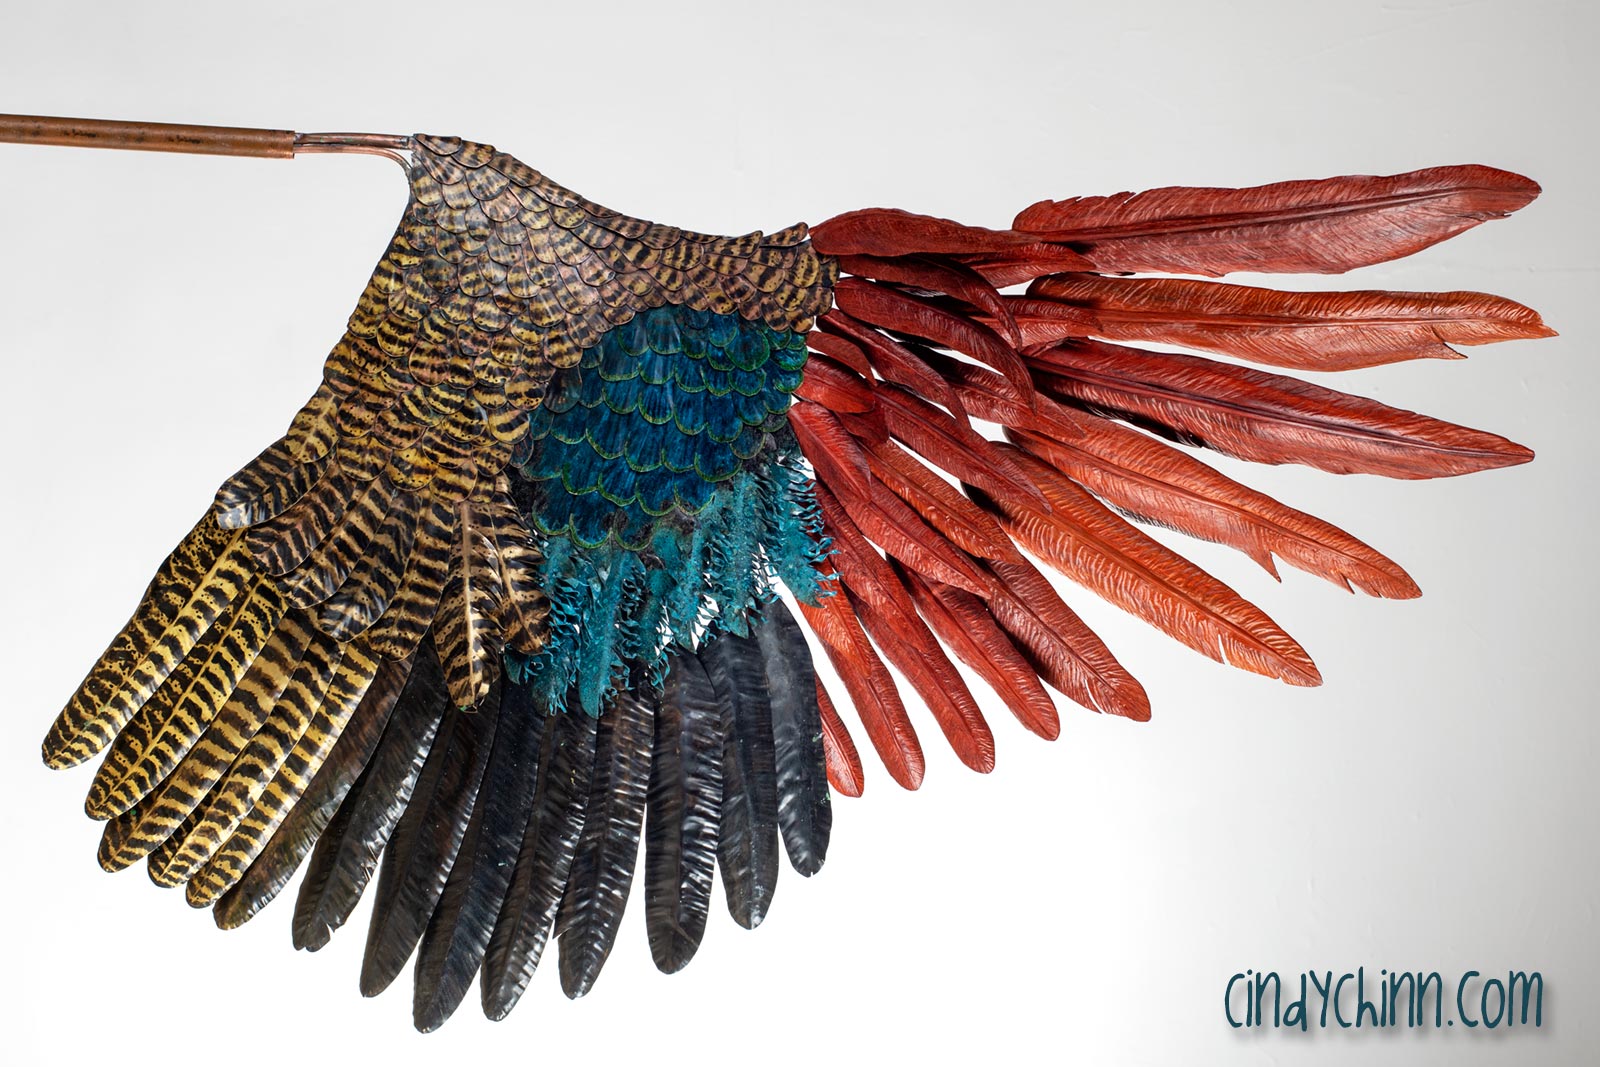
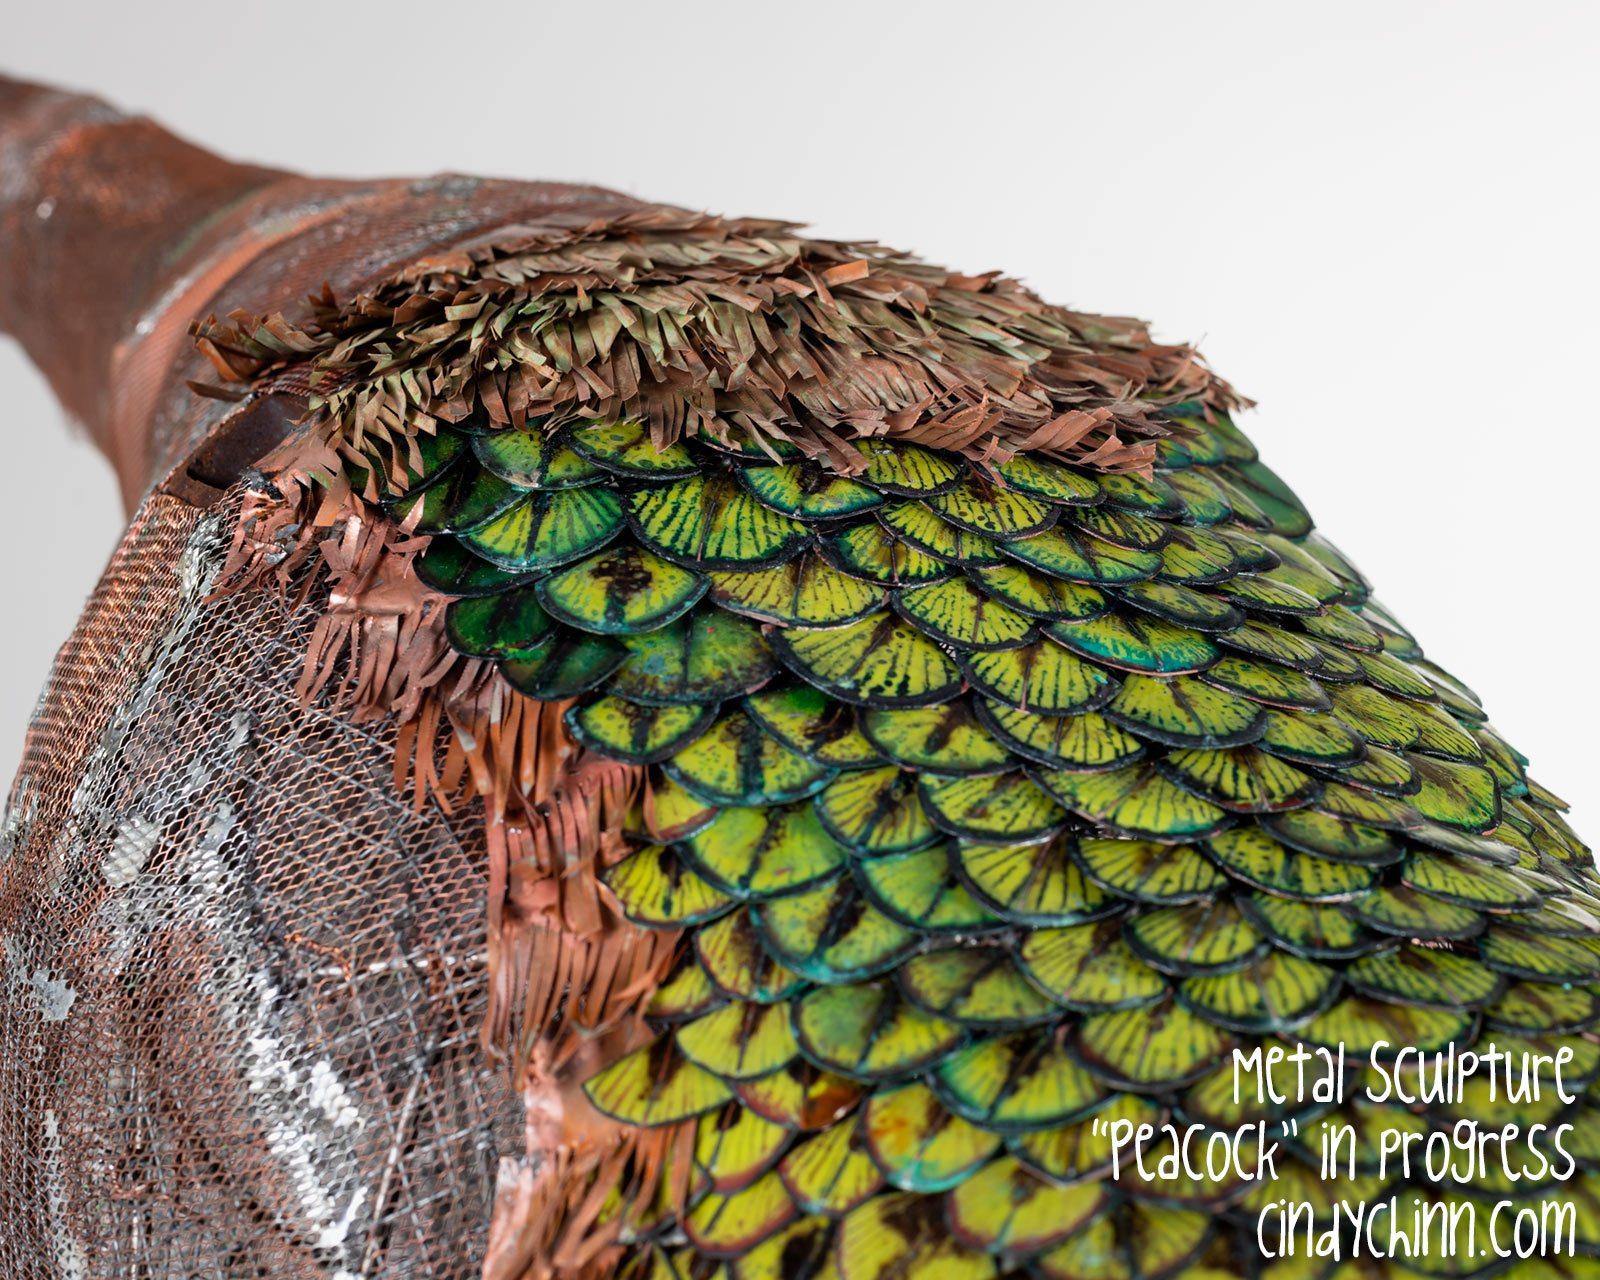
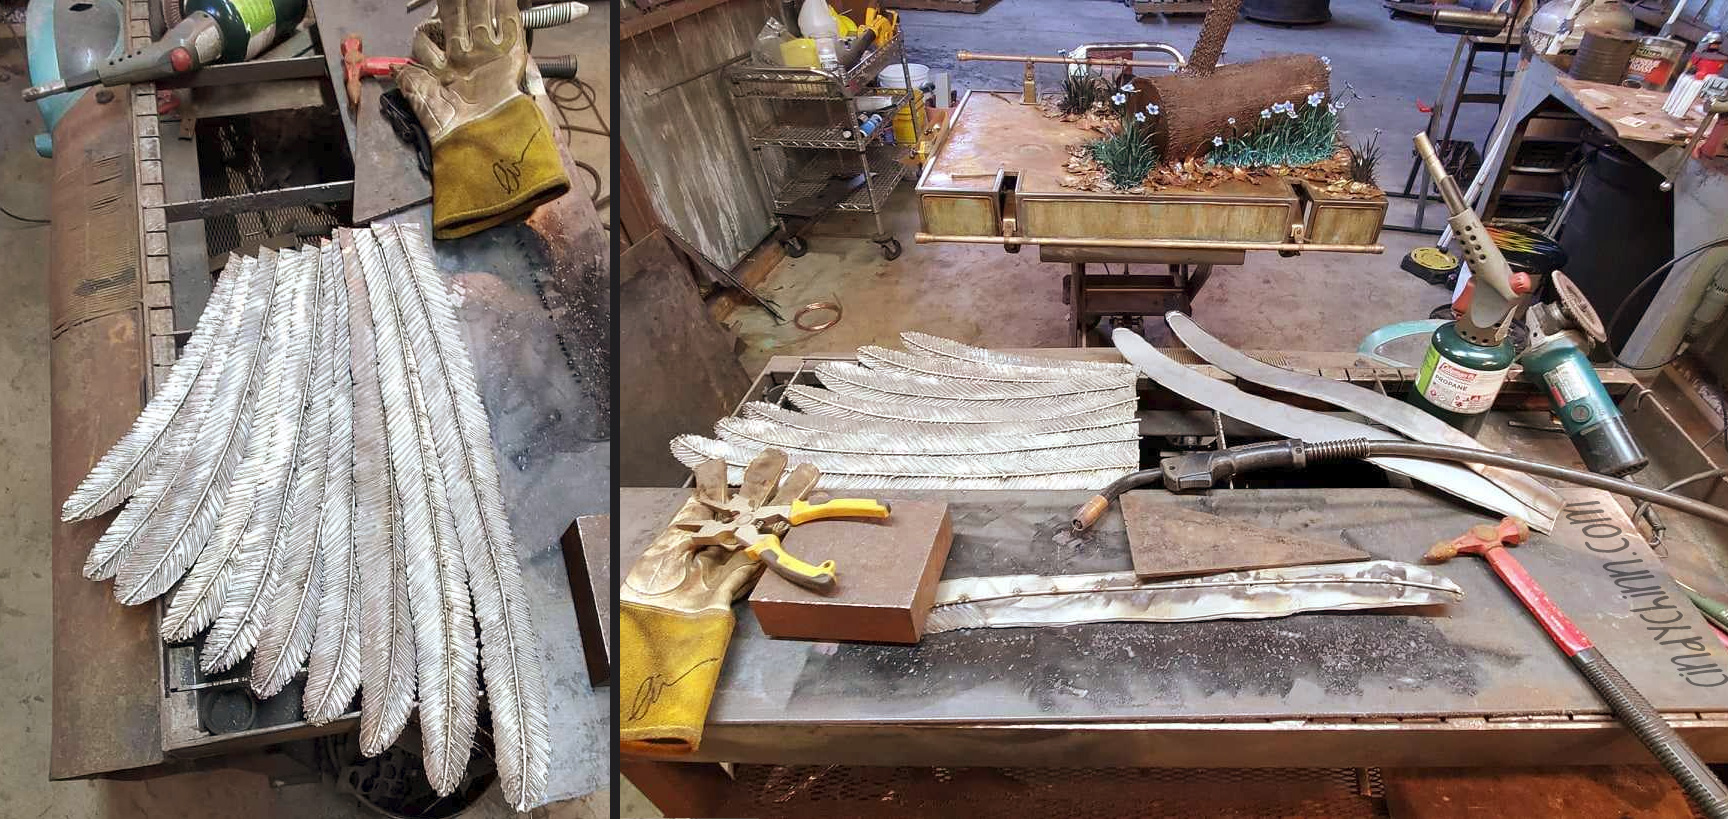
In the photo of the wing below, you can see a mix of techniques. The top flight feathers are hand carved from padauk wood. Below them, the blue feathers are copper with a patina added in a fuming chamber. The dark feathers to the right are brass with a patina added, and the bottom feathers are brass with gun bluing adding for color. Each metal feather is cut and formed by hand.
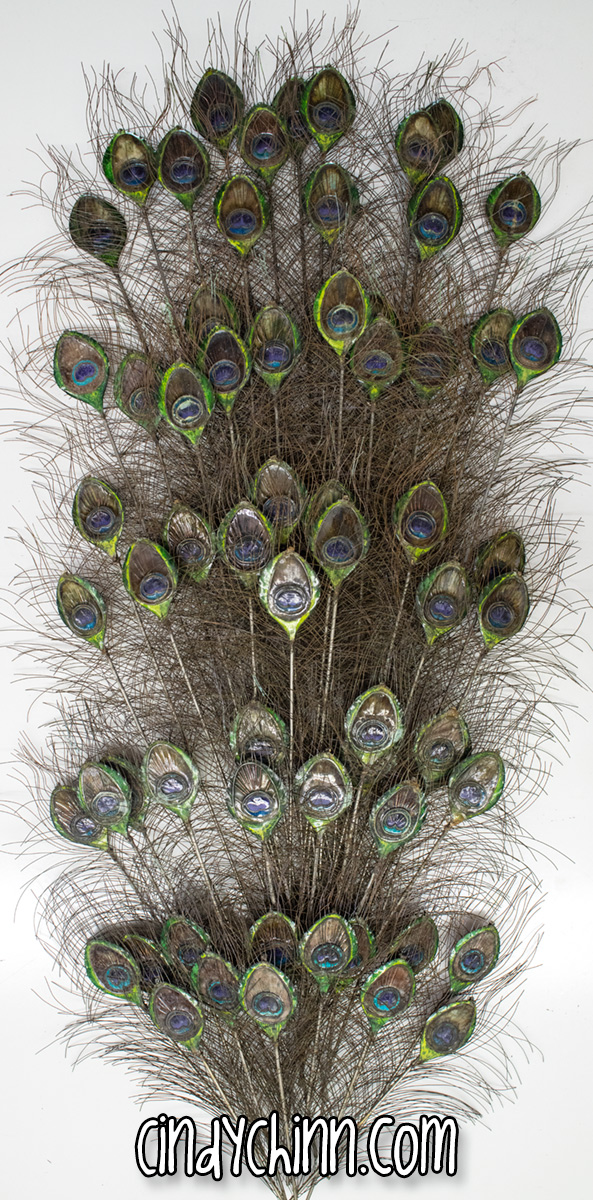
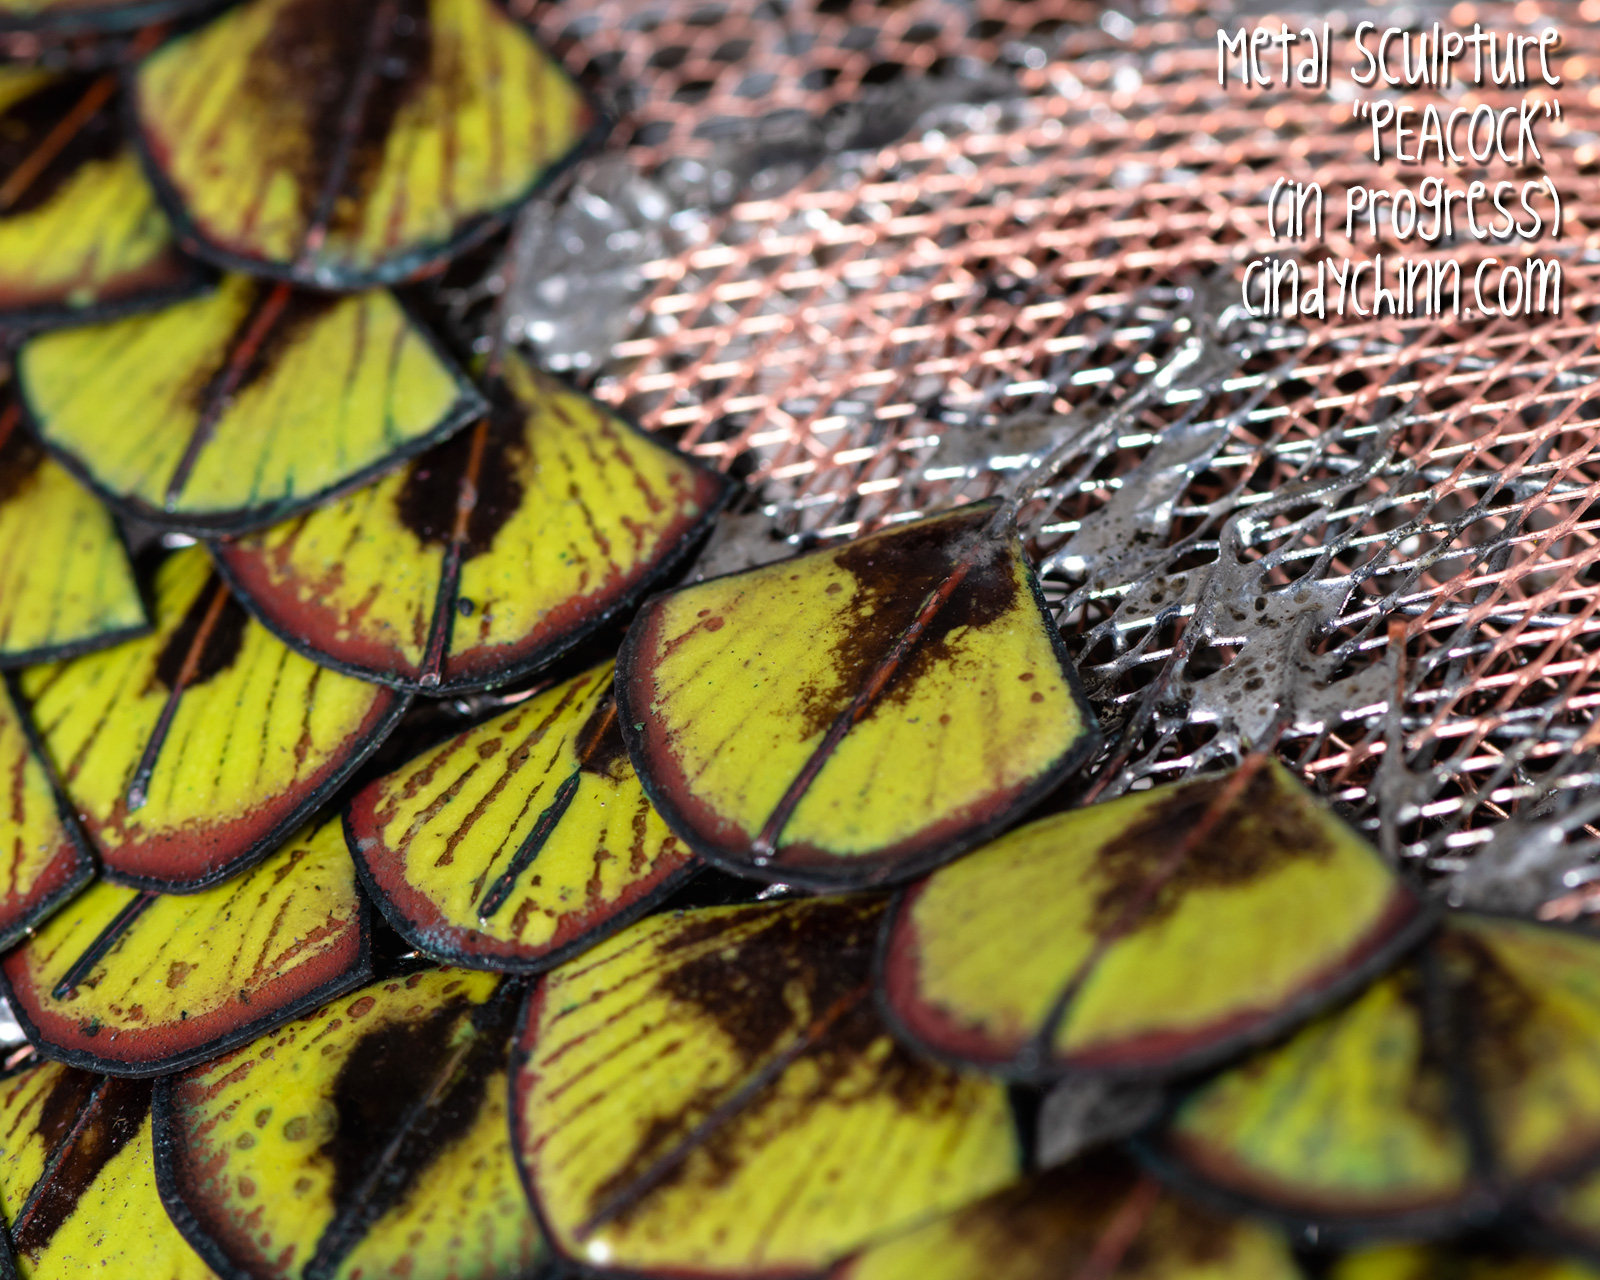
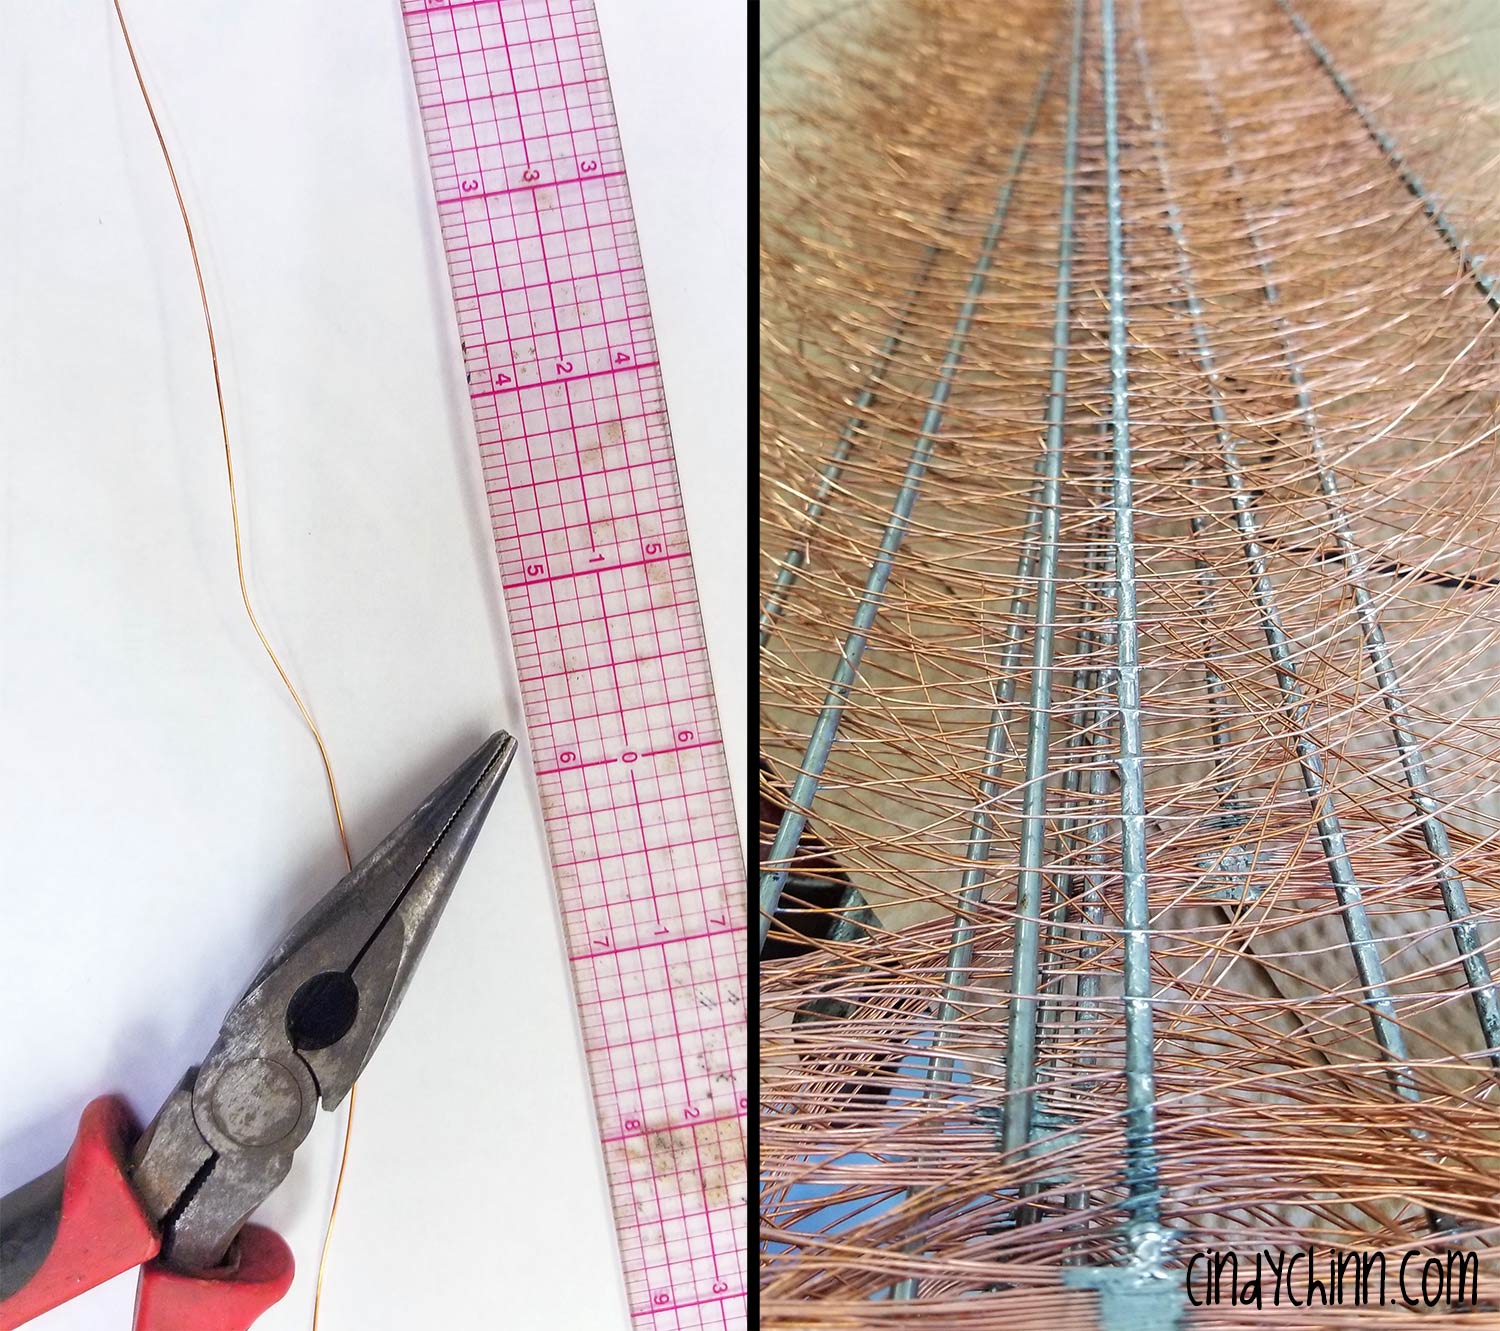
How many tail feathers does a peacock have? About 150! That’s a lot of feathers to create one at a time. I’m using copper and cloisonné to get the colors and form I want. Below is an early photo showing the feather eyes in their first stage.

You can see the copper wire added and a first layer of enamel. The image below shows the same pieces with color enamel added.

Here’s a more recent photo – I have enough done for one tail now! Now I just have build the rest of the feather!

Here’s a photo of some of the ‘sword’ feathers that belong on the sides of the tail. These are made from copper, and then placed in a fuming chamber to add a patina.

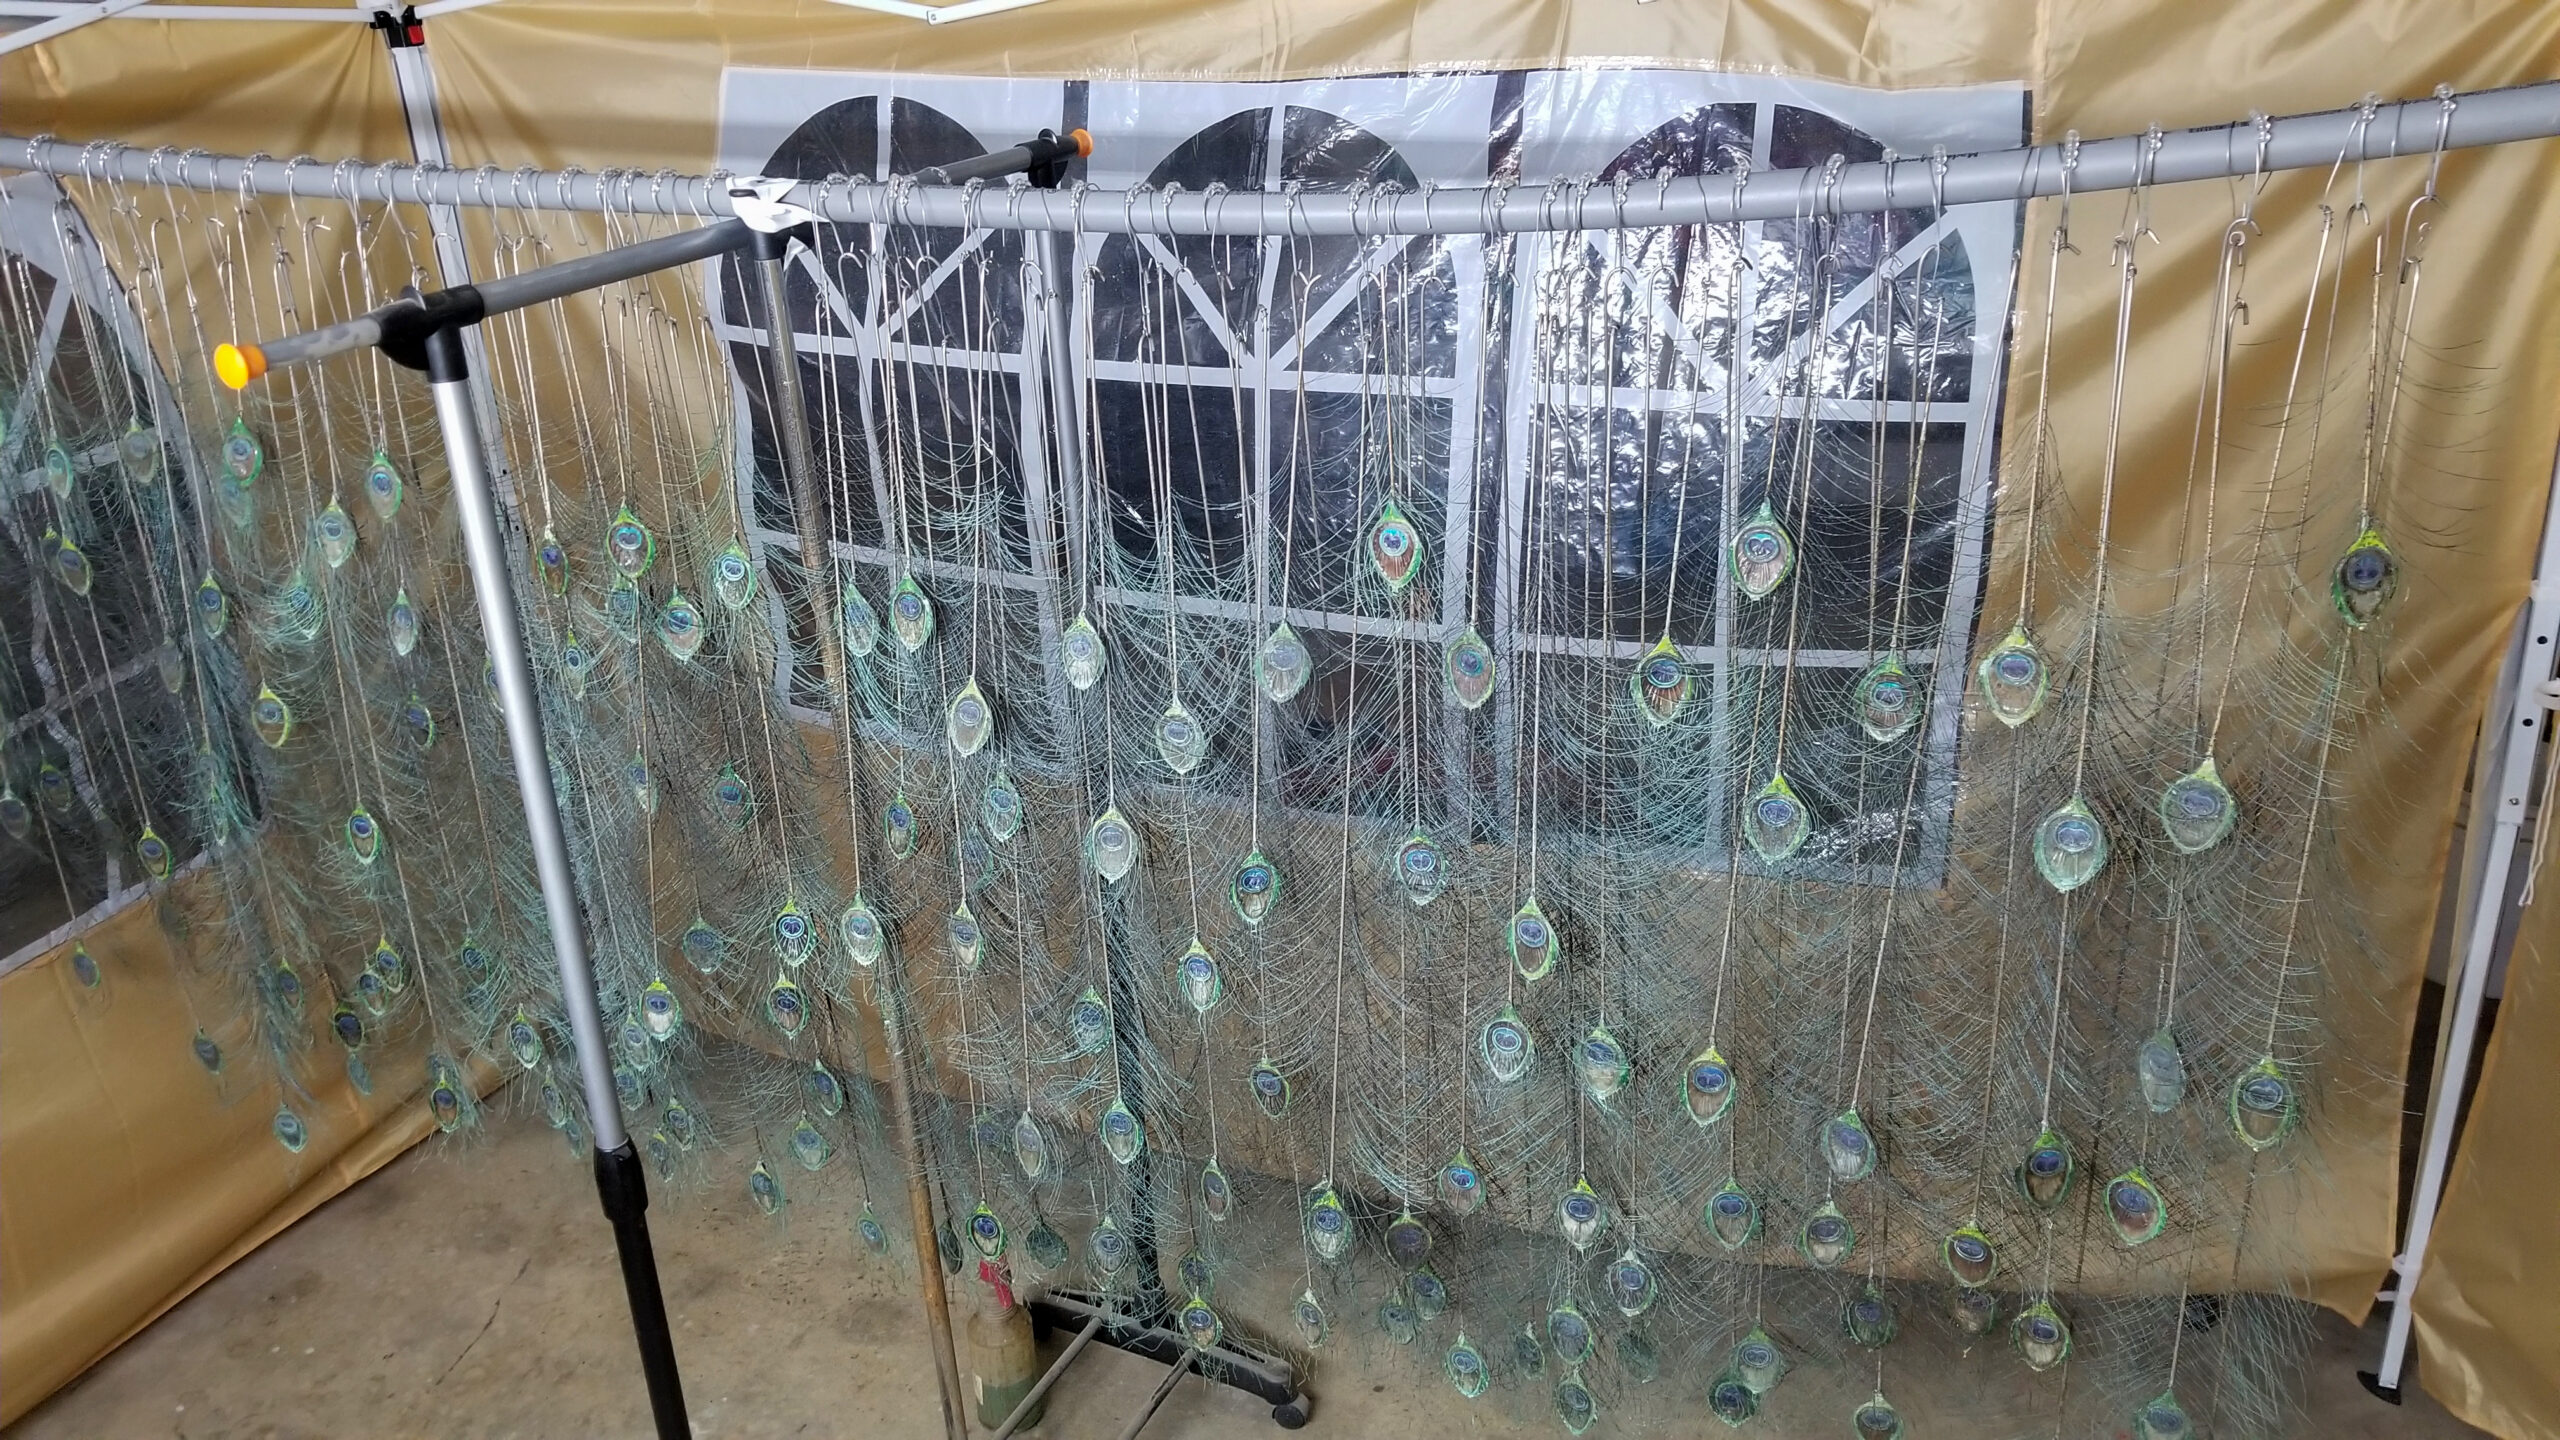
I’ve bee working on the tail feathers and there’s a LOT of them! This is most of what I will need for now (I hope!).
July 2020: I’ve begun work on the base of the sculpture. I’m making a portable base to support the peacock sculpture. It is built with retractable wheels and handles that stow away for easier transport.
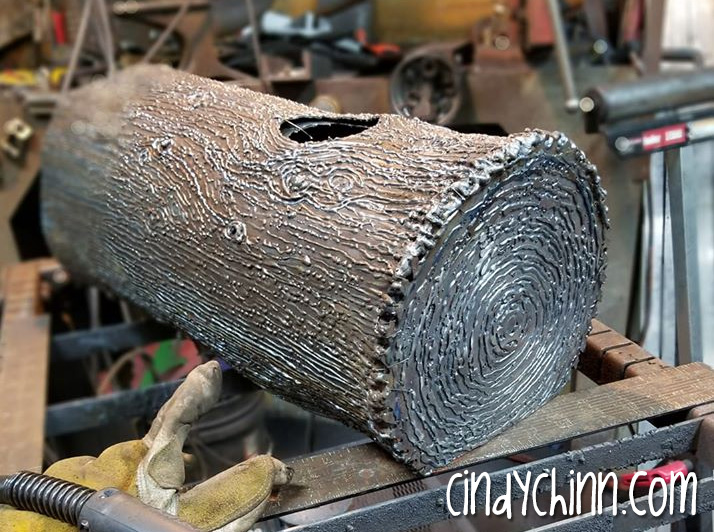
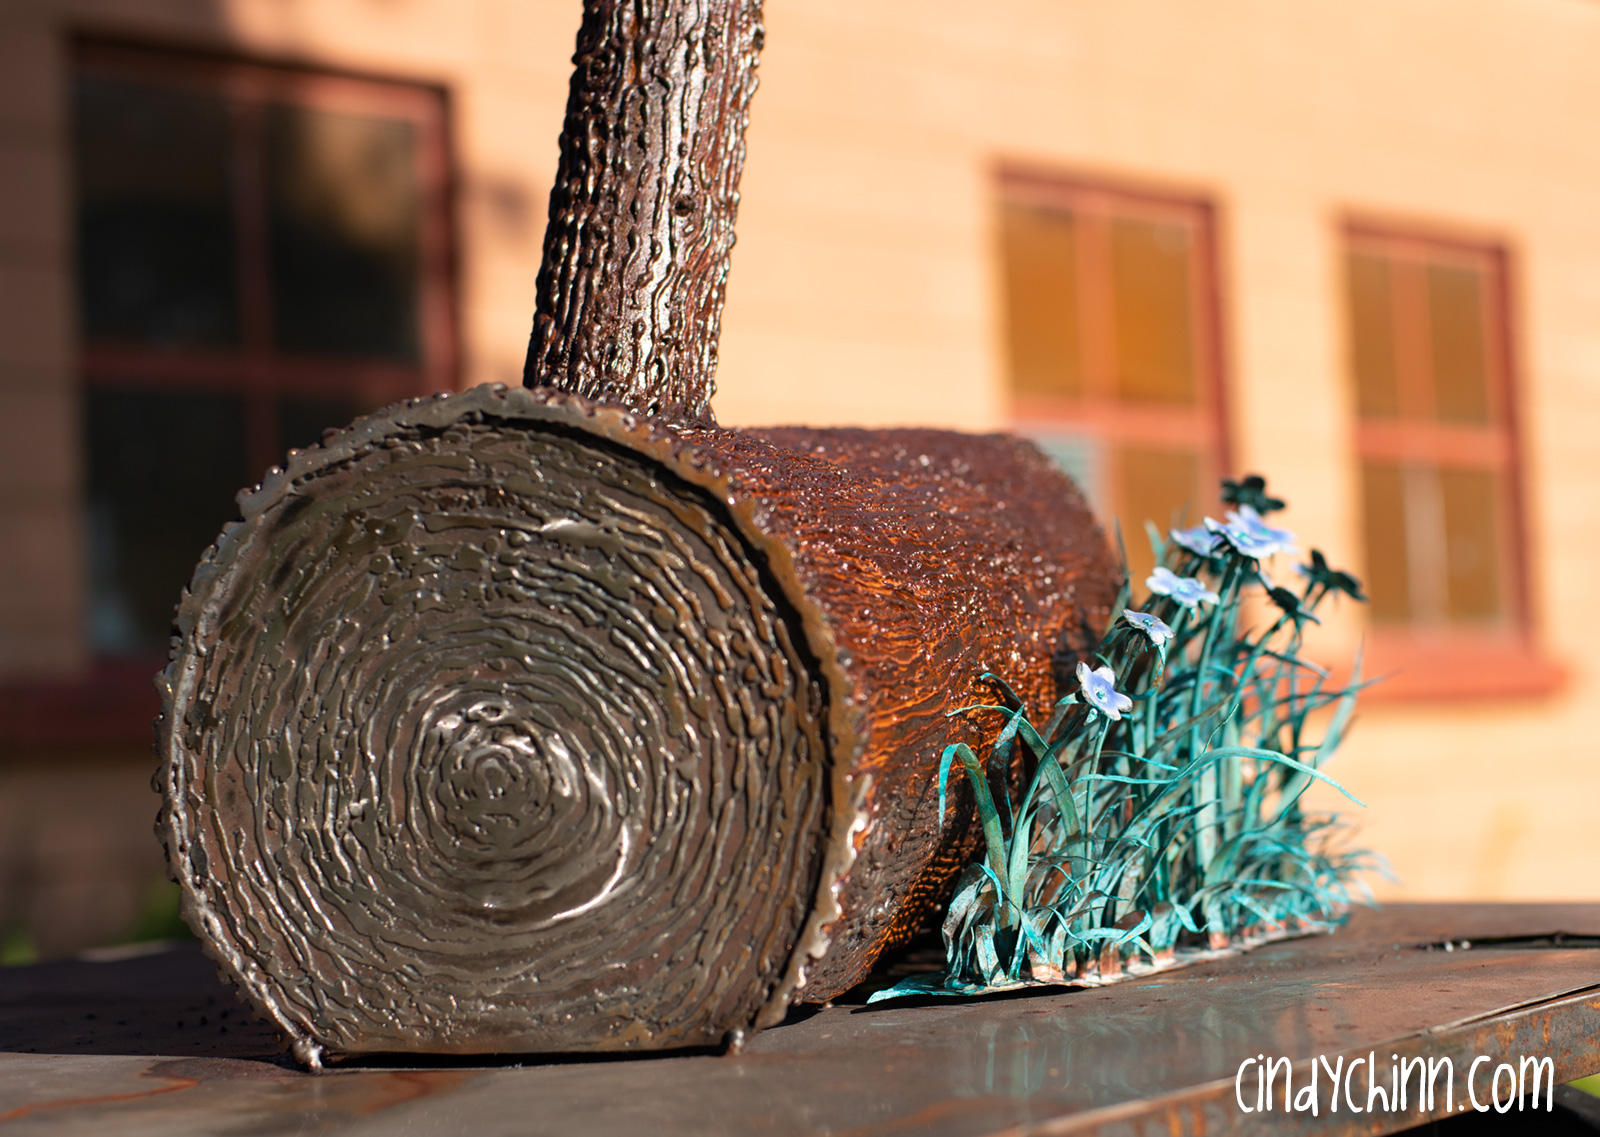
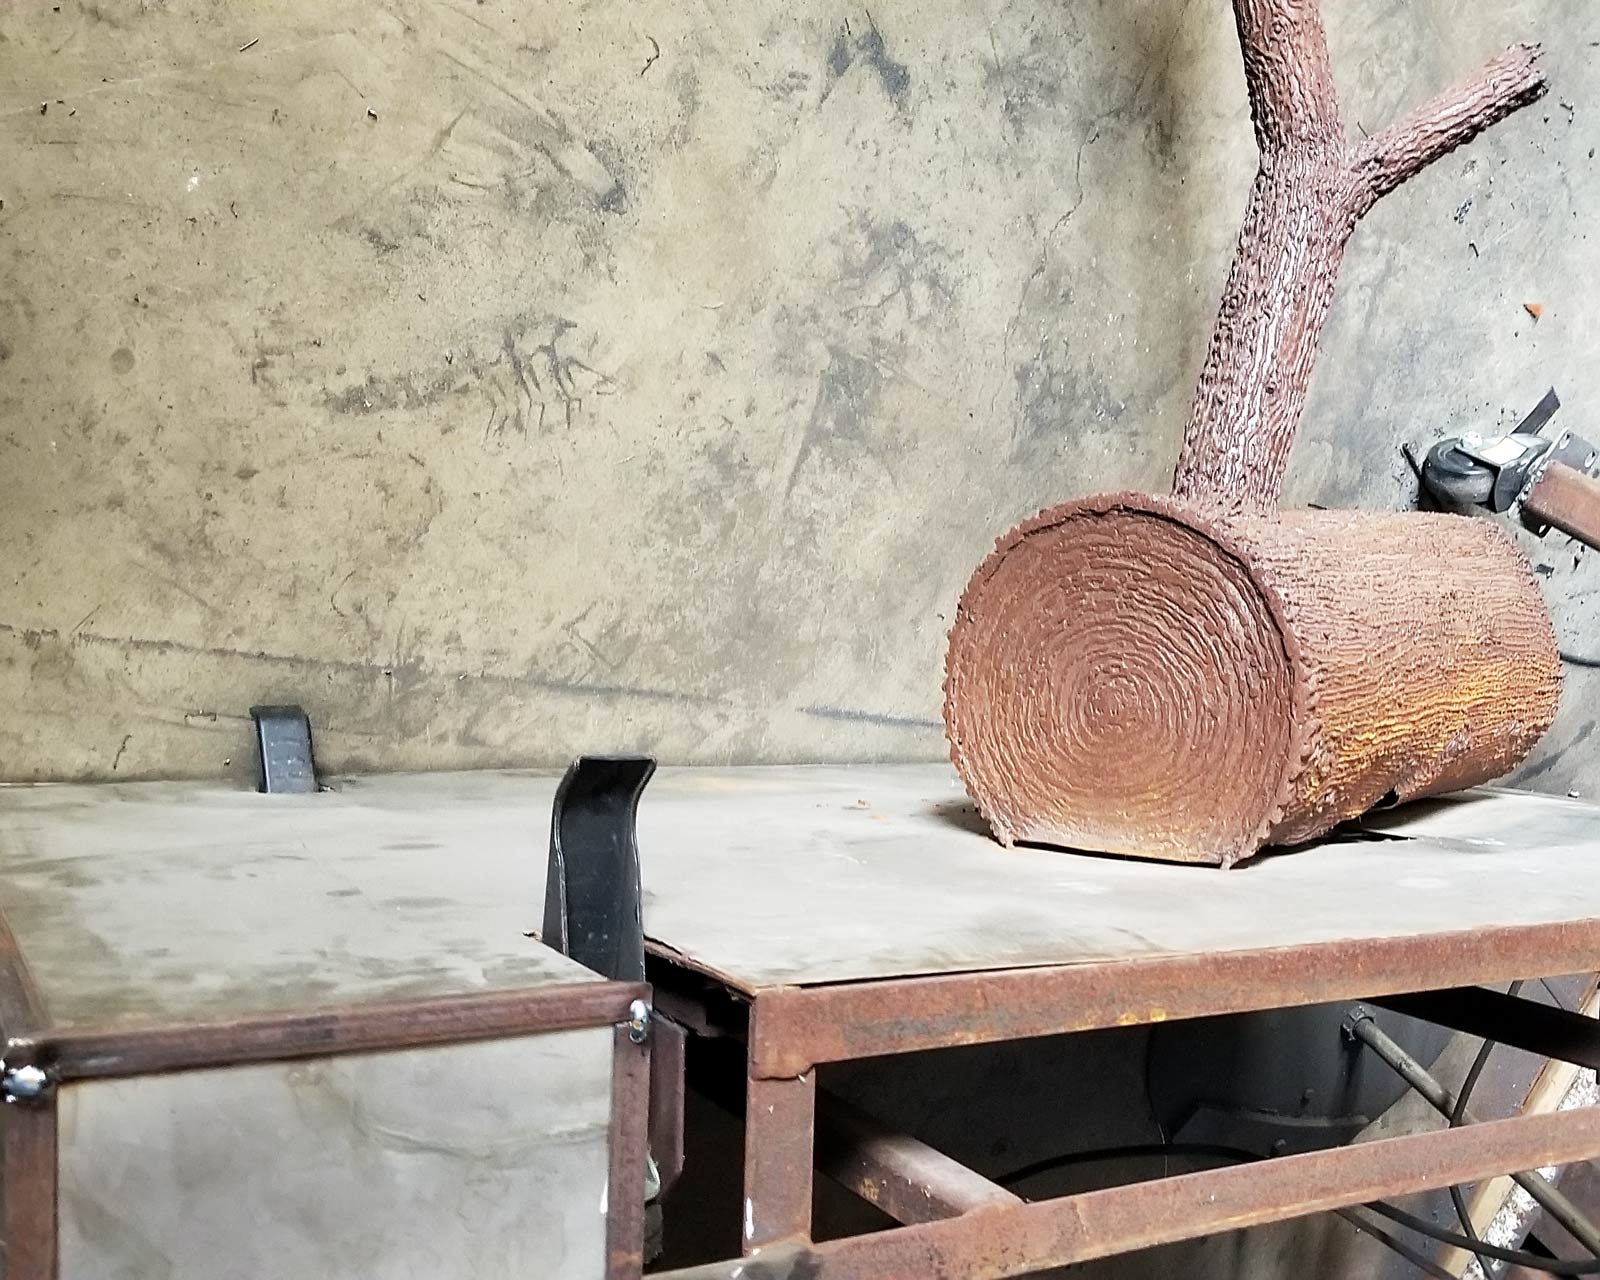
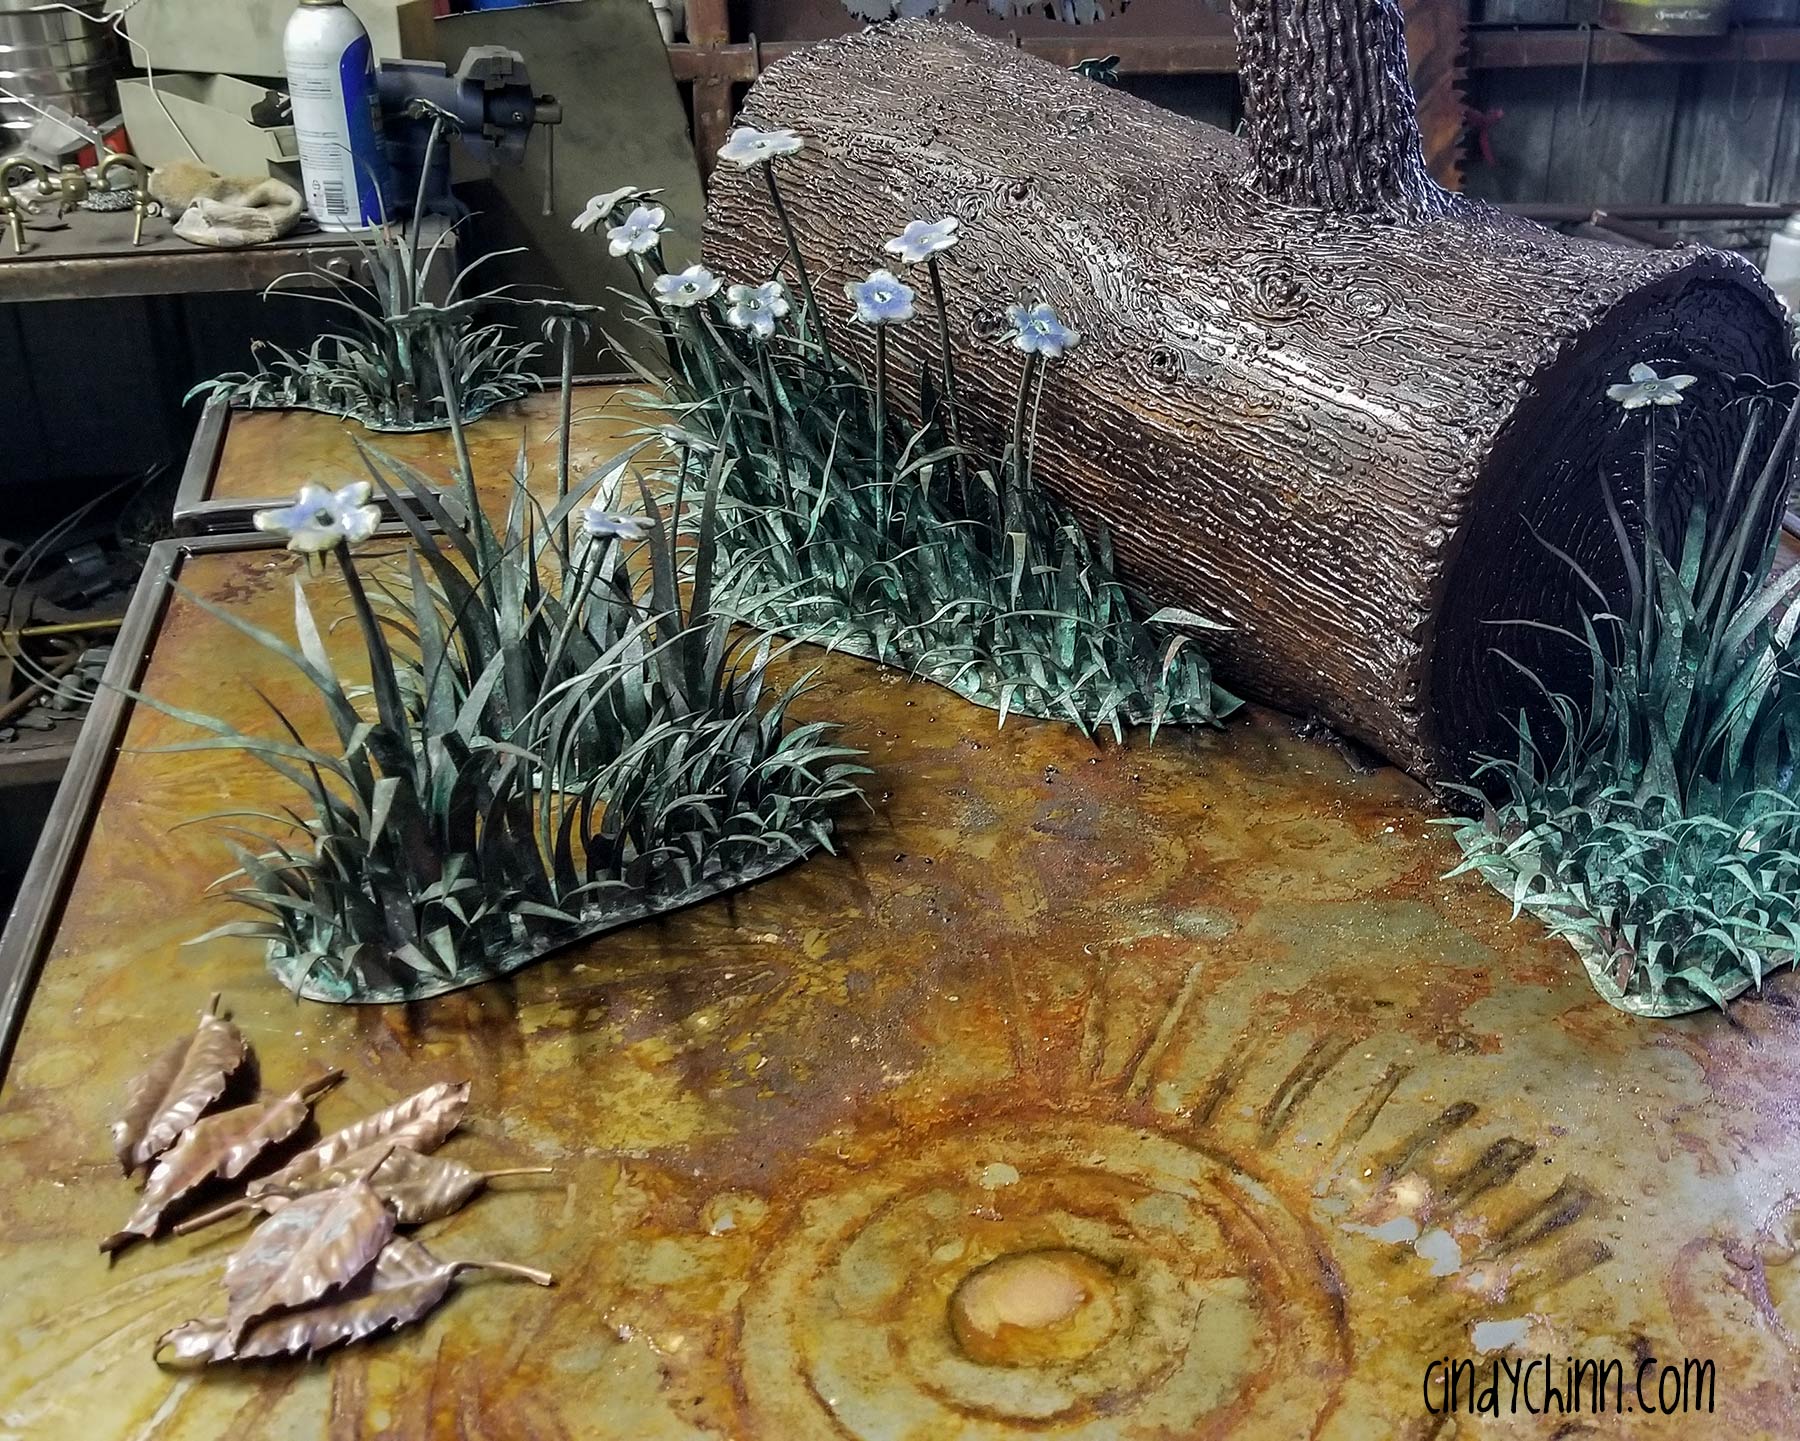
The ‘ground’ will be covered in a mix of leaves and grass (all made from metal of course) and a metal log with branches will be used to support the main sculpture. For the log I used the tube from an old Mr Heater propane heater and added a saw blade on end. I then welded the texture to it.
This was then mounted to the base, and here’s a photo of it in place with some of the grass. It’s fun watching this come together, but I have a lot of work ahead of me!
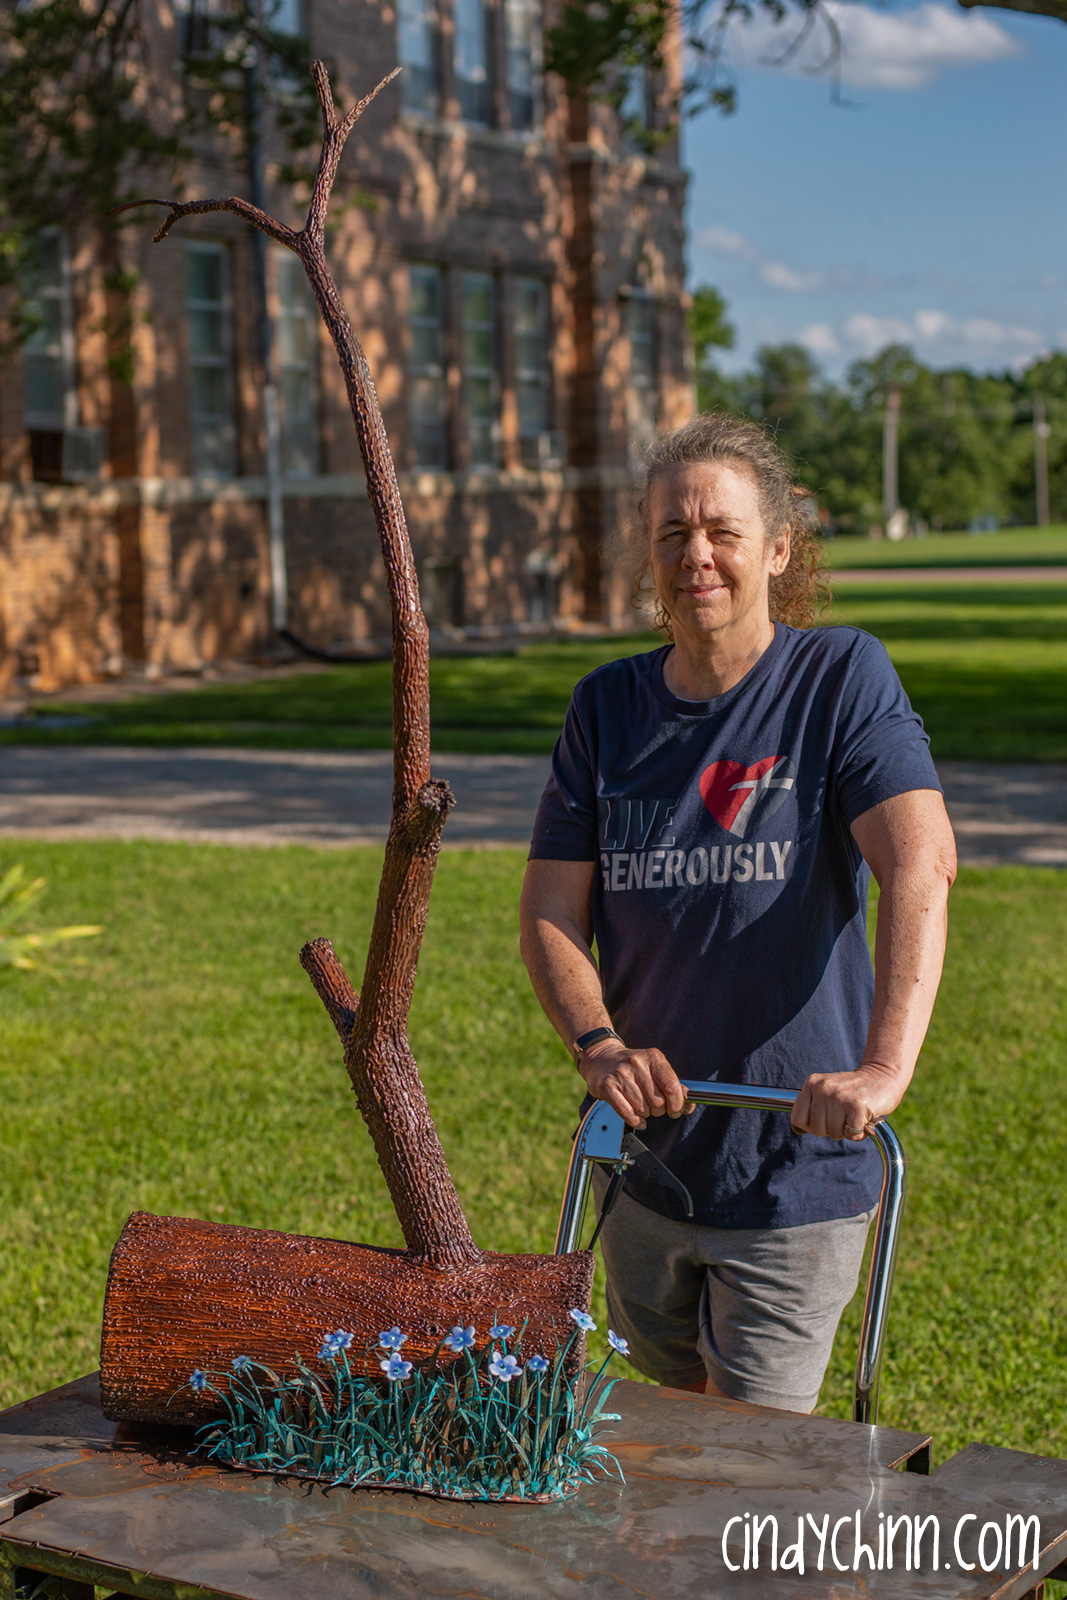
And here’s the full base on my new hydraulic cart! This peacock sculpture will be heavy, and just the stand was too much to lift onto my welding table. The cart allows me to adjust the working height and saves my back!
Here’s a closer look at more grass and flowers as I am ALMOST done with enough for the base!
August 2020: Here’s a short video of my working on the grass and the combined pieces that will soon be added to the base of my peacock sculpture.
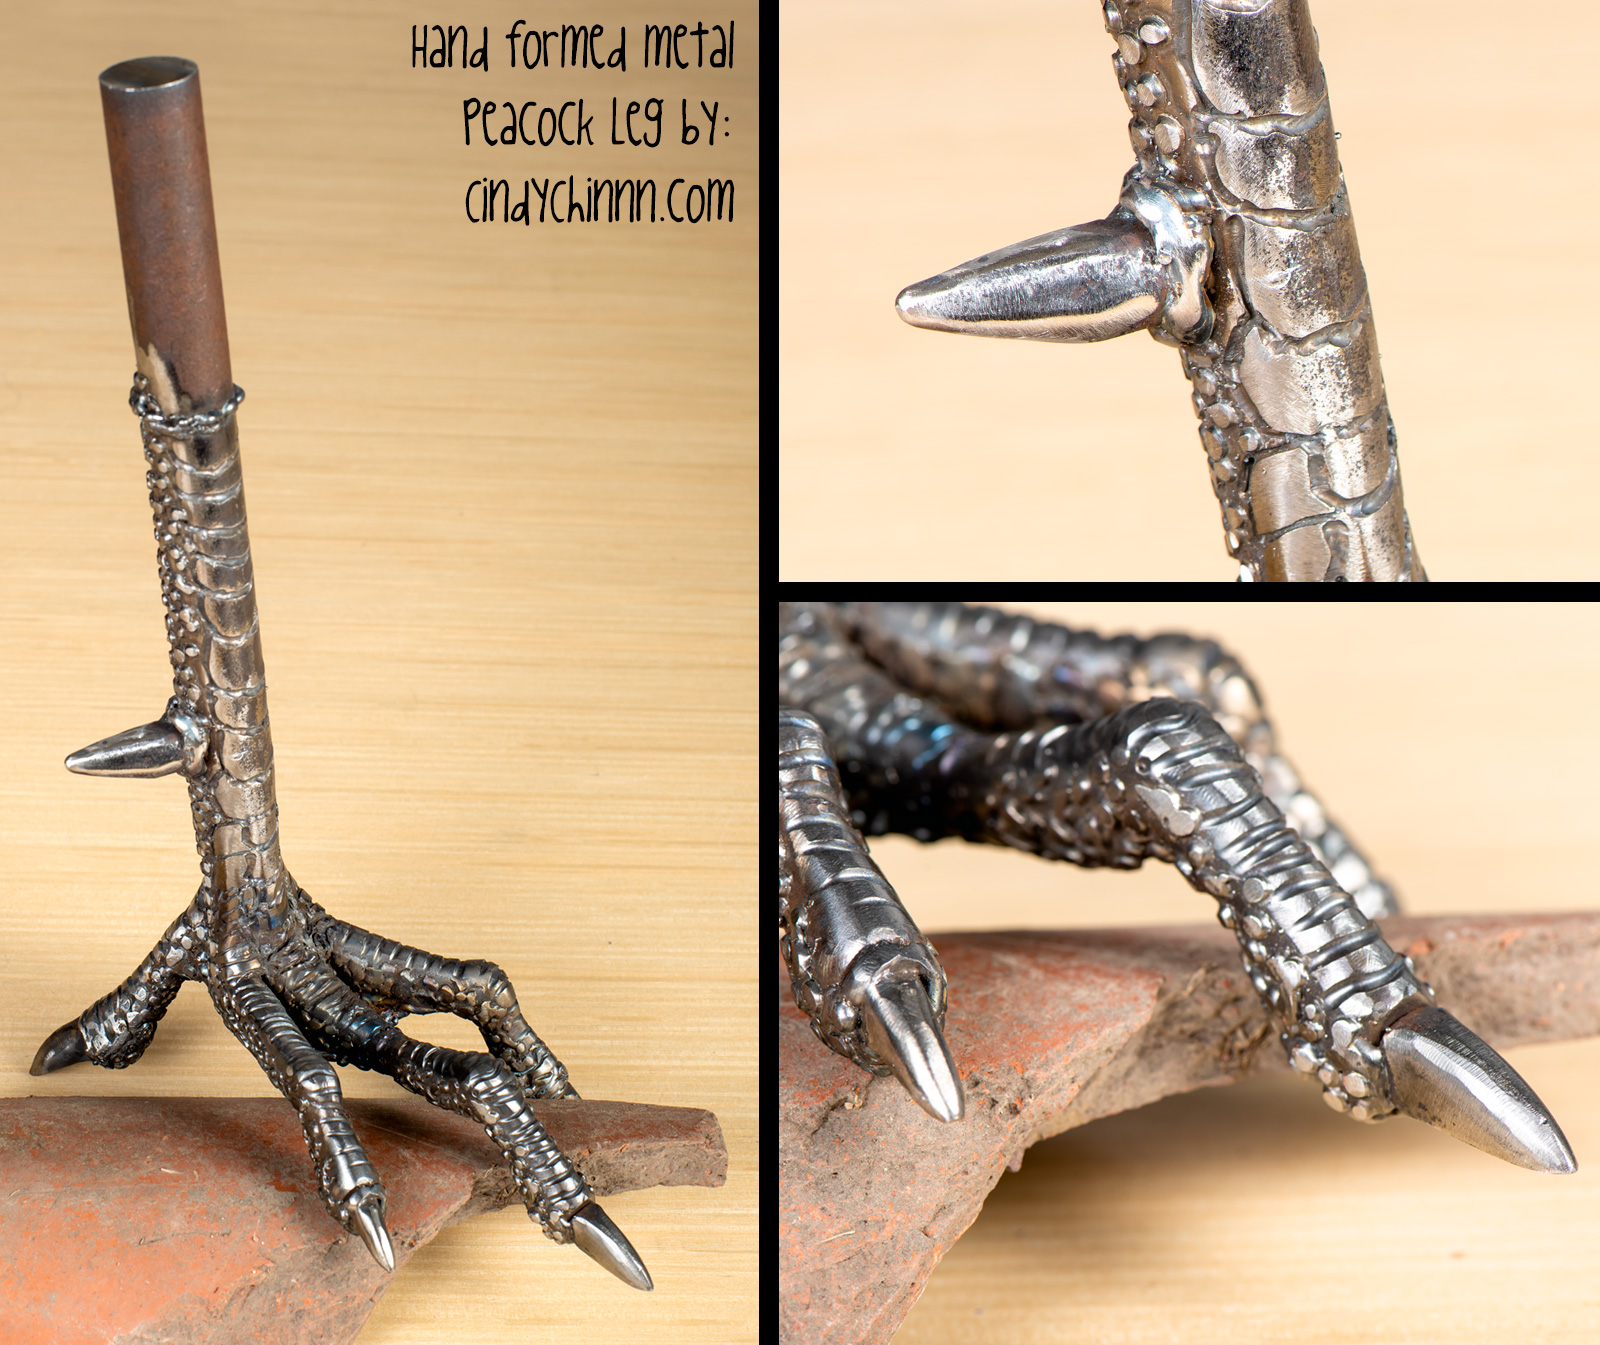
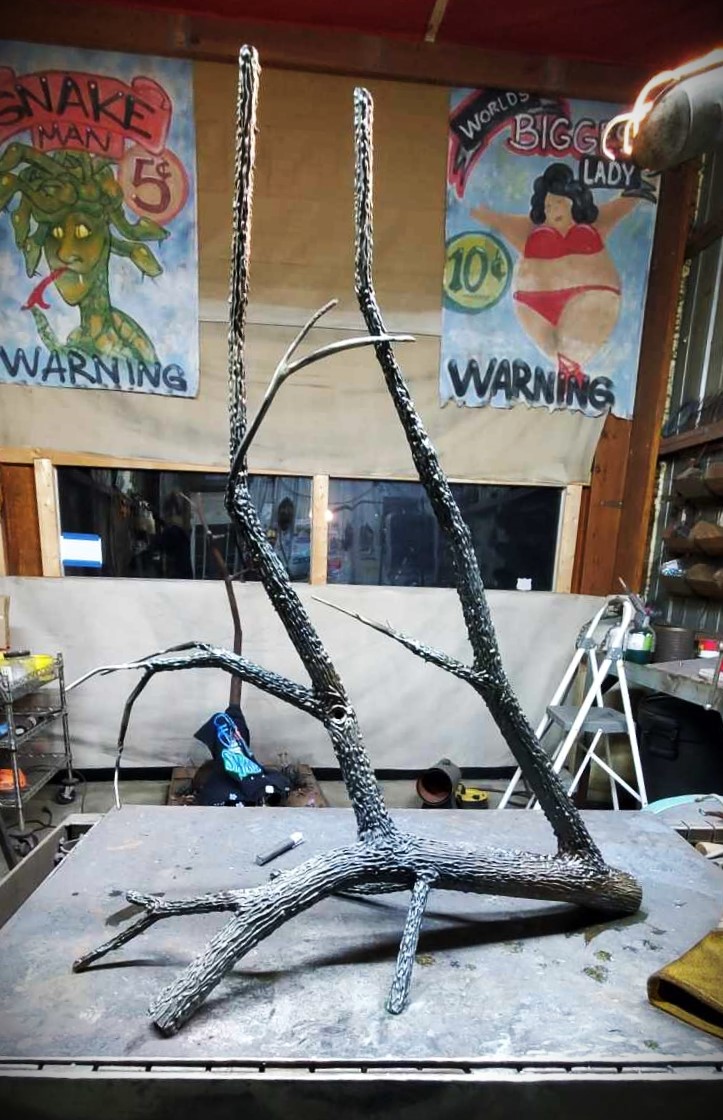
August 13, 2020: It was a long night in the welding shop – then I ran out of gas. But… I did get one leg completed! 😀
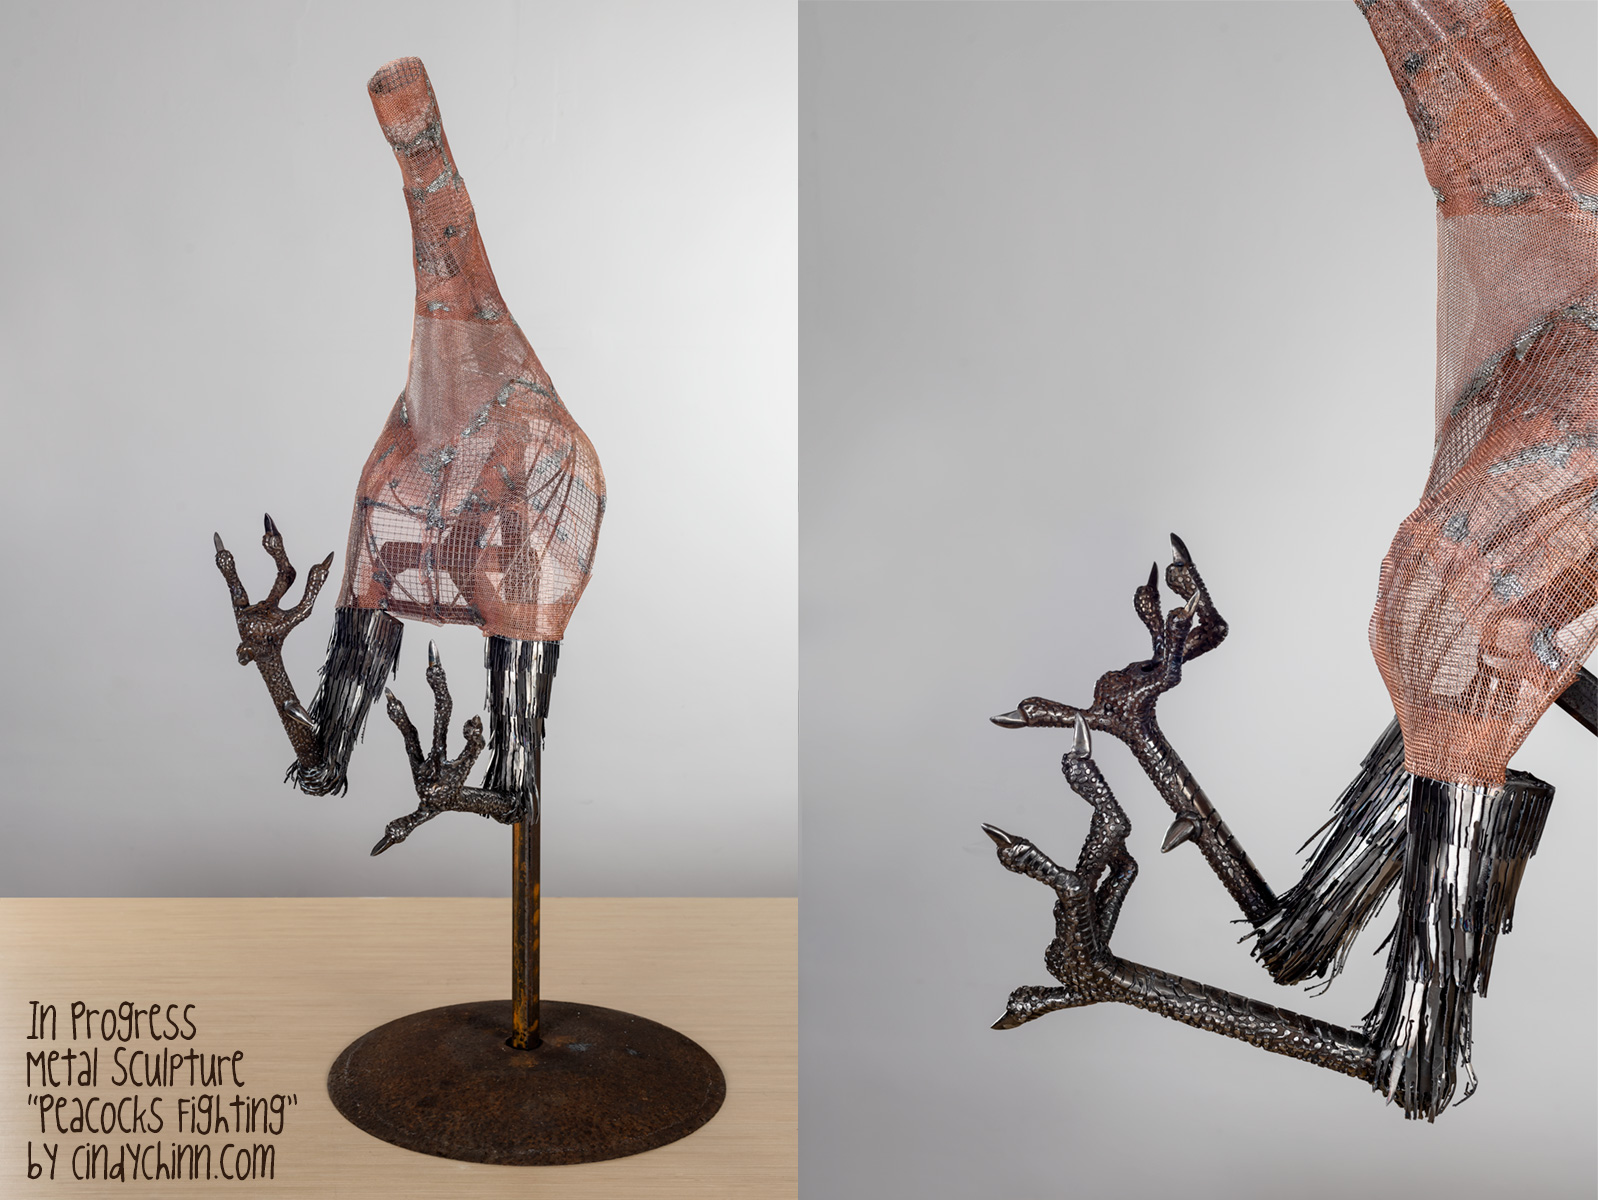
August 18, 2020: Yesterday I started forming the body and soldering the frame together, then I built the wire mesh to cover it and added 2 of the legs I had built. It’s fun to FINALLY see a bird start to take shape after 5 months of work. 😀
And another long night helps fill in more of the body! 😀
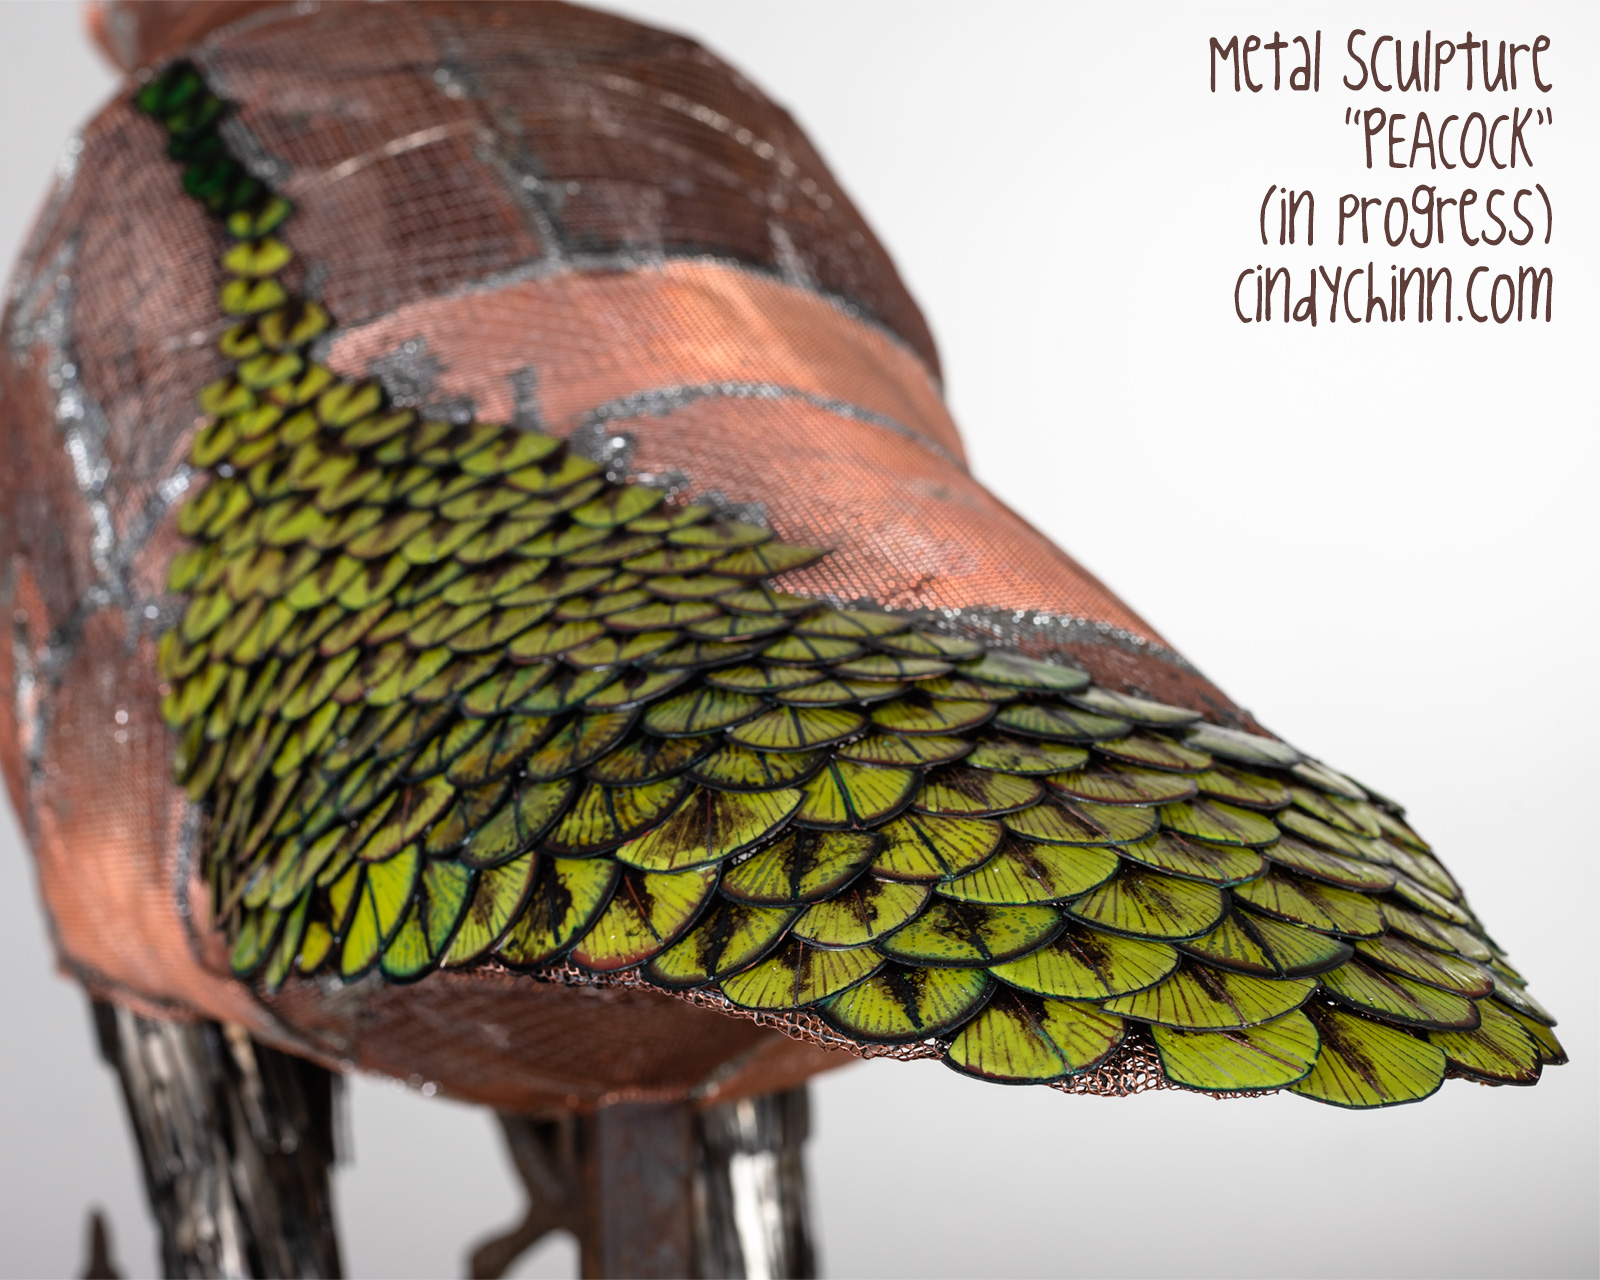
August 21, 2020: I have finally got to the point where I can add feathers! Each feather is copper and hand enameled individually. After I made a large batch, each feather is hand soldered to the copper mesh.
August 28. 2020: Most of the back feathers are done and soldered on! I’ve also added some thin copper for the rougher feathers.
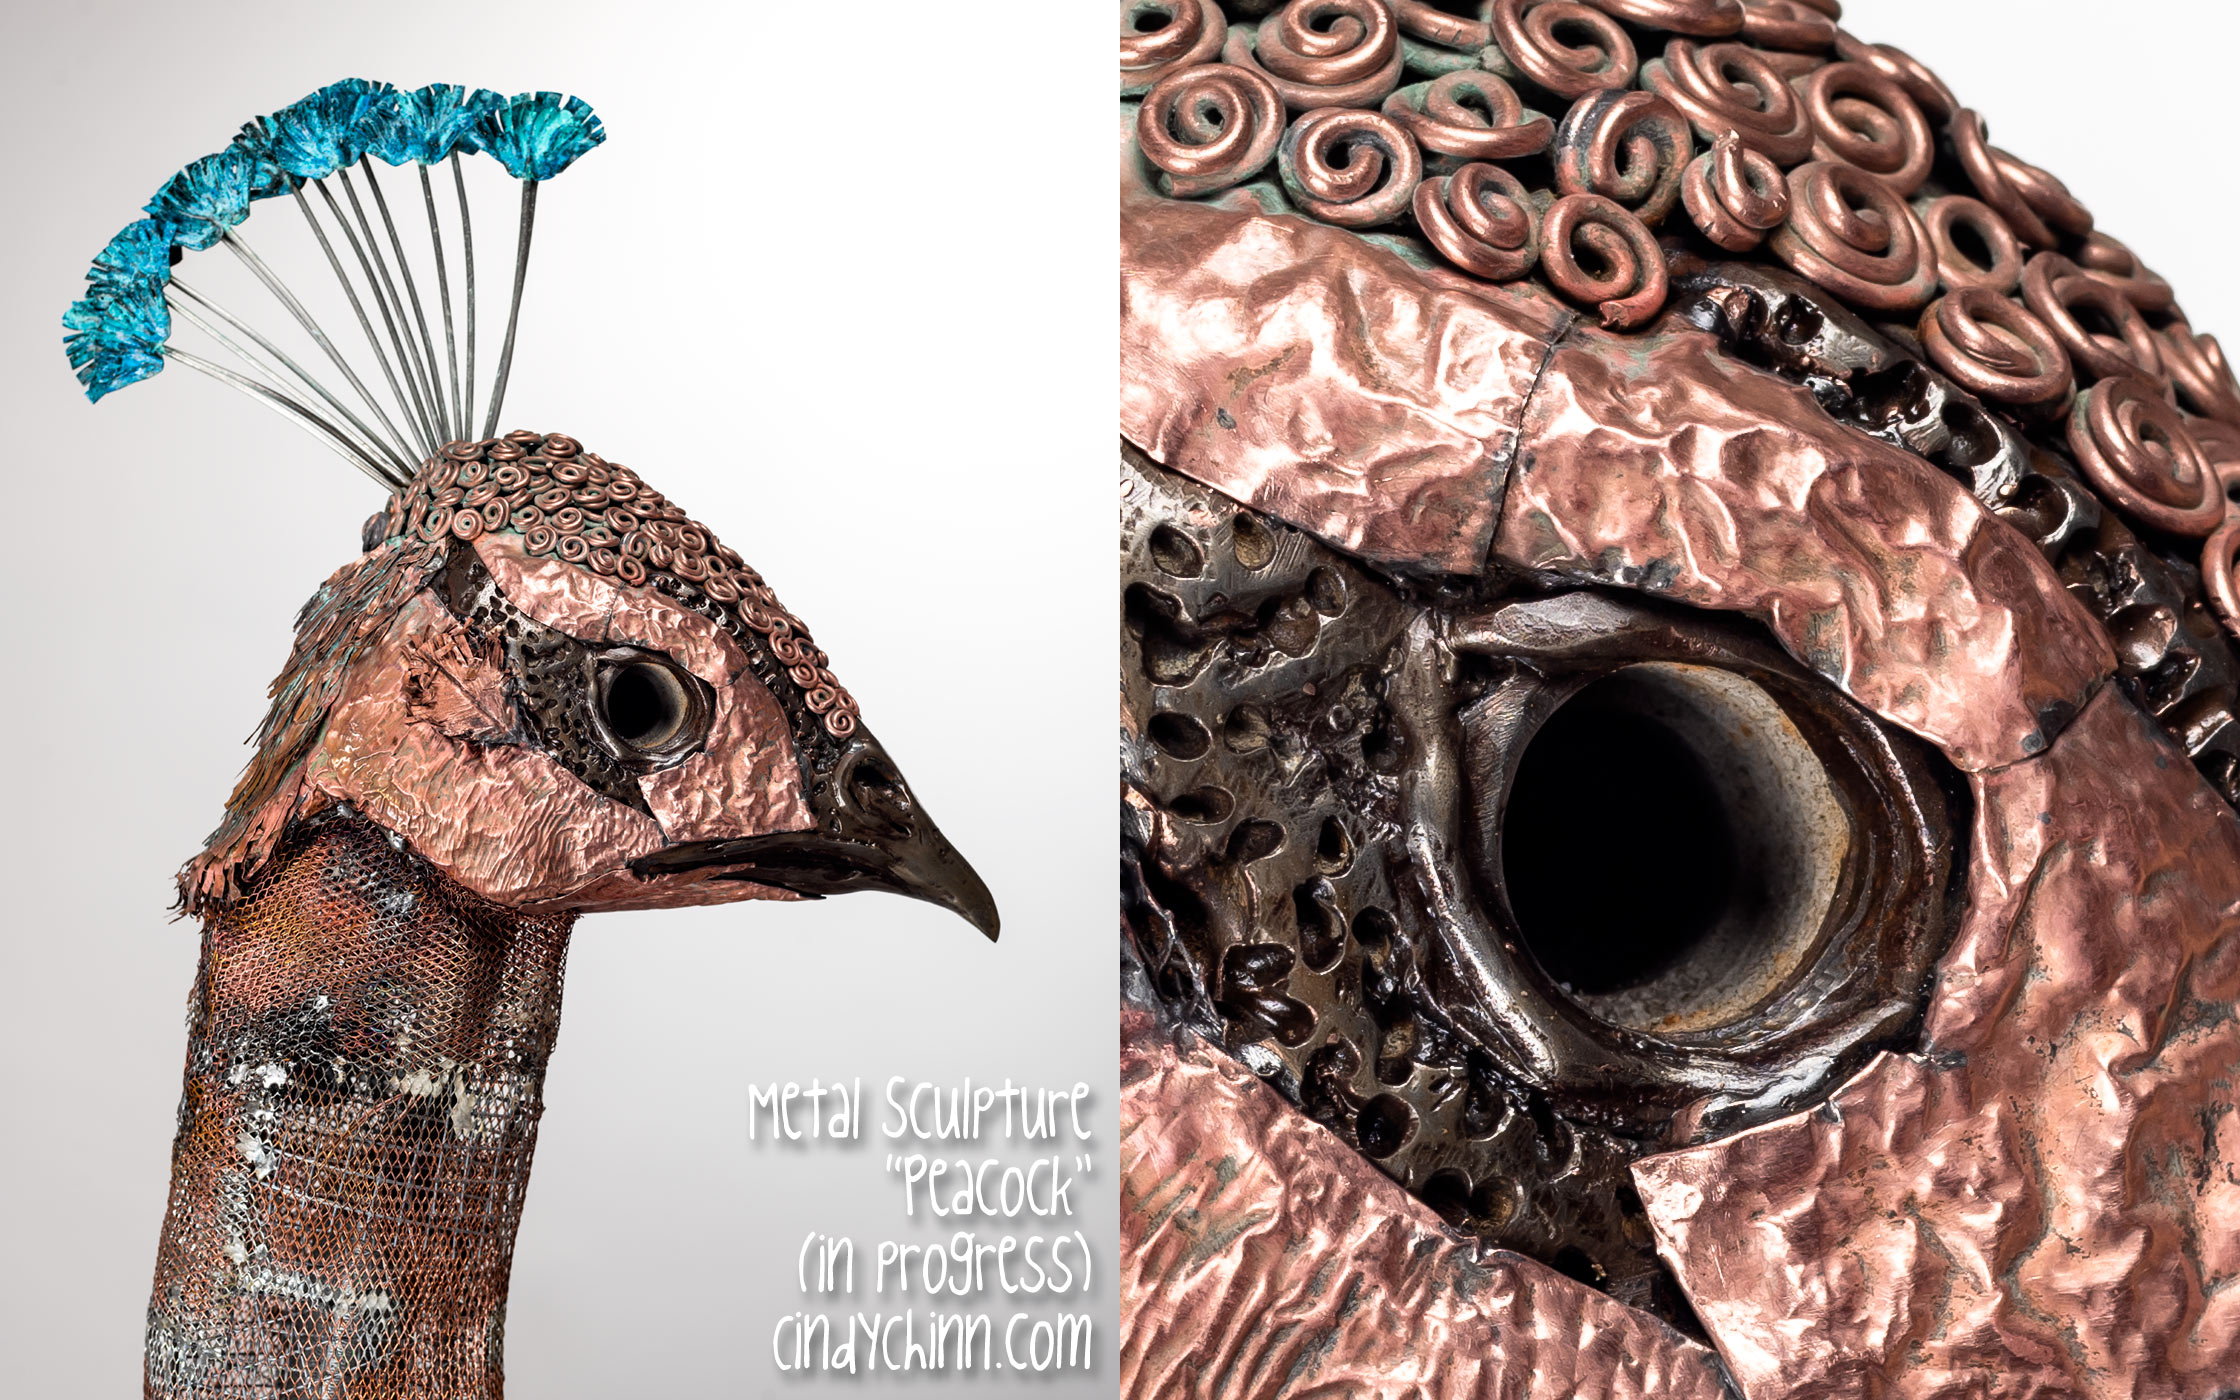
August 30, 2020: Here’s the first head getting assembled.
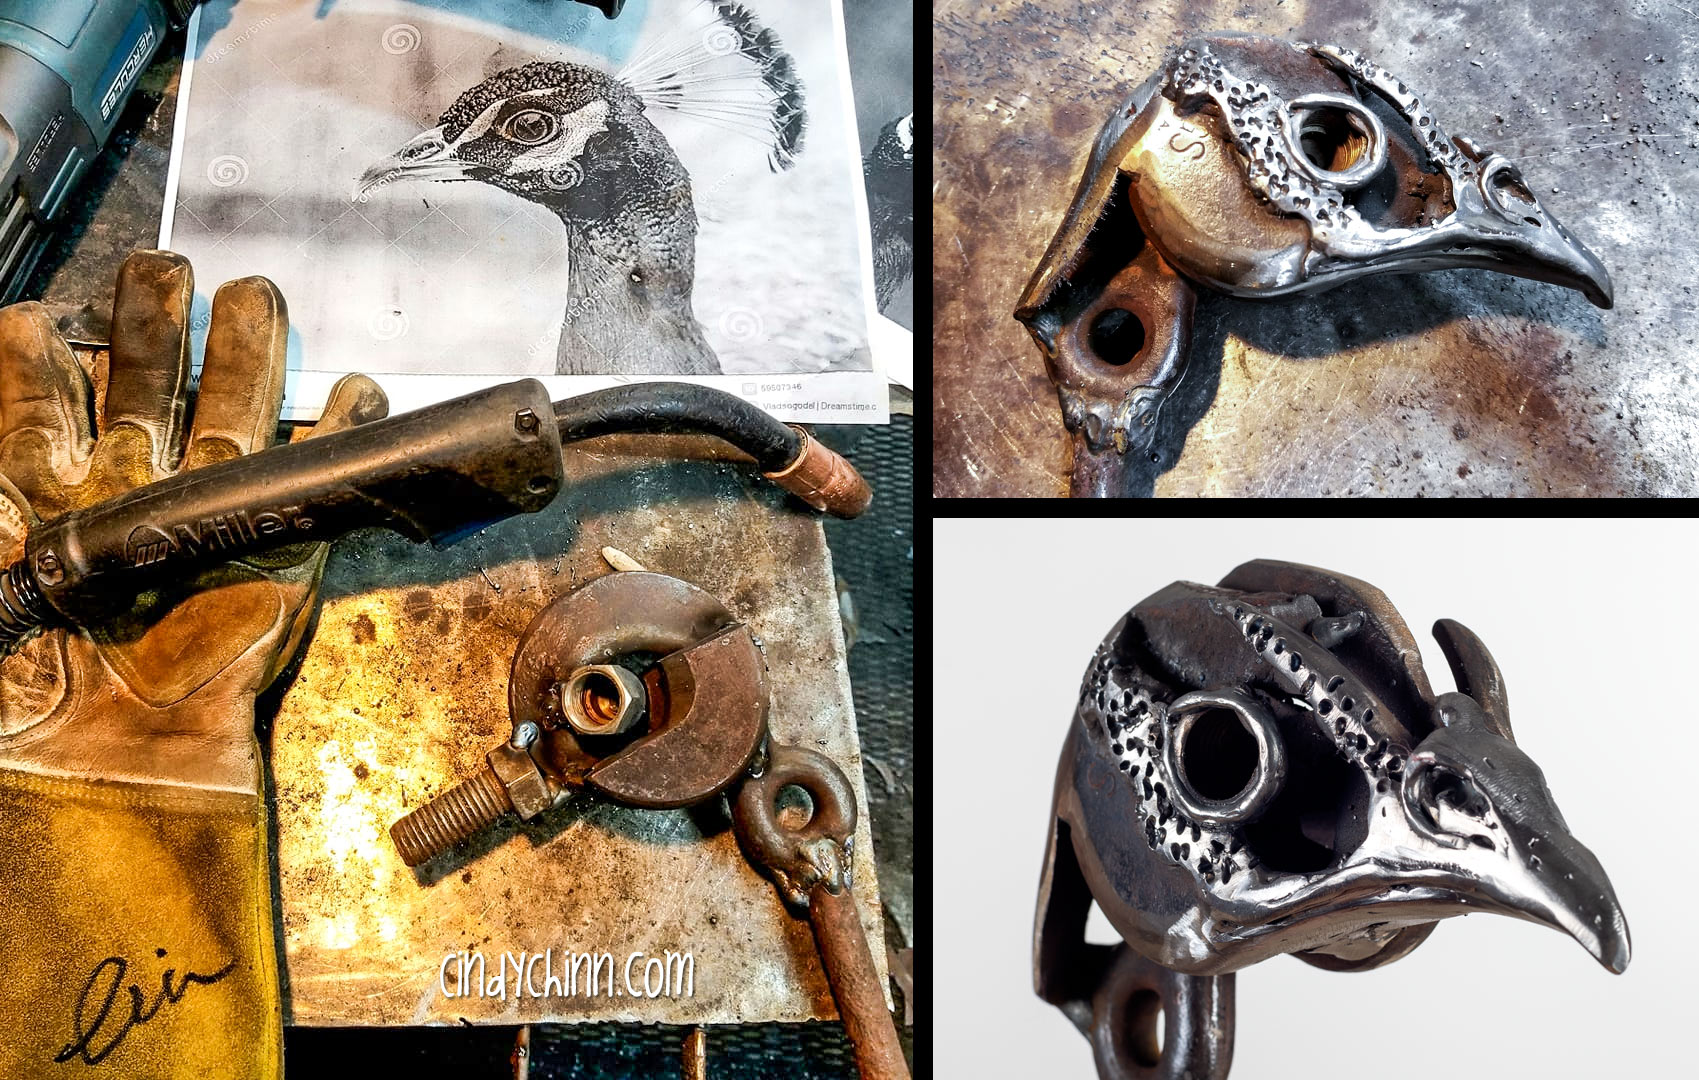
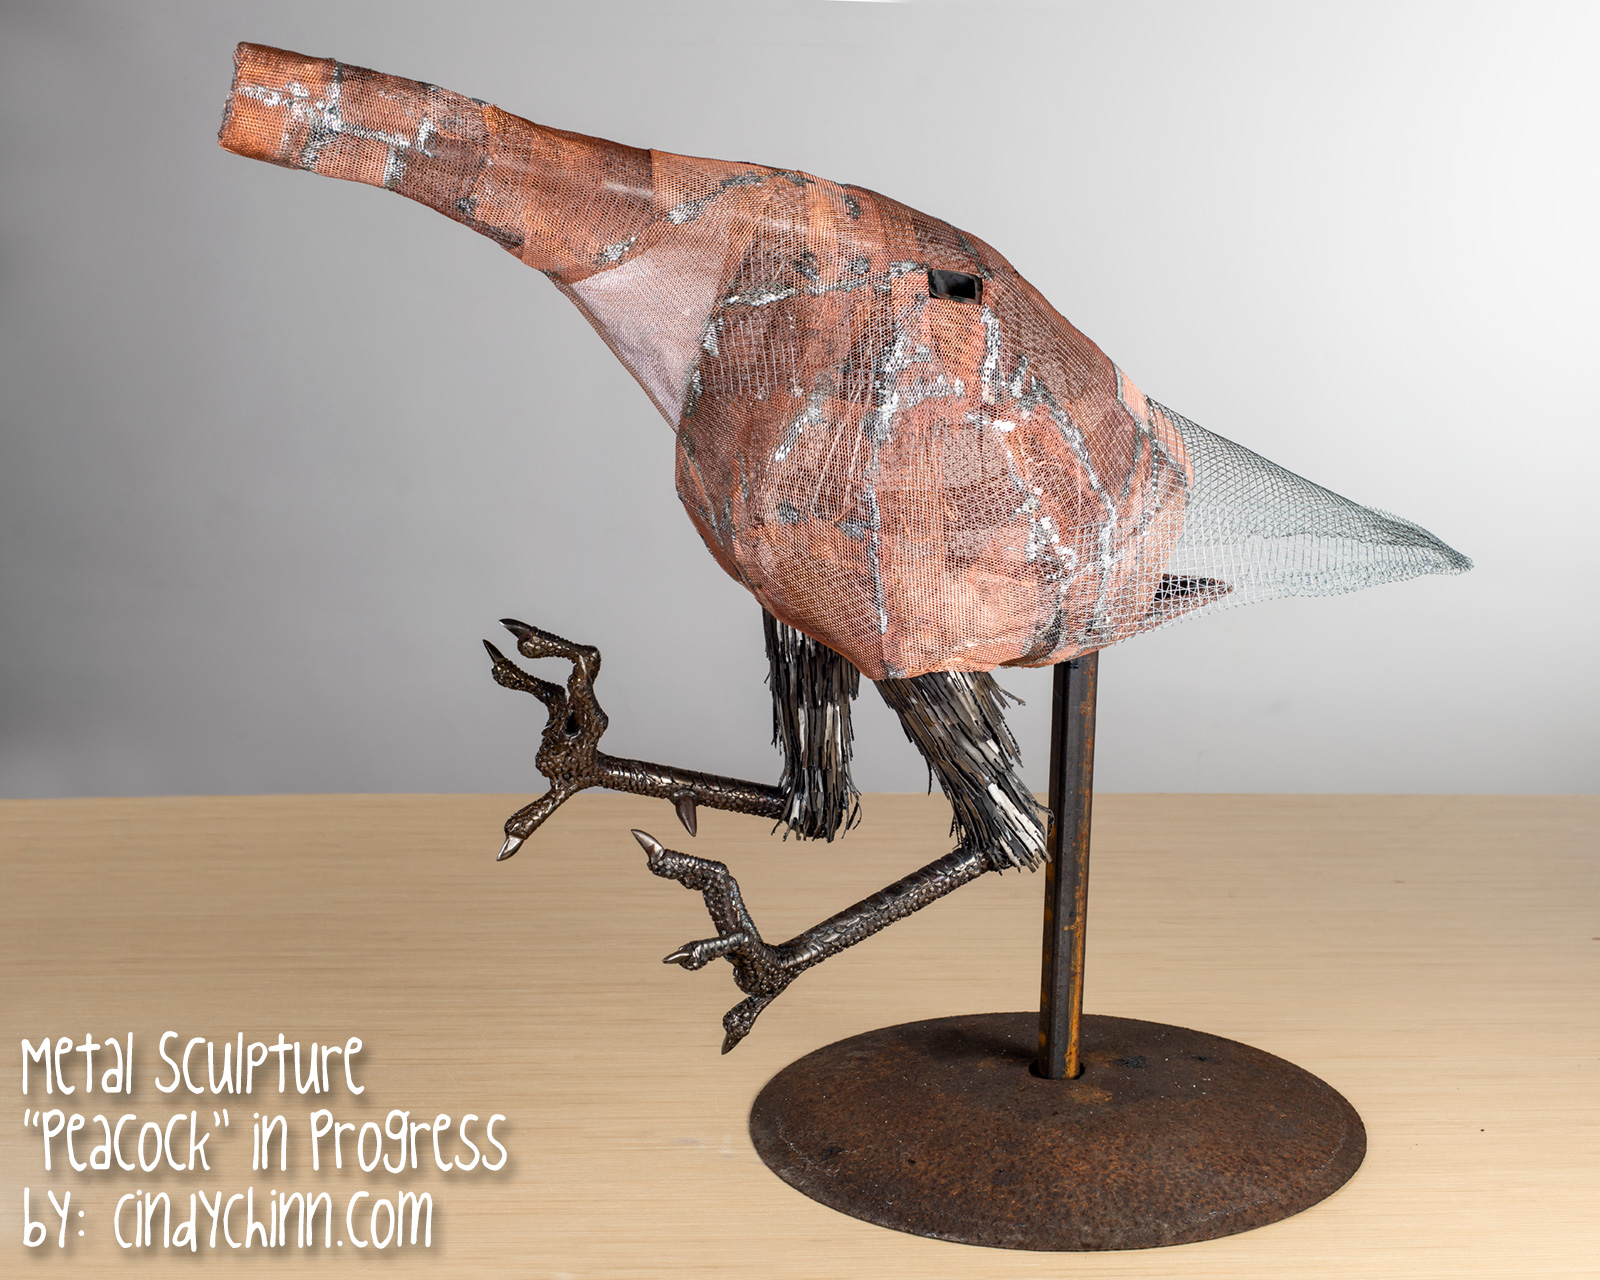
September 4, 2020: I finished forming the head and attached it to the neck. Now I can start adding feathers down to the body!
September 6, 2020: Last night I cut out a LOT of feathers from scrap copper and today I’m soldering them on to the body.


September 8, 2020: Most of the feathers are done now! Soon it will go into the the fuming chamber to add a patina to the copper.

August 10, 2023: After a long hiatus, I am back at work on this project! 😀 I plan to get one done in the next couple of months and take it to an international show in Doha, Qatar.
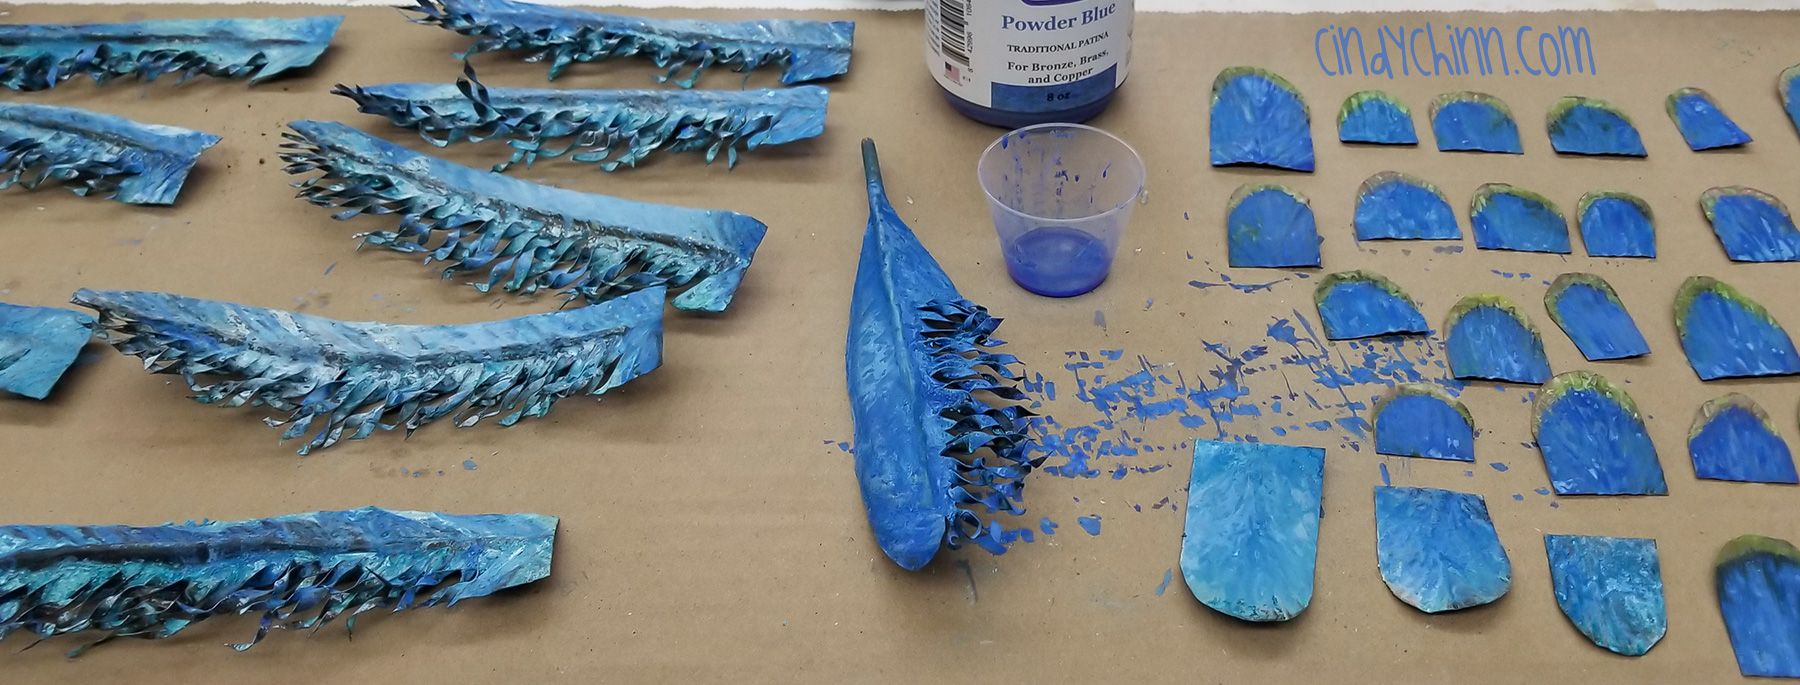
August 12, 2023: I’ve started adding a patina to the tail feathers, and getting them closer to the correct colors.
August 14, 2023: The last of my feathers are coming together. Each one takes about an hour from cutting the copper wire to soldering it to the stainless steel stem, and then forming the feathers. Next up is to add the patina and make them ‘peacock’ colored like the ones above.
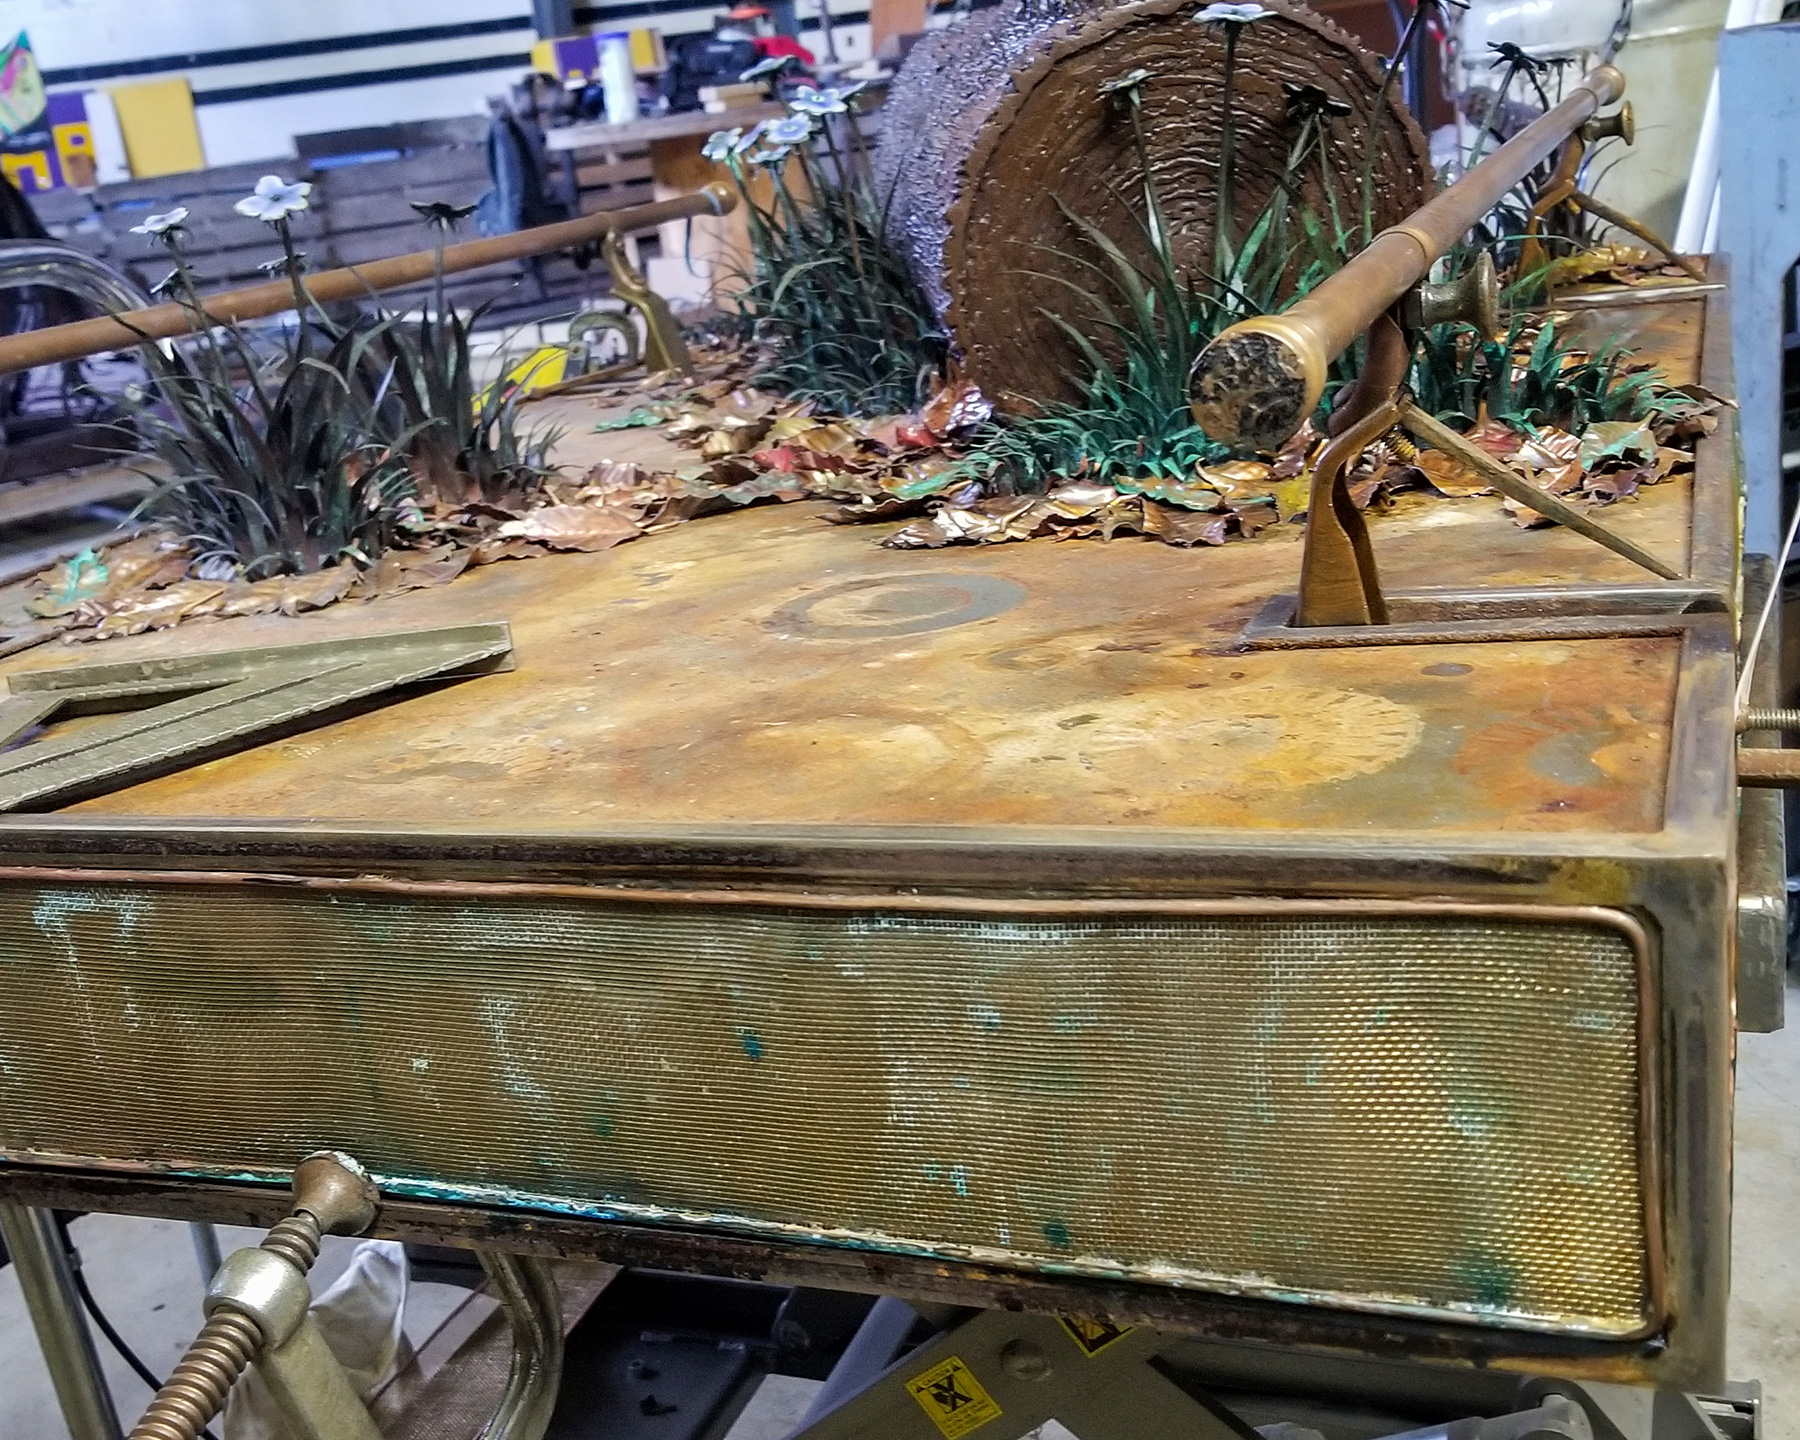
August 17, 2023: I spent the early morning hours working on the base for the sculpture. I’ve added a stainless steel skin, with steel trim. The lever in the foreground is one of four retractable wheels. I have grass made to go next to the log, which will support the bird.
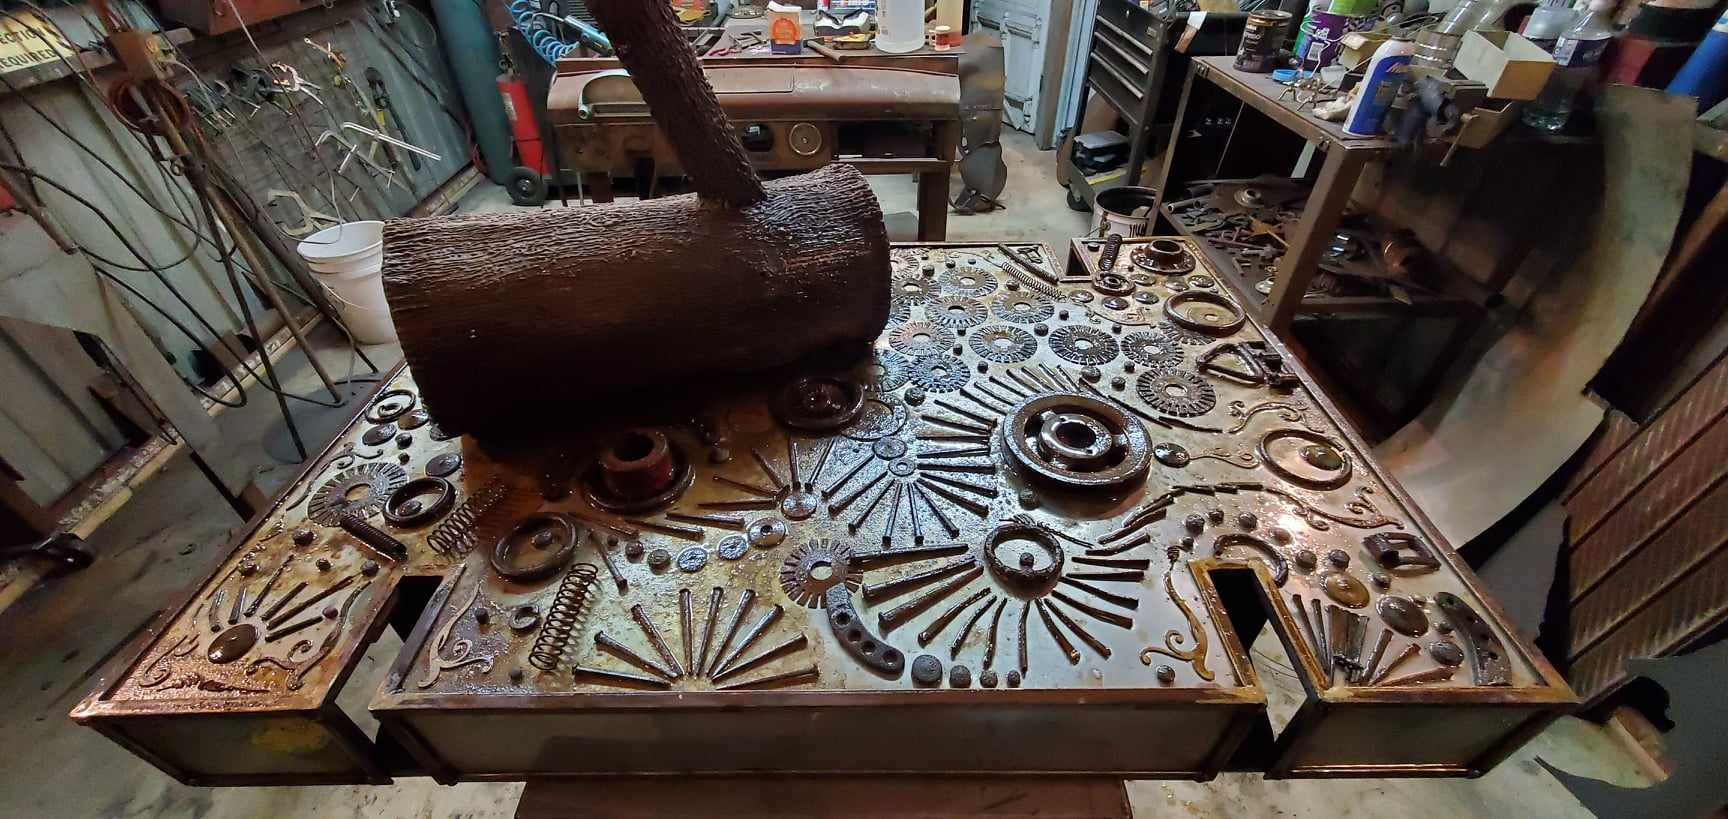
August 18, 2023: This was an experiment in which my goal is to add some color to the base by rusting stainless steel. I put a pattern of metal objects on the sheet, and then doused it in vinegar. Here’s an images showing all the pieces in place while it rusts.
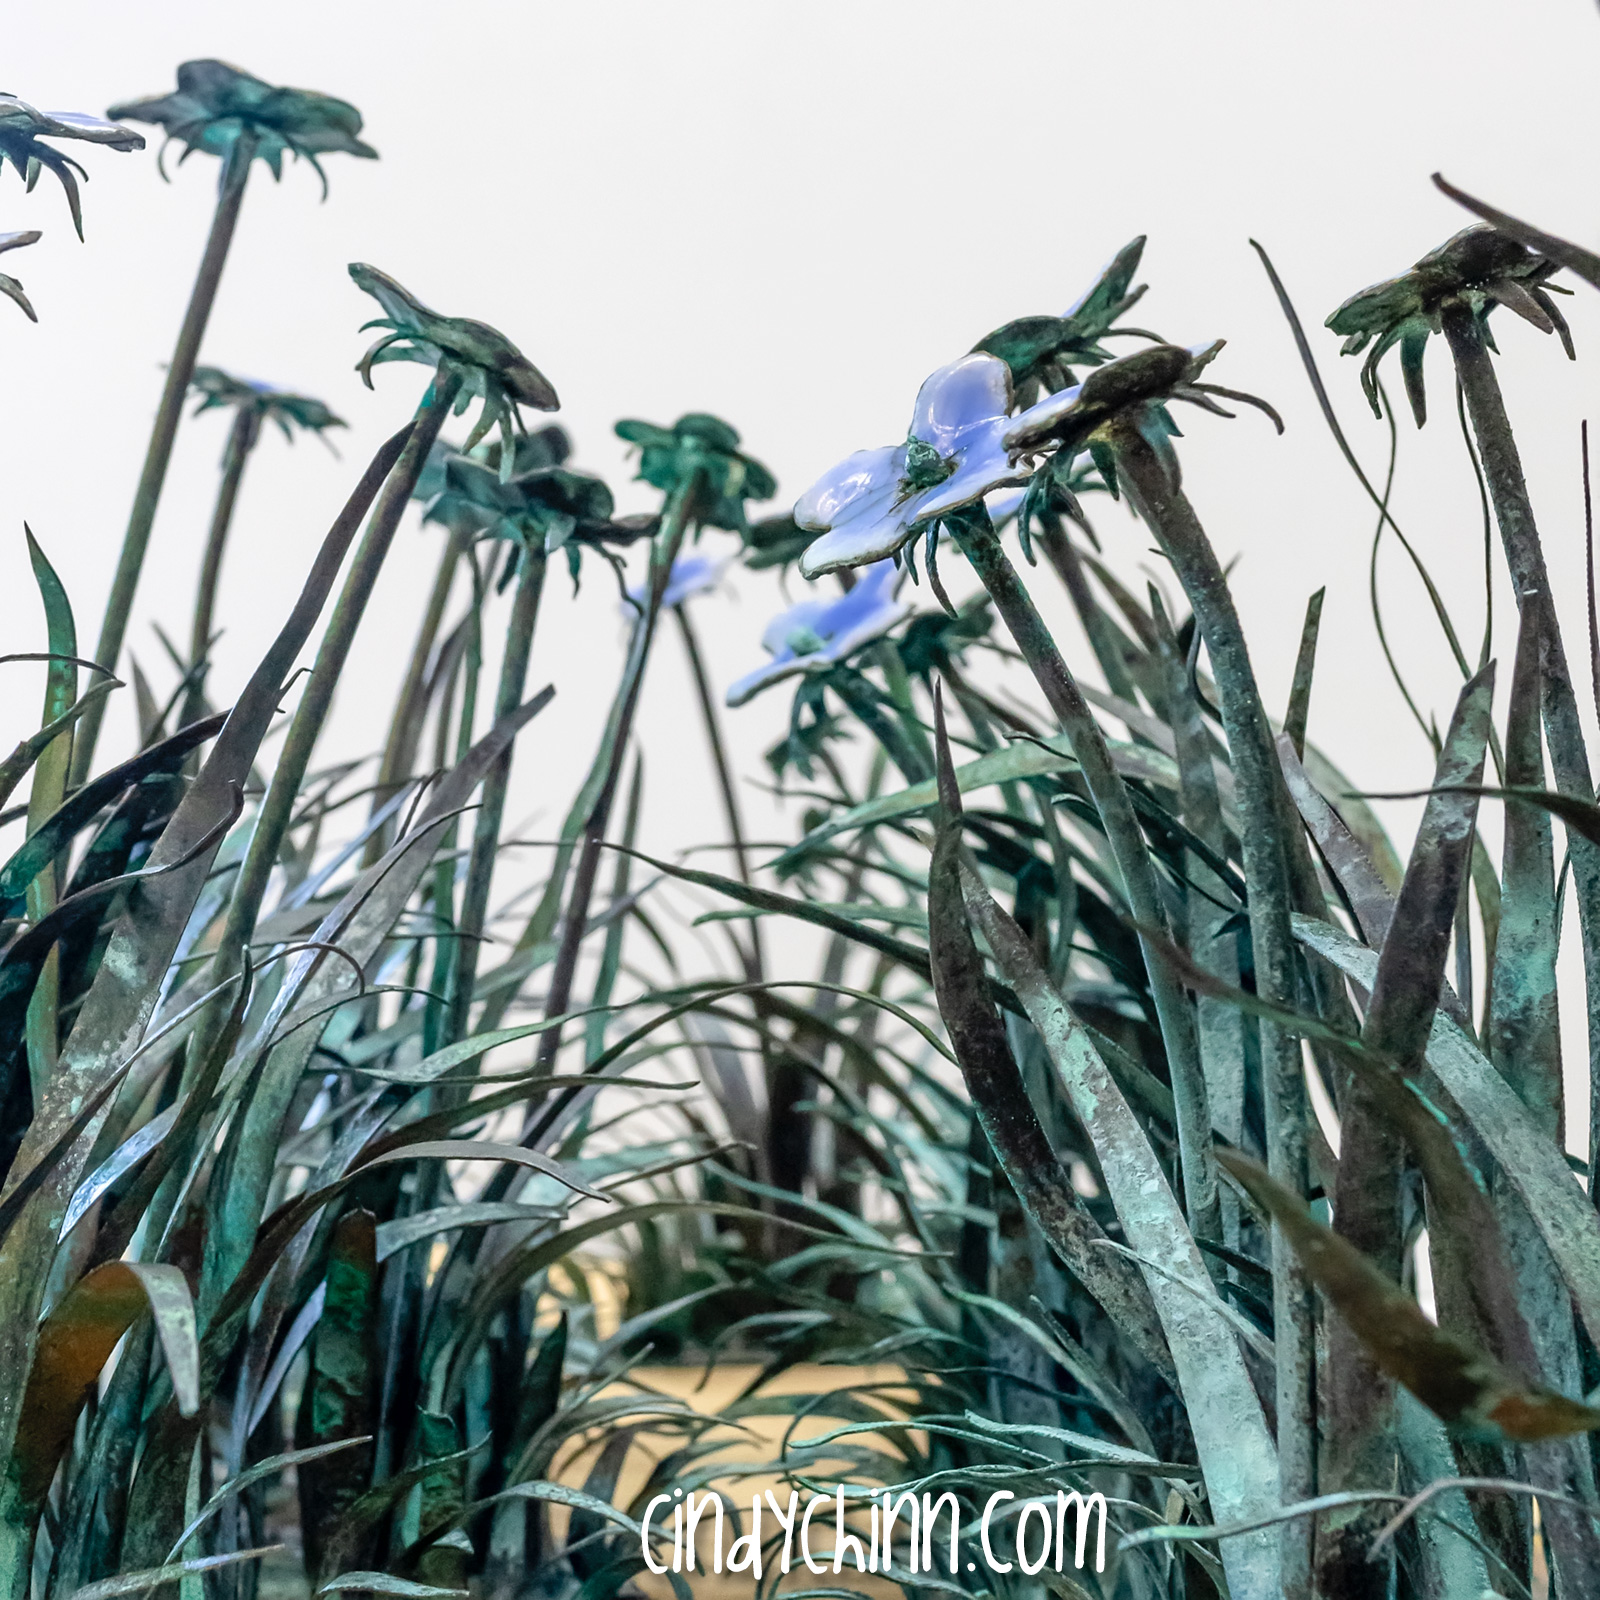
August 19, 2023: Here’s another look at the base which shows the patina, the flowers (copper and enamel) and some of the leaves that I will be adding to the base soon.
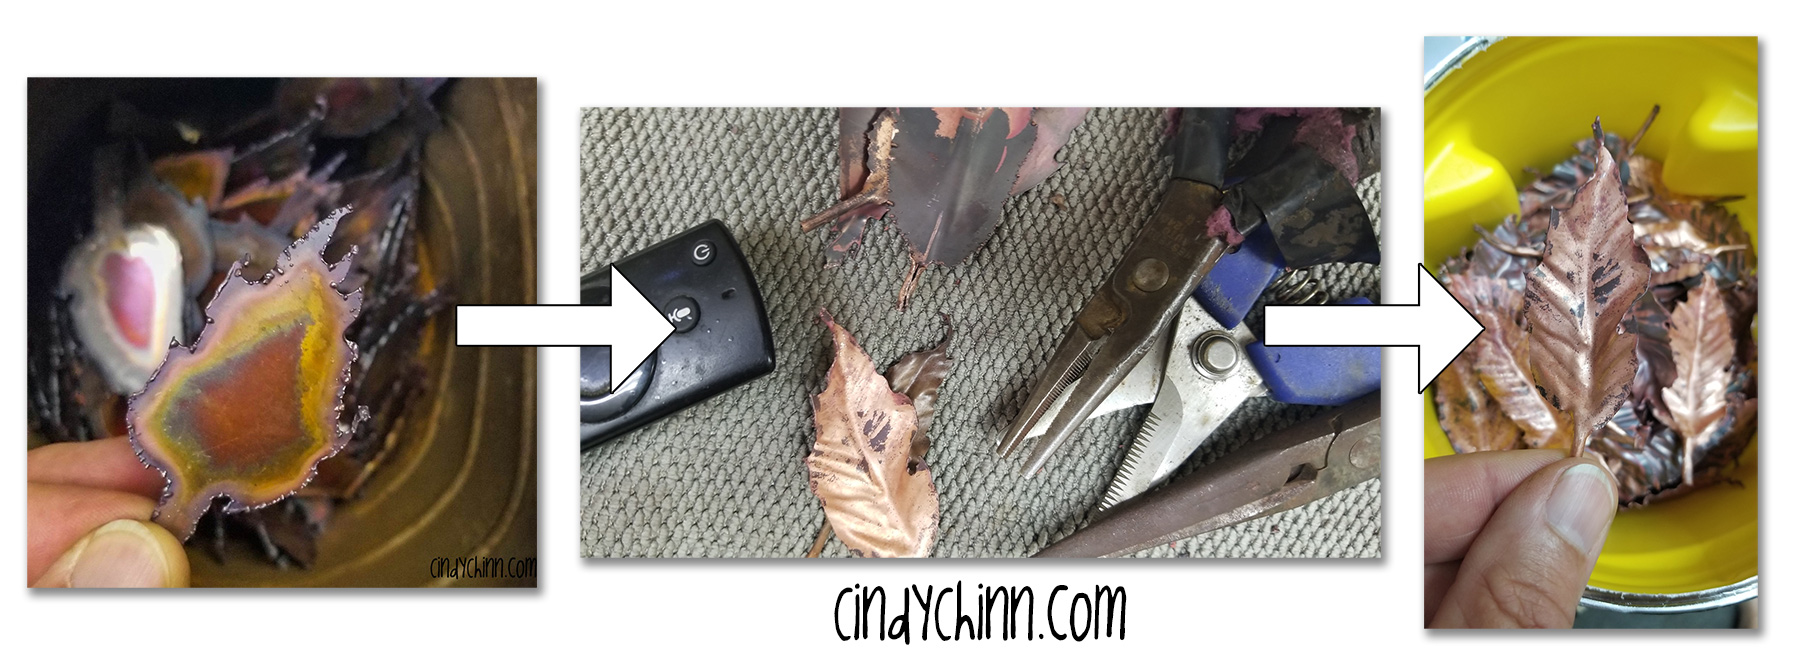
August 20, 2023: Last night I learned a lot about attaching copper leaves to ‘stained’ stainless steel. 😀 I learned silicone does NOT stick to either copper OR stainless steel… super glue sticks to copper but not stainless steel… epoxy metal is still up in the air. and JB Weld 2 part epoxy sticks to everything, even though it doesn’t say so on the packaging. But I have a batch of leaves in place and will check to see how they hold up over time.

August 22, 2023: It was a long night of ‘leaf forming’ – taking each copper leaf I had cut out the night before, and hand forming each one into a natural shape. At least I was in front of the AC and was able to watch countless episodes of the “Outer Limits”. 😀
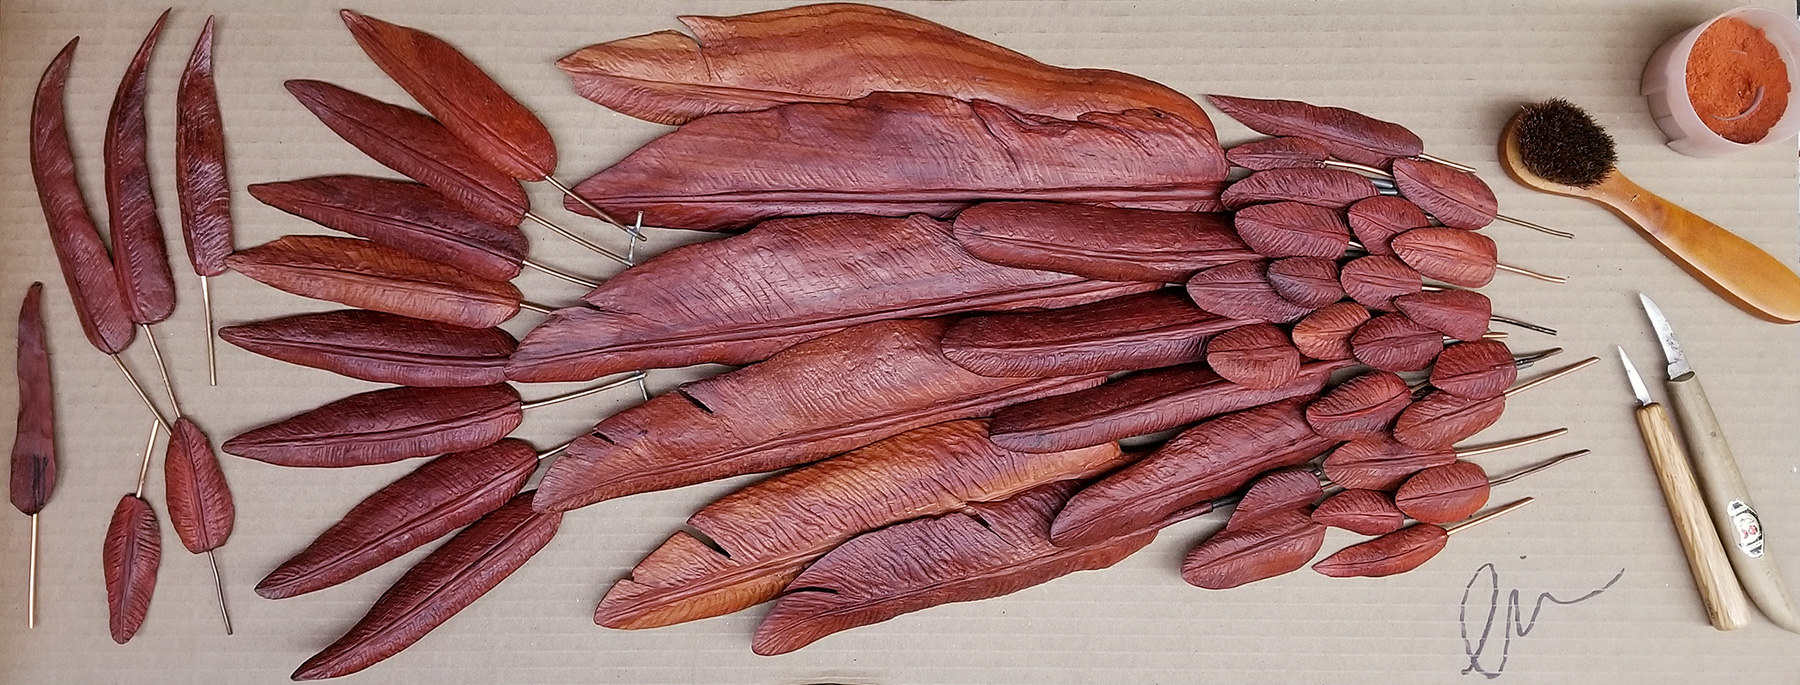
August 28. 2023: The past couple of days have been spent working the carved padauk wood feathers for the second wing. It’s a long process, but it’s coming along.

August 30, 2023: Work continues on the wood feathers. I’m carving the bigger ones now, and slowly getting them all done.

September 3, 2023: YAY! I’ve finished carving my feathers for my peacock sculpture! I still have LOT to make for the 2nd wing – but they’re metal. Each wood feather is treated with beeswax and orange oil. For each wing, I have carved 47 feathers. I’m VERY happy to be moving on! 😀
September 9, 2023: Work on the wing feathers continues! Last night I was able to start adding color to my feathers, and put them in small fuming tanks. 🙂 Here’s a look at my ‘office’ for the next couple of days!
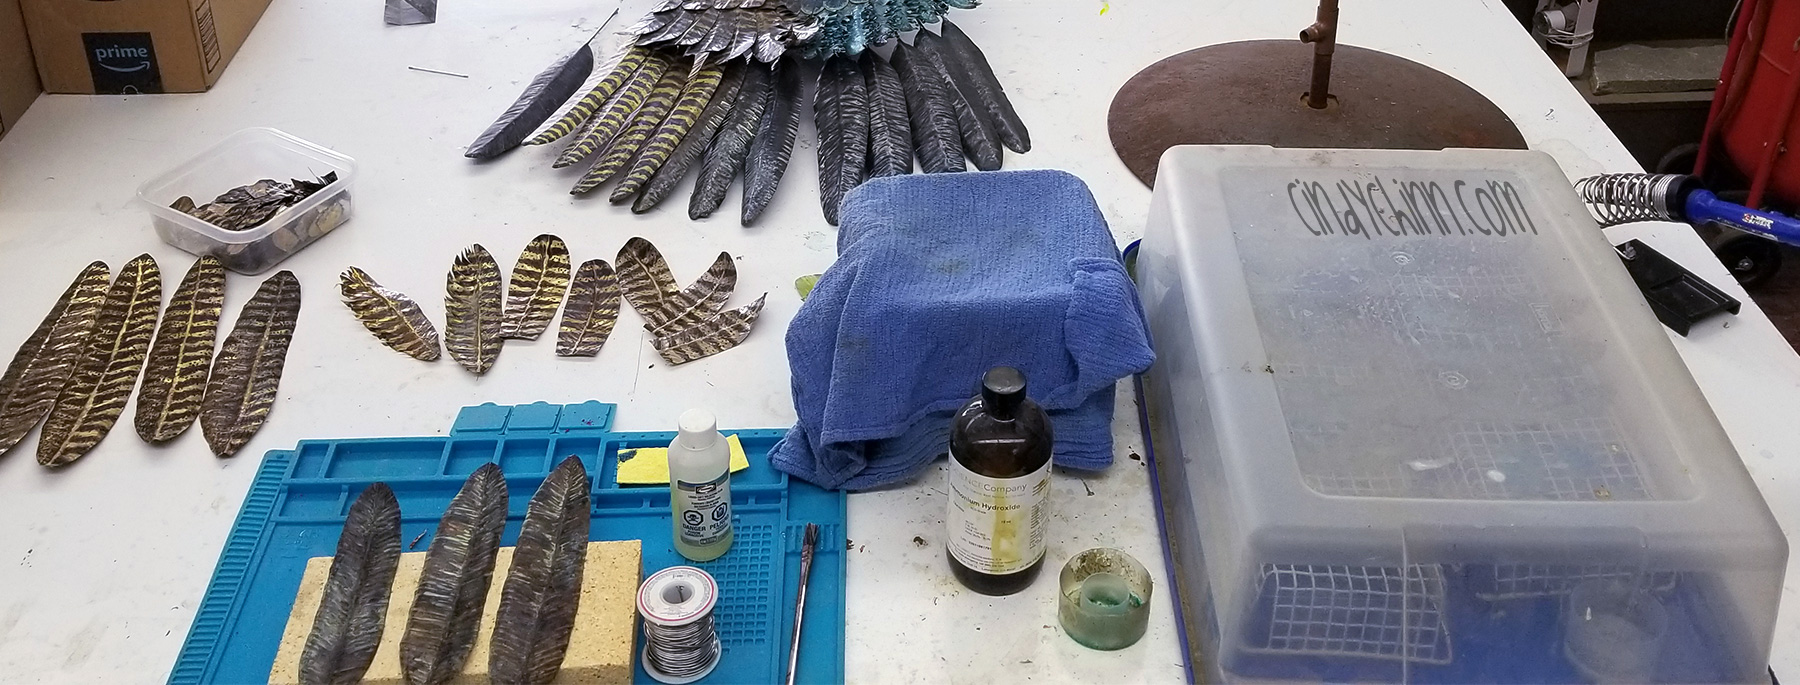
September 9, 2023: I’m getting the blue set for the wing feathers. Not a quick, nor easy process – but it’s happening! 😀
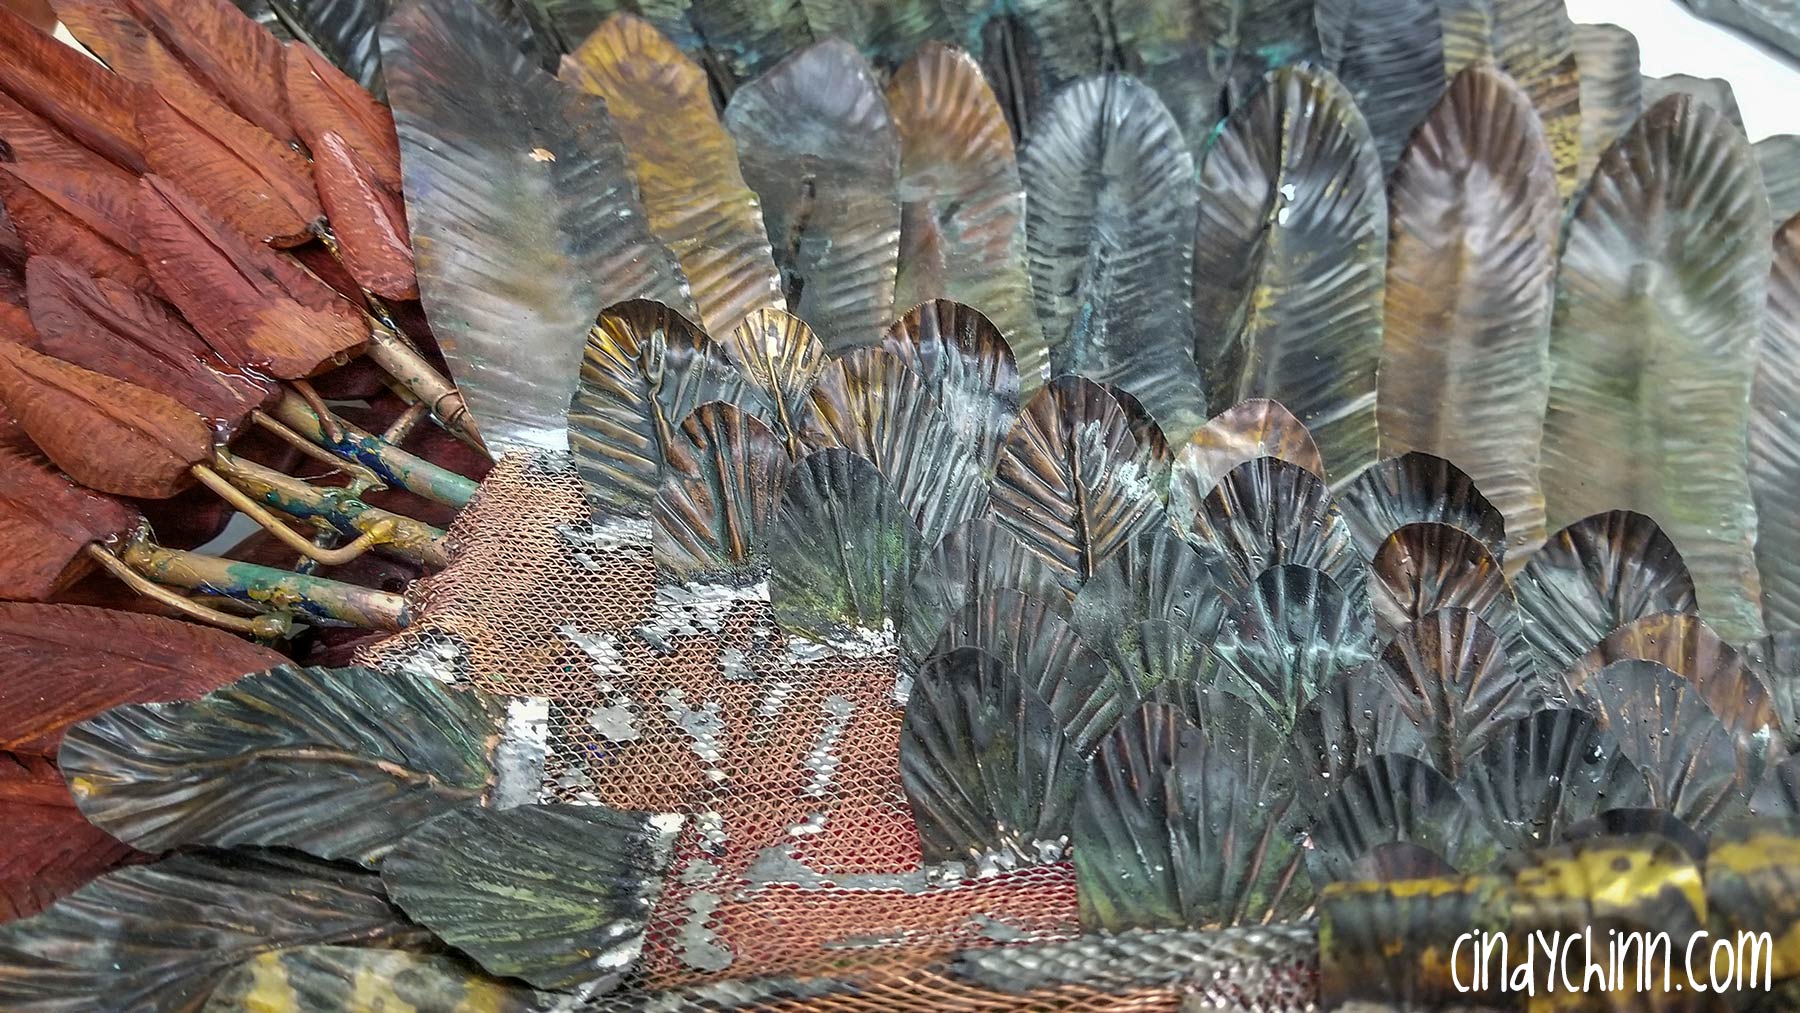
September 15, 2023: Here I am with all of the feathers that go into one wing. Brass, copper and wood – specific finishes for each area of the wing – and soon it will all come together!

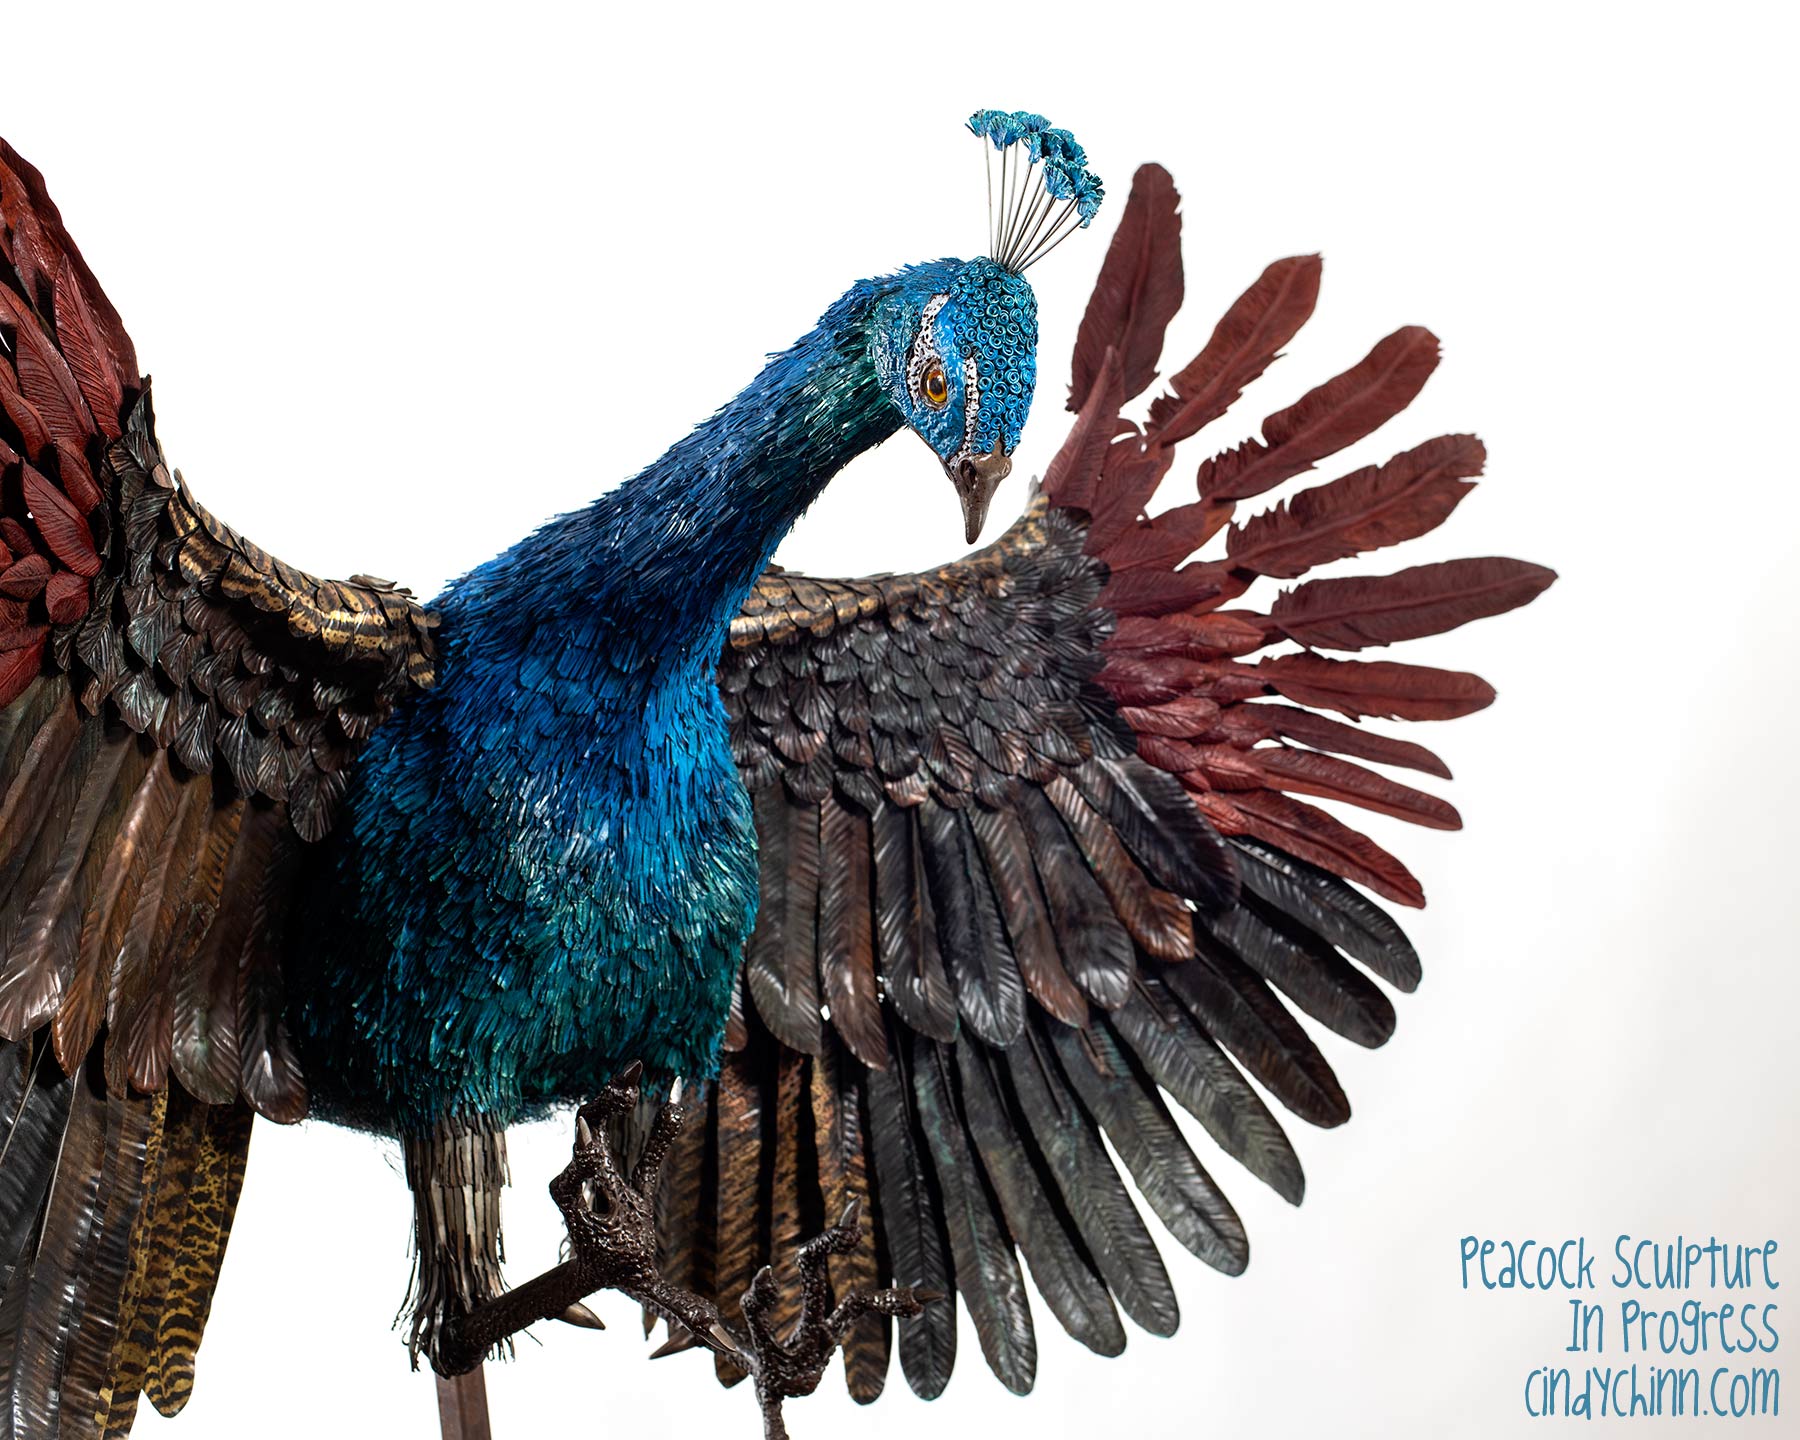
September 17, 2023: After a week of finishing up the feathers and building the frame for the second wing, progress is happening in the ‘build’ area of the project! I have a good start on the new wing, and and finishing up the first wing by filling in the back of it.

September 18, 2023: I’m trying a technique to add color to the body – but not 100% sure it will work. For now, it adds a new look while I continue with the wings. In other news, the stand broke today, and thankfully I was able to avoid disaster!
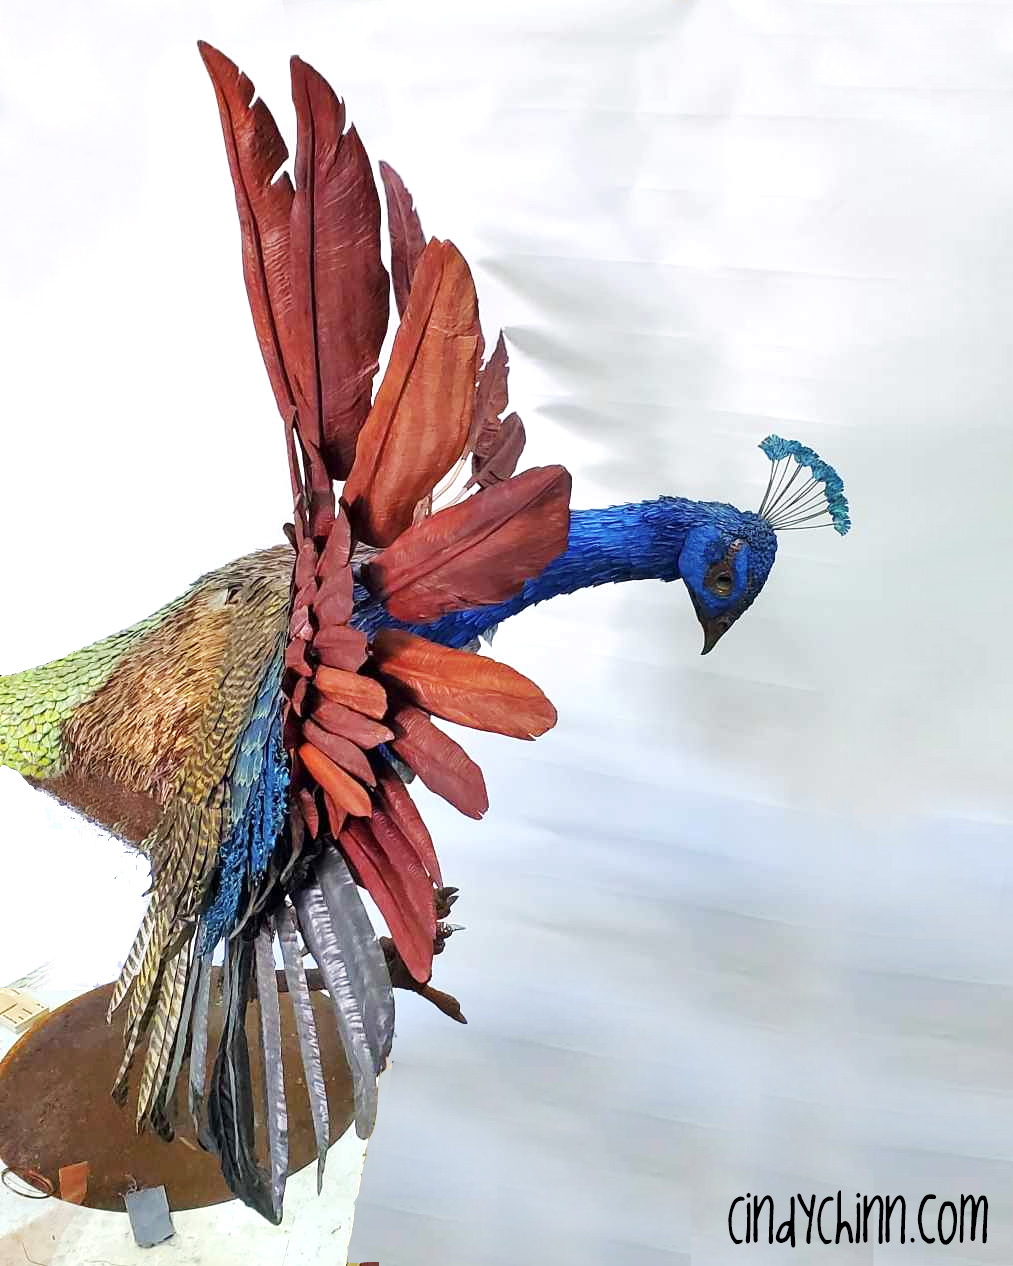
September 19, 2023: Work continues from last night and into this morning as I build the 2nd wing. The first wing is pretty much complete (pending final installation) – but I’m happy with how this is coming together!

September 21, 2023: Here’s a closer look at the feathers and show a bit of how I attach them. Still a few more wood feathers to carve to fill in the game to the left. But progress is getting made!
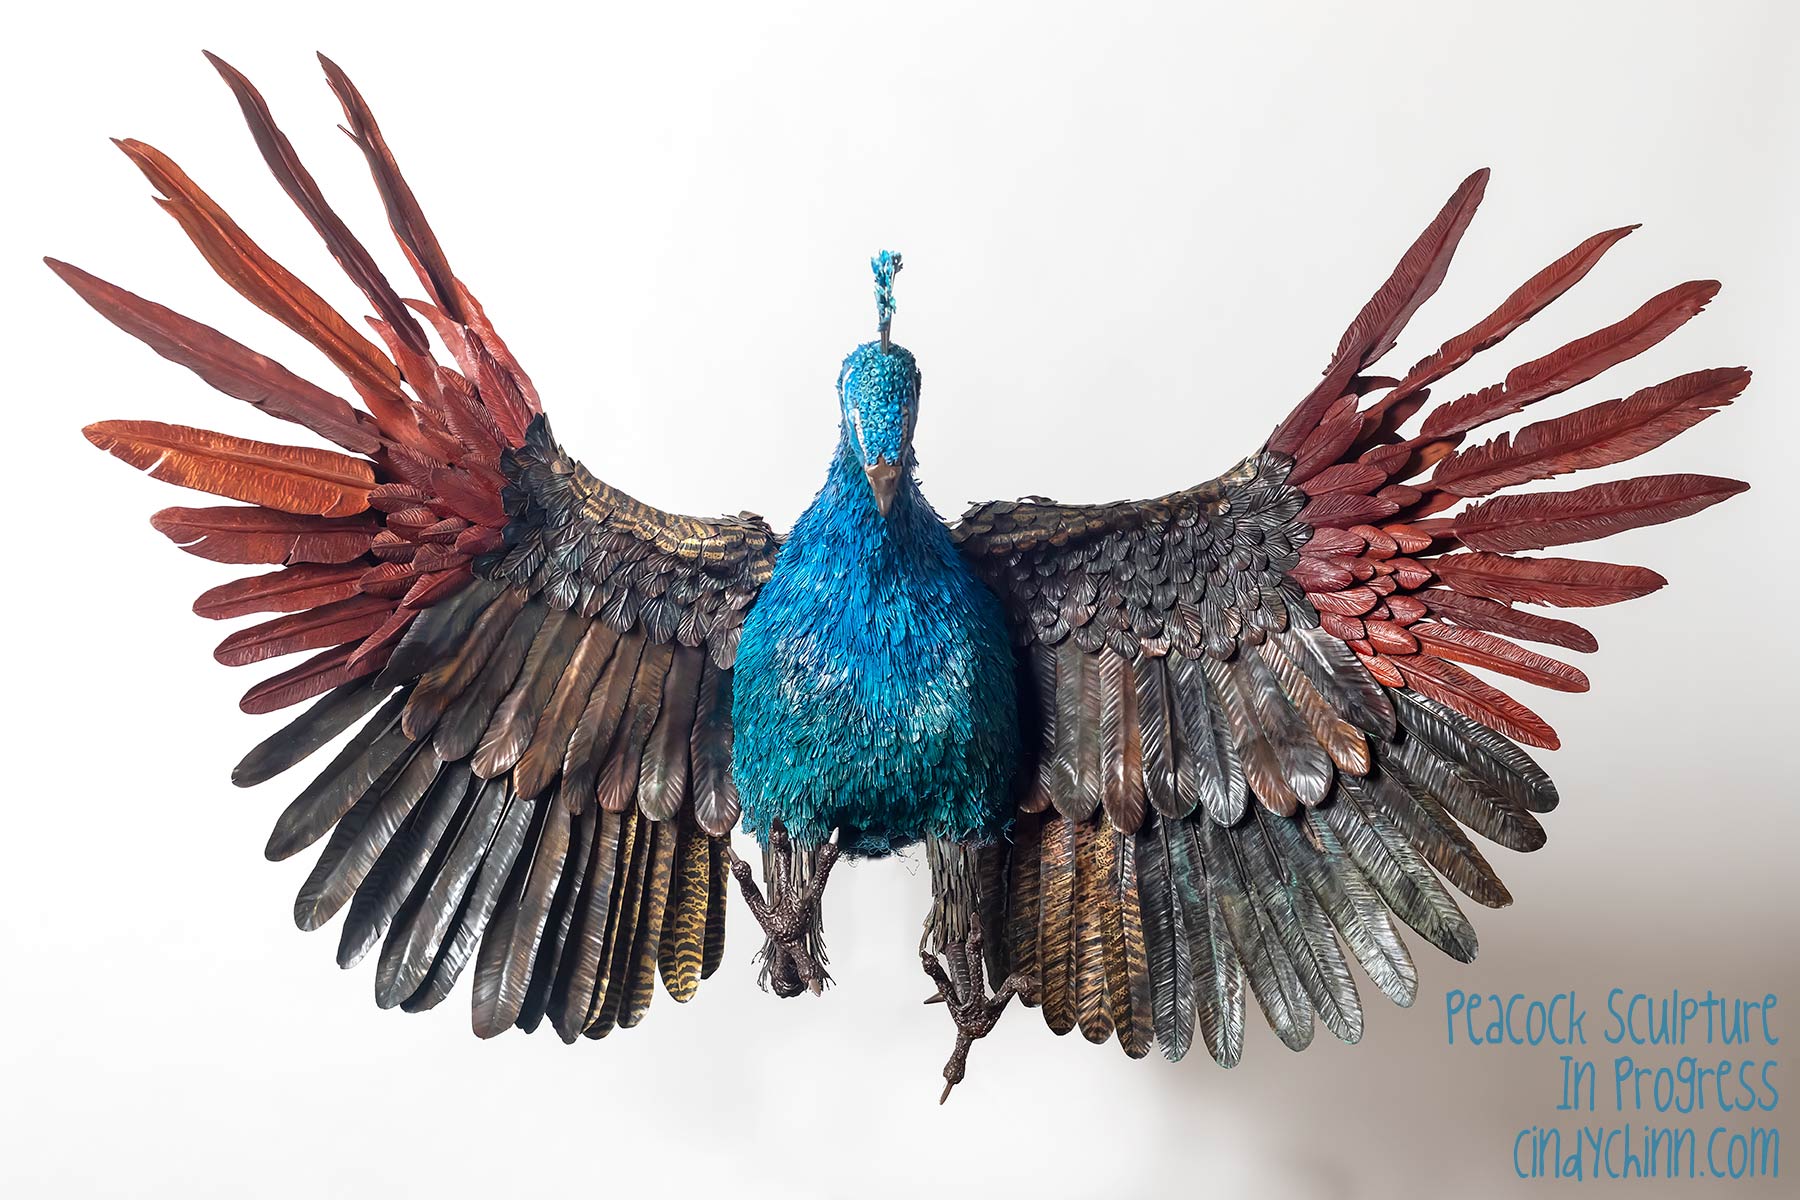
September 27. 2023: I have the wings DONE! Here’s a look and what I have so far, and now I’m working on the base – and SOOOONNNnnn – adding tail feathers! 😀
October 2, 2023: I’m putting some finishing touches on the base before I start adding the bird and the tail to it. Getting SO close! 😀
October 4, 2023: Peacock 101: The long tail feathers with the eyes, on a peacock, aren’t actually ‘tail feathers’ at all, they are back feathers that form a ‘train’. The actual tail feathers are pictured here in this photo… YES, I am STILL making feathers! these should be the last set though, I have 10 more of them to make. And they will be attached before the the ‘train’ feathers… I’m making them out of stainless steel.
October 12, 2023: While I have my base for the sculpture on the stand, I thought I should add the plaque (and make it a little easier on myself). I had a friend use his CB router to make this out of sapele wood, then I’ve waxed and painted it to highlight the letters.

October 22, 2023: I have a hollow log on the base of my sculpture and needed to add something to put in it. I built a little Jerboa, and he fits in nicely.

October 24, 2023: Yes – I’m still working on the base, but ‘should’ be done soon and can start the process of mounting the bird on it! 😀 I’ve got the plaque attached, the handles for the retractable wheels are done, and I have a couple of other tweaks to finish.

November 1, 2023: After much contemplation, I’ve added to the support structure that will go under the peacock. Still a little fine tuning, but it’s almost there!
November 5, 2023: FINALLY…. I was able to add the tail and train feathers! 😀 I’ve got a good start, but still need to add seven more layers of train feathers!
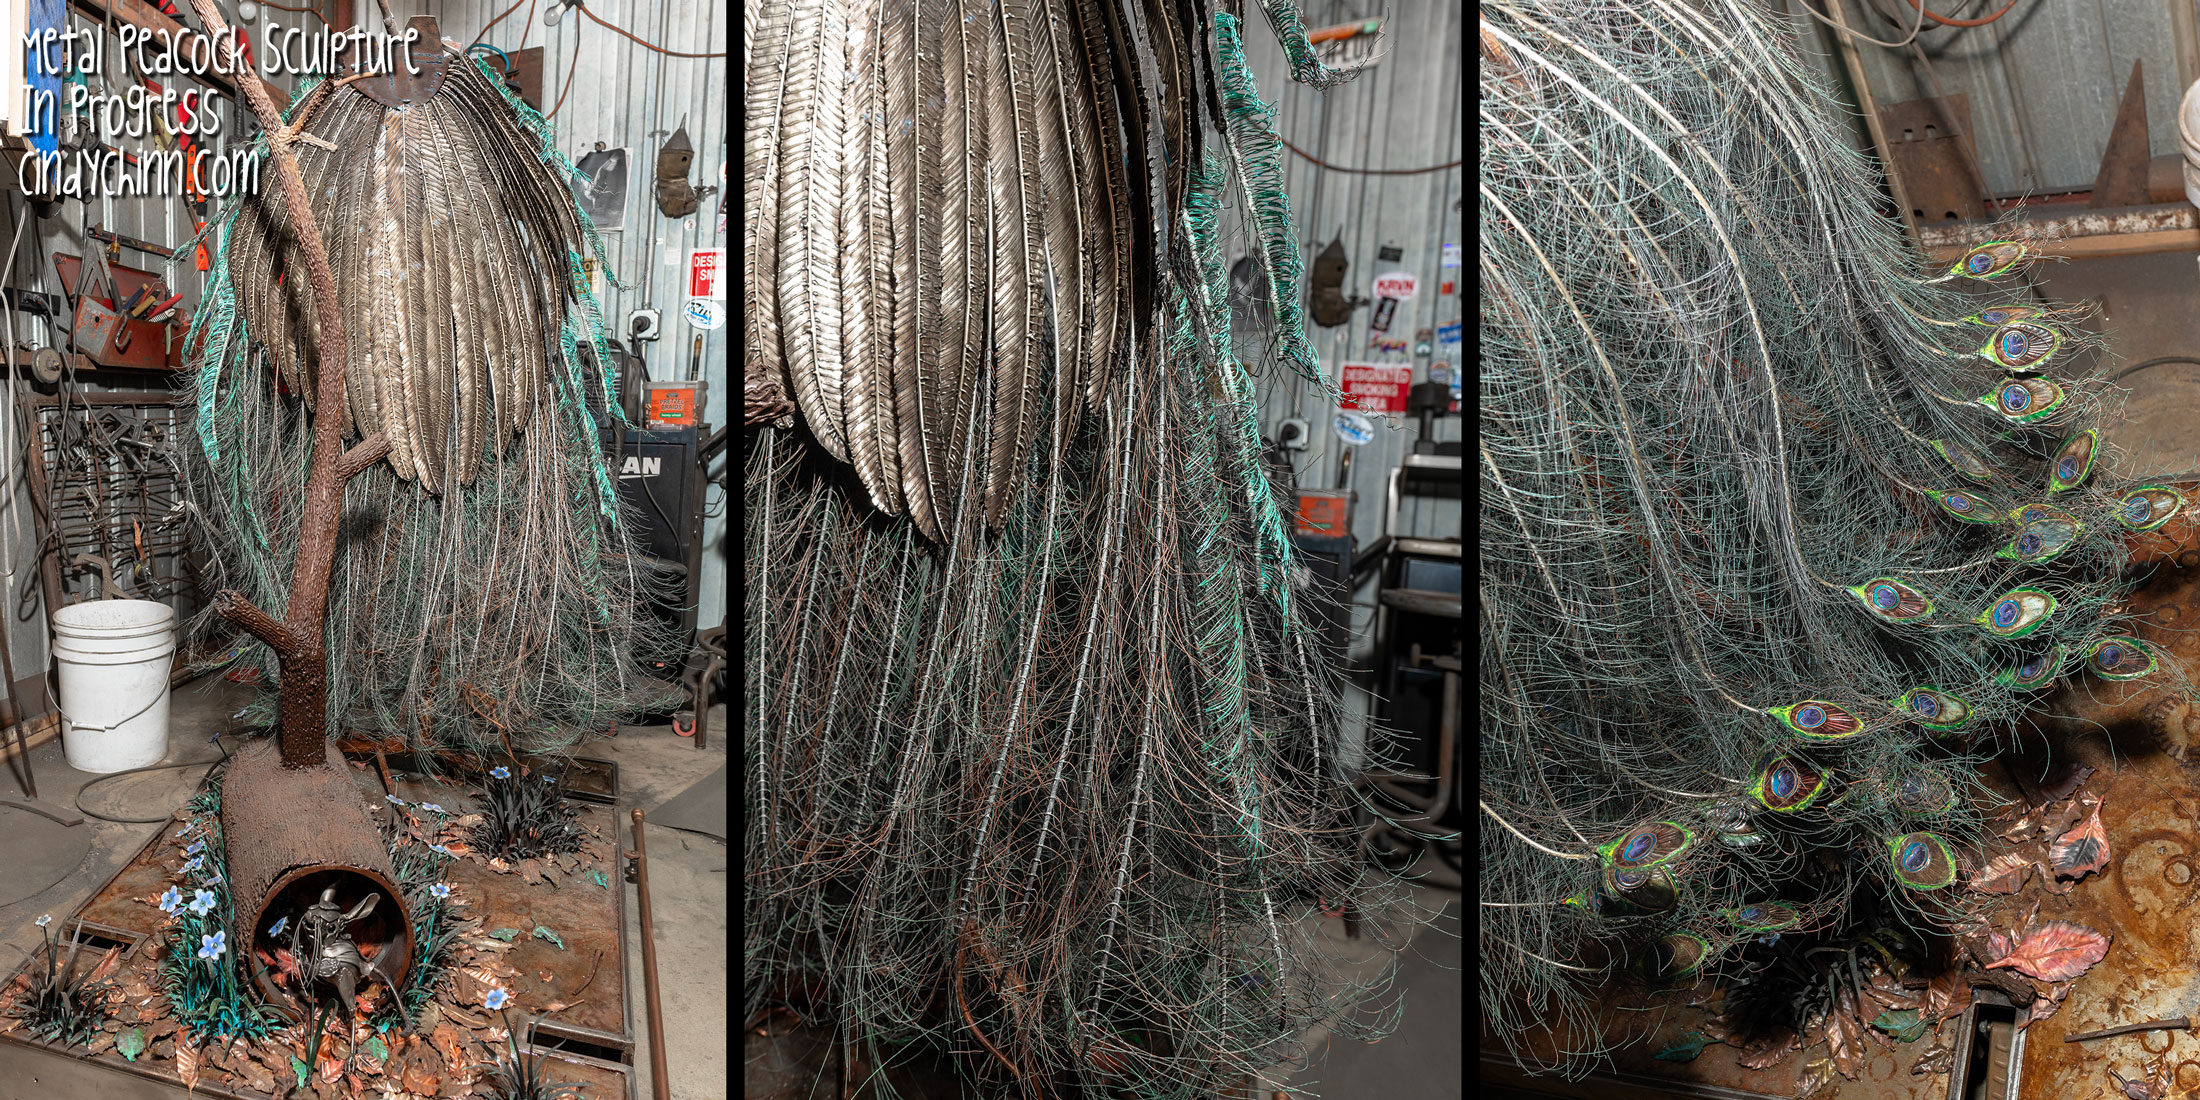
November 13, 2023 – COMPLETE!! 4 years in the making! Brass- Copper- Stainless Steel- Scrap Metal- Wood- Enameling- and a ton of patina! The Peacock- just over 6.5′ tall and don’t ask what he weighs!
Pingback:Phoenix Metal Sculpture | Artist Cindy Chinn
Pingback:2021 Year in Review | Artist Cindy Chinn
Love peacocks! Awesome job
Will you sell this when done? Final piece will look like? I’d be very interested in buying if you are selling. Let me know cost, etc. Thanks!
Yes – it will be for sale, anyone interested can email me at Cindy@CindyChinn.com I don’t have a price yet, but will know closer to completion.
Amazing it’s great to see your work
Thank you for showing how you design a&
work. Val.
What a fantastic project…. Cannot wait to see the final piece.