

Welcome, I was commissioned to create a large brass and copper metal wall art metal sculpture for a residence in Lincoln Nebraska. What a fun project this was! I used a lot of techniques from my past and created some new ones. I have a lot of in progress images and videos to show how this was done.
Click any image below for a larger view..
Metal Wall Art Final update: December 16, 2015
The copper and brass piece is installed and the client loves it! Another successful art project. I learned a lot on this one and had a lot fun with it. There was a fine mix of engineering new techniques and creative insights to complete this one. 20′ across and 4′ tall – 500 leaves – 150 mushrooms – 2 kids – 1 bird.

What follows below is the progress of the project from design to completion – including videos of some of my methods.
Here’s the rough sketch that will be the basis of the design (20′ x 4′) :

The scene consists of the client’s grandchildren out in a wooded area looking for morel mushrooms. I’ll be using brass and copper to create the scene and attaching it to a metal frame that will hold it all together.
I’ve had some of the material cut locally with a CNC machine. This will give me the leaves and the mushroom shapes for the metal wall art. This was a long process, but was needed to create a more ‘custom’ look to the piece.

June 29, 2015: To make the holes in the mushrooms, I’ll be cutting them out with my plasma torch. I tried a sample with the CNC machine, but like the randomness of cutting them freehand. It will take a little more time, but will be worth it in the end.
After cutting the holes, I’ll be coloring and shaping the brass mushrooms, but for now…. lots of cutting!

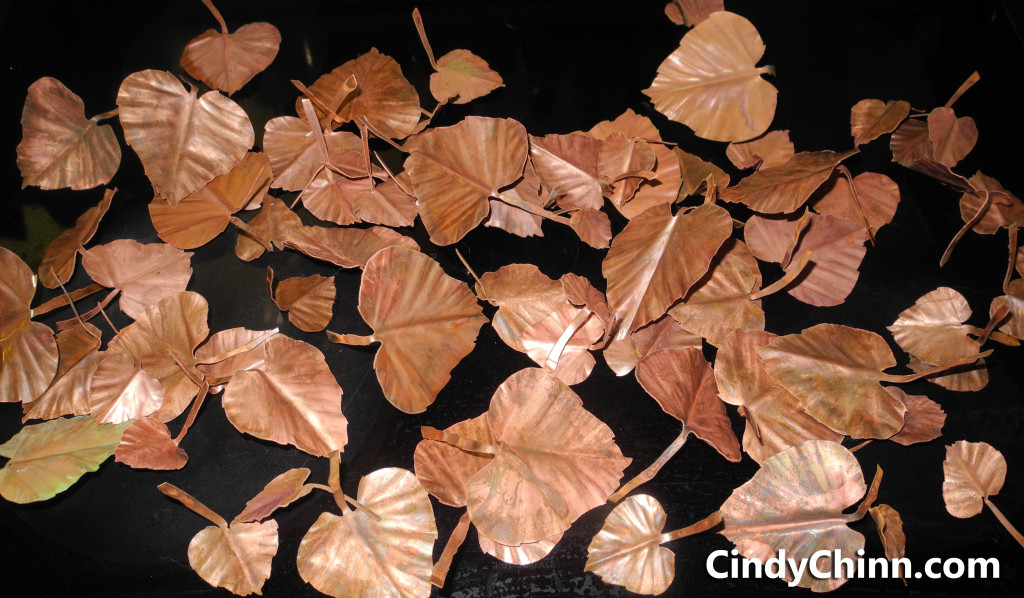
July 10, 2015: I’ve been busy lately forming and colour treating leaves. Here’s a photo that shows the steps from fresh copper to finished leaf for the metal wall art. I experimented with a few concepts and techniques before settling on the final design.

Here are the leaves still attached to the sheet as I heat treat them (see the video below):

Here’s a video of me heating up a leaf for the metal wall art:
https://www.youtube.com/watch?v=rTD3nrR_R0k
July 13, 2015: This is what 70 or so hand tooled copper Elm Leaves and 70 or so copper Cottonwood Leaves look like. They range from 2″ to 5″ in length. I have another 140 or so of each in brass to tool now.

July 15, 2015: Today we were at the client’s house fitting the steel frame for the sculpture. I wanted to make sure that all measurements were correct and mark the frame where the wall studs were.

July 30, 2015: Well – I’m formed my LAST leaf now! 😀 YAY! Check out the video below to see how I form them by hand.
July 30, 2015: Colored Brass Leaves

August 3, 2015: After all of the planning, all of the forming and all of the coloring, I’m finally able to start building! Here’s the beginning of what will be an amazing copper and brass tree.


I’ve started on the first child. I’m using a combination of brass, copper and tin to form the shapes and soldering them together. Then I clean and buff it up as I go along so I can better see what I am working on.
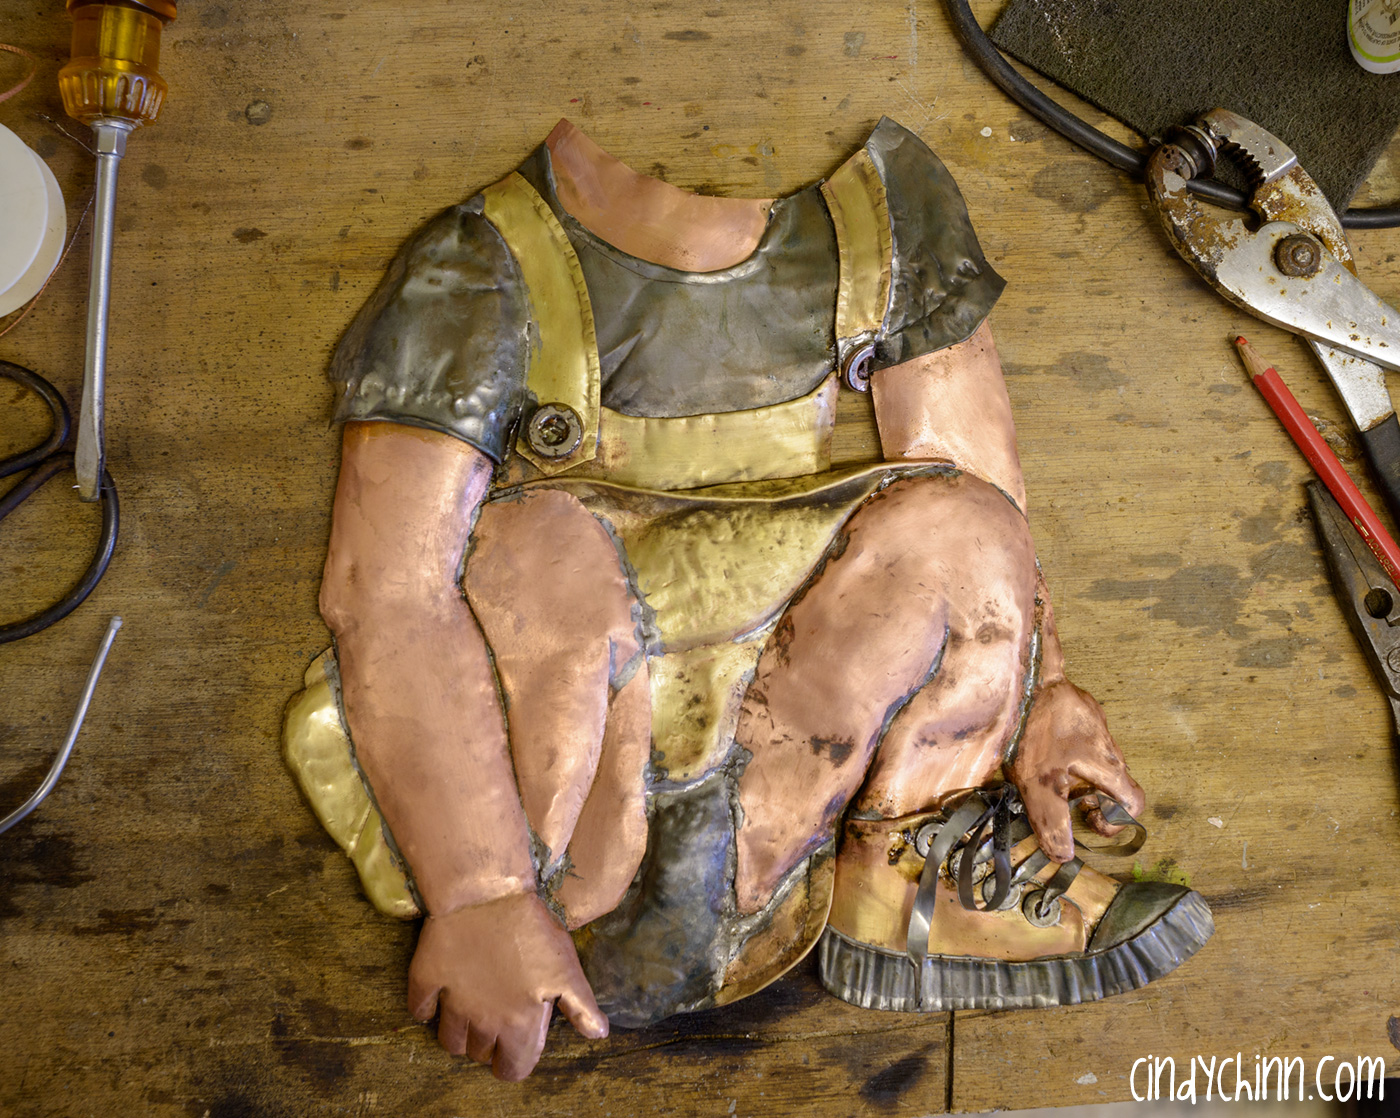

First the design is drawn onto the copper sheet, then cut out with sheers, the metal is heated and forming begins. Once the shape is completed, the metal is cleaned up and the hair is added.
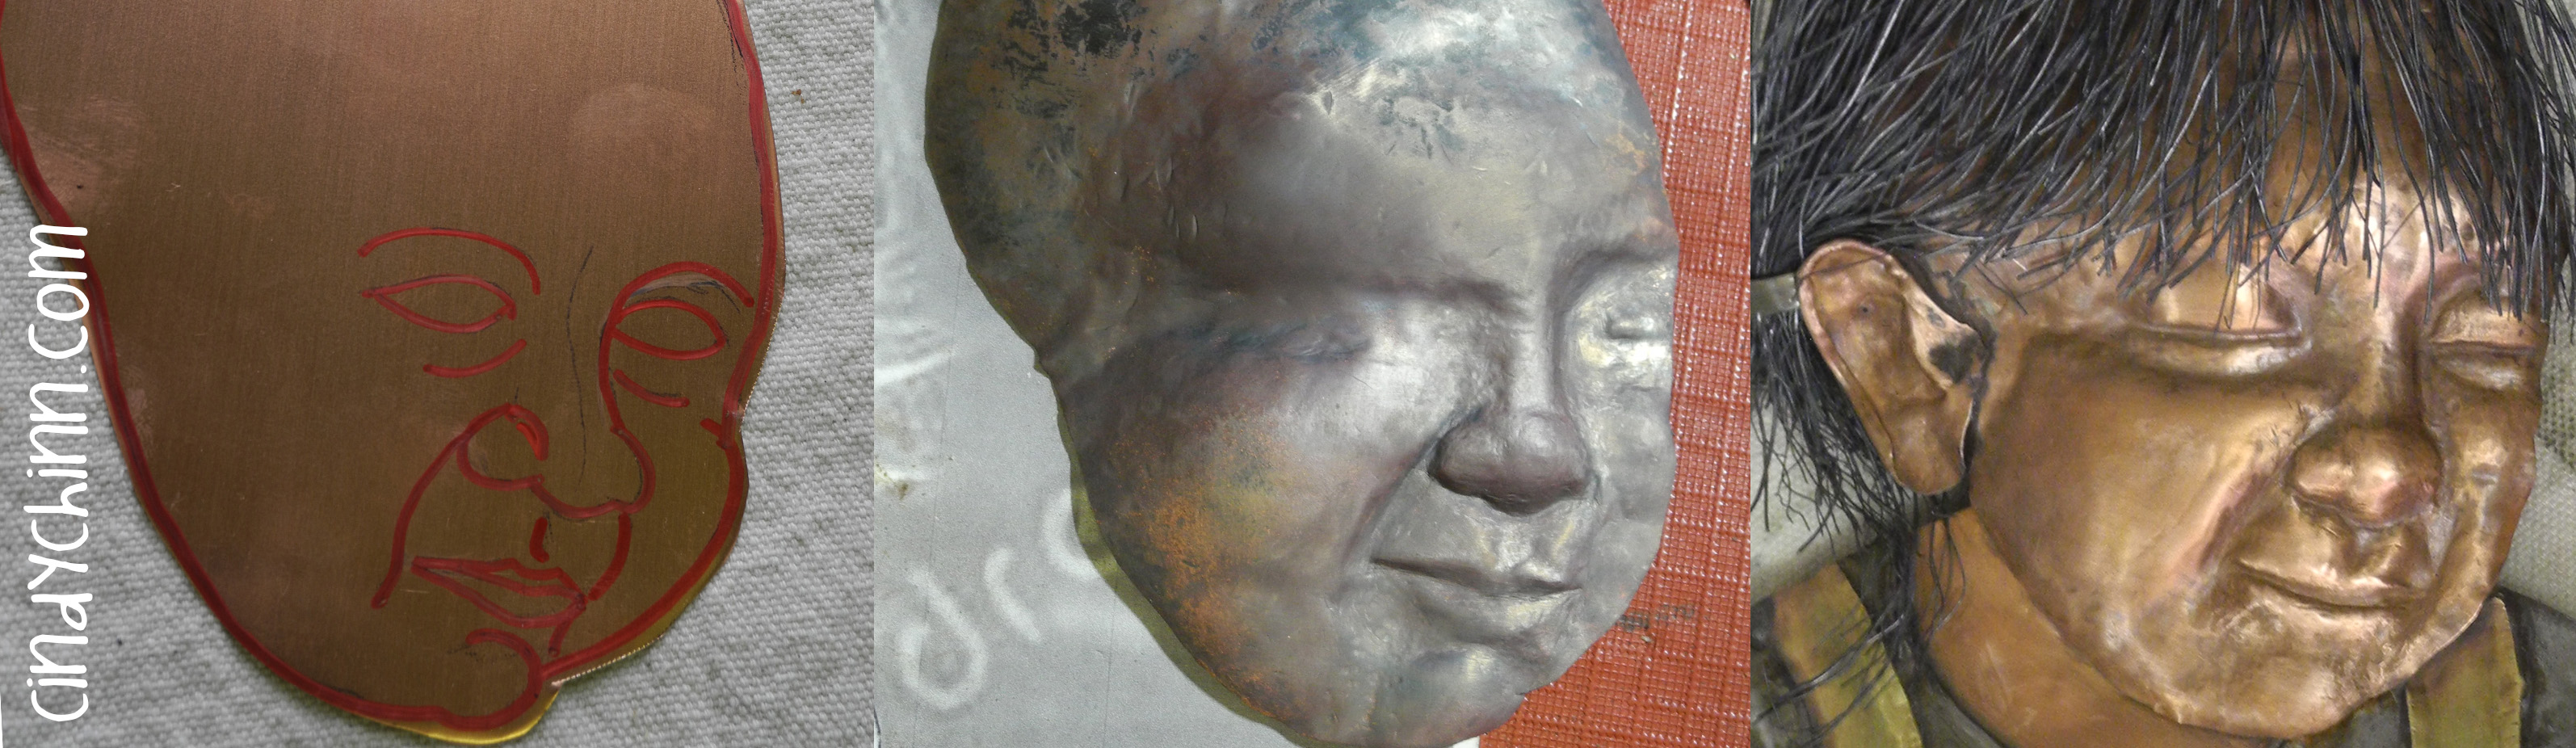
Finished and ready for a final buffing and seal.
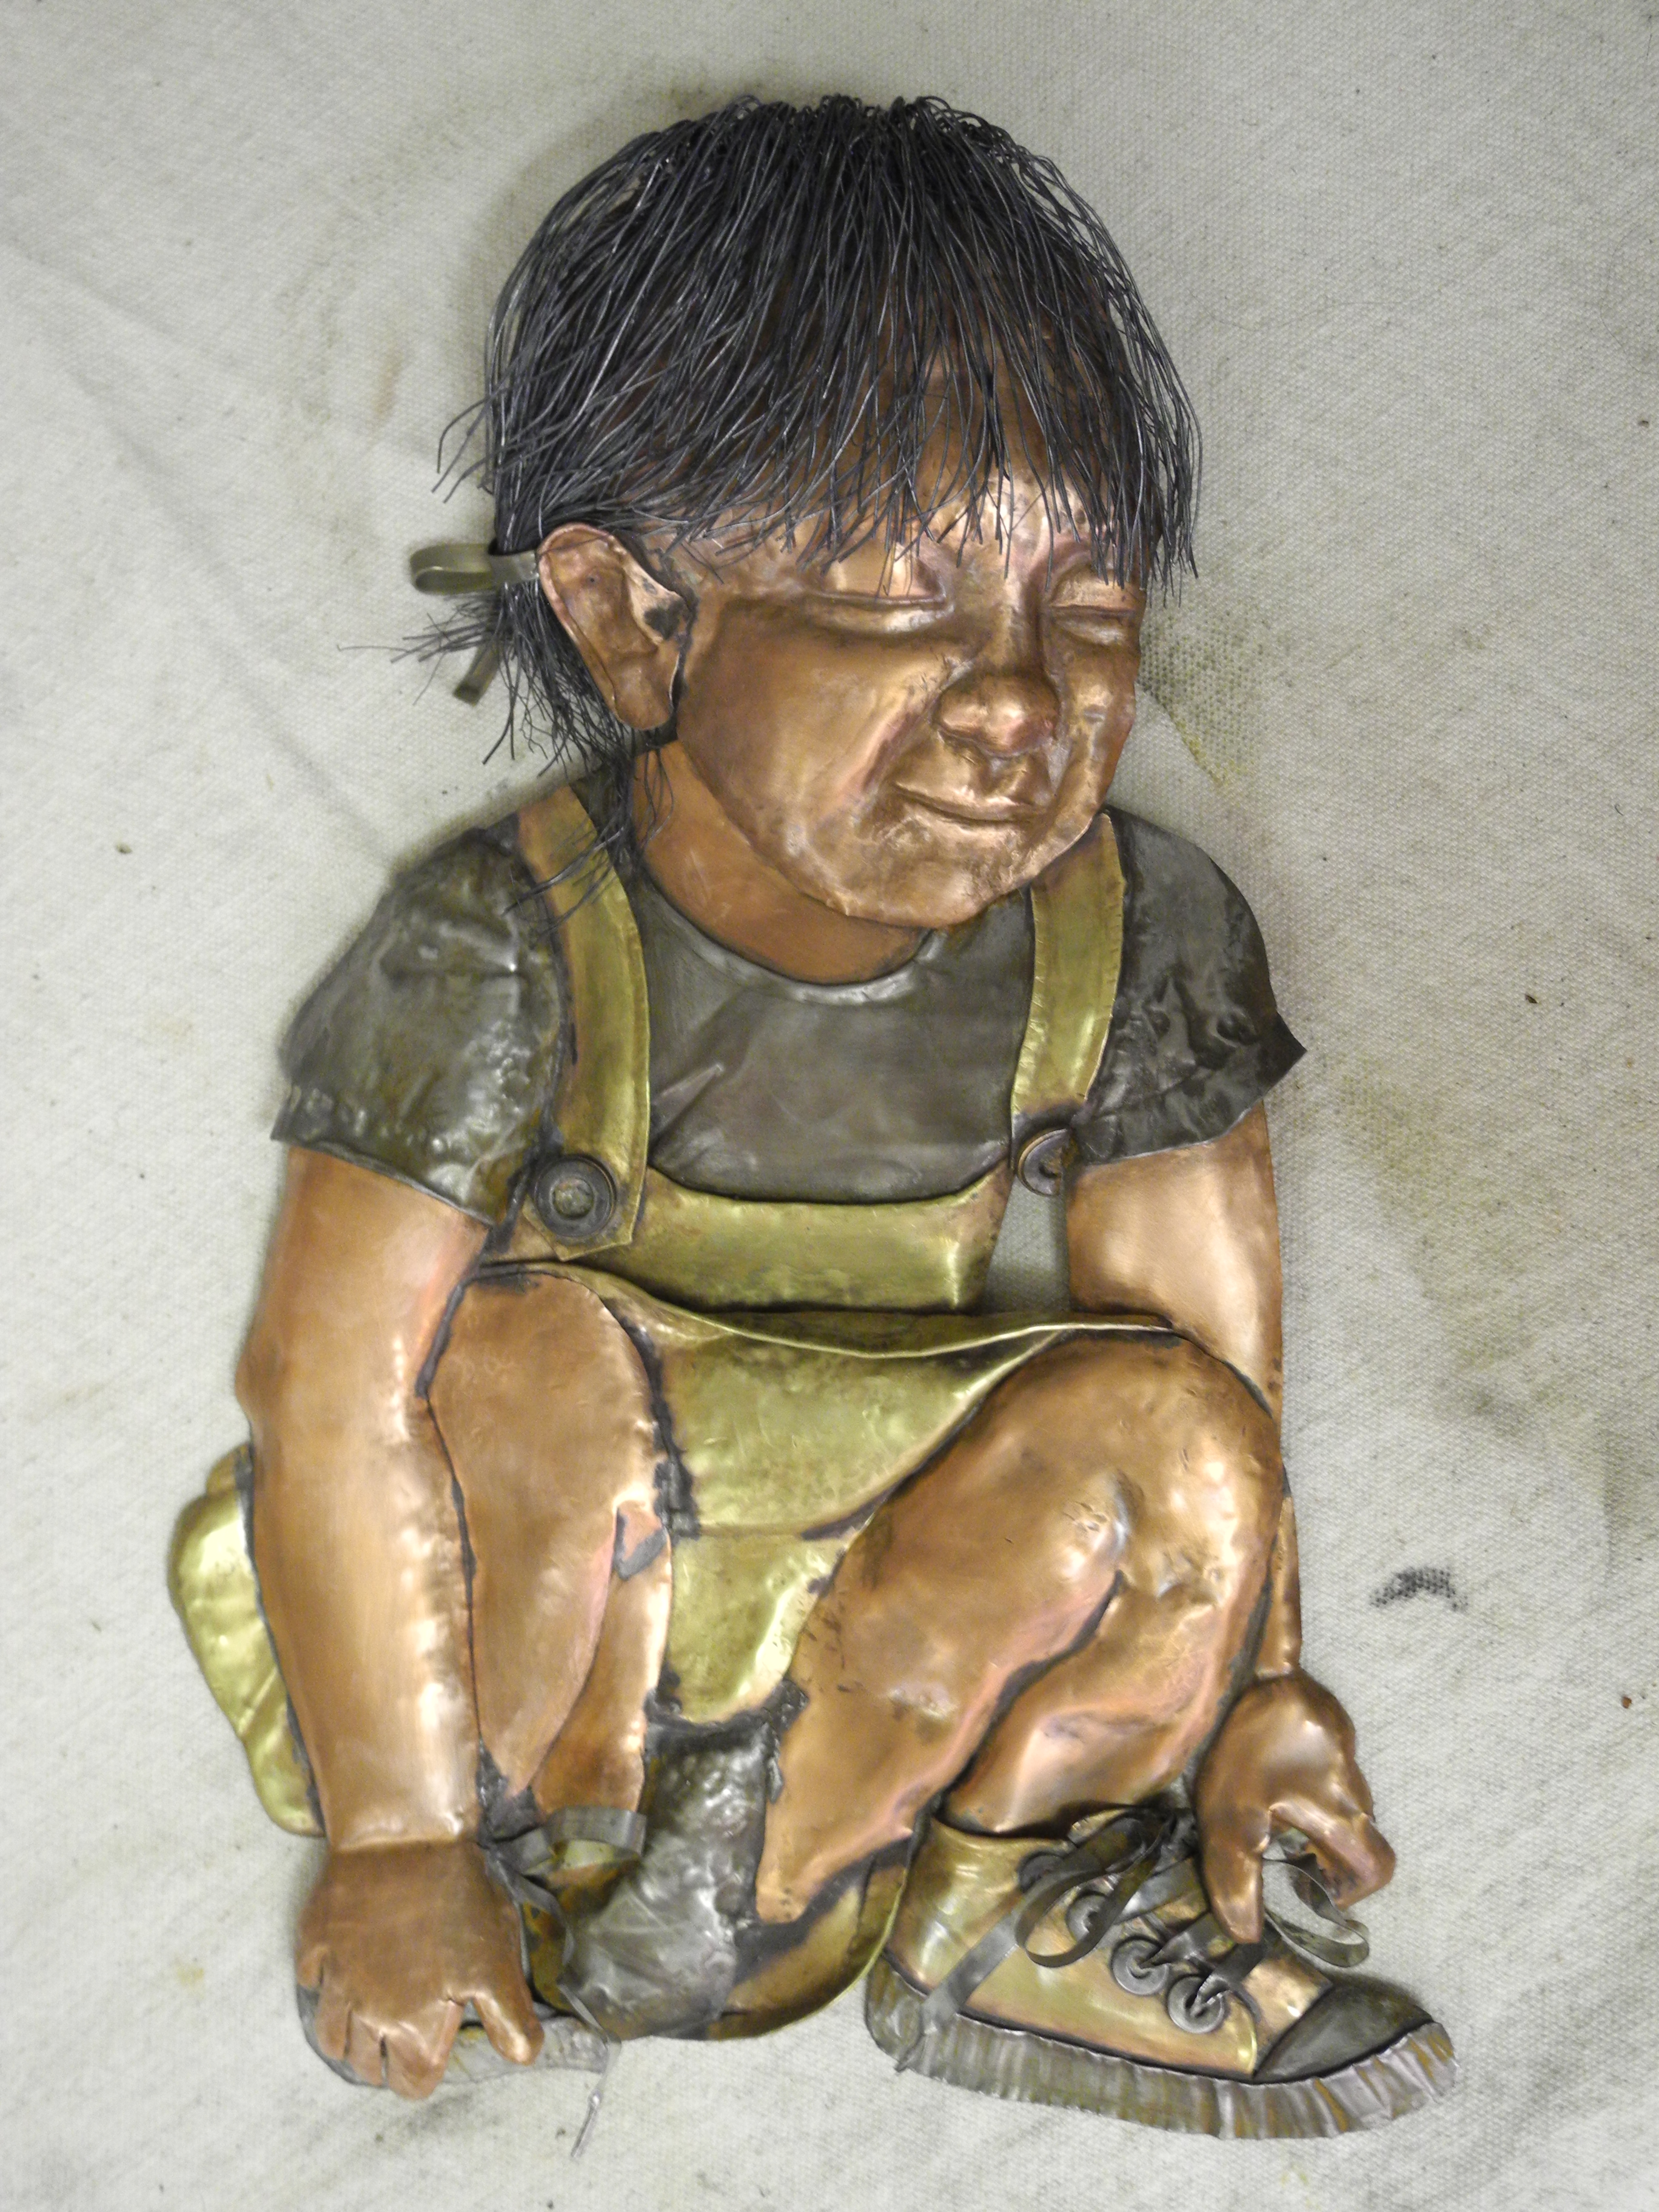
The little girl is complete and the boy just needs to ‘grow’ some hair. 😀

November 3, 2015: With the copper artwork kids completed, I spent time attaching sheets of copper to steel frames. Then I cleaned, wire brushed, cleaned again and heat treated the copper to get a flowing, colorful background. It is on these sheets that I will mount many leaves and mushrooms (and the kids!)

November 16, 2015: Progress on the panel is coming along nicely! Lots of soldering going on in the shop! 😀


November 18, 2015: More leaves and mushrooms are added! It’s all going to be complete soon (and I hope I enough leaves!)


Here’s a video that shows what goes into adding a mushroom:
November 24, 2015: Assembly is more or less complete (there may be the odd leaf added) and all that’s left is a final clean and polish and sealing. I’ll be starting the mural soon that will be on the wall behind the sculpture.

December 14, 2015: I have the background painted. Everything is ready for a final spray of clear coat – and then….. INSTALLATION! 😀

Here’s a video of me painting the mural:
Here is the final installed project – followed by a gallery of images showing the install.


Cindy,
That is definitely a work of art deserving of a “Wow”! That looks amazingly complex. I do metal wall art, but not to this extent. Beautiful! And thank you for sharing all the great photos.
Thank you Paula – I really enjoyed working on this piece. 😀
Hi Cindy, Just curious how long did the Wall Metal Sculpture take to complete from start to finish Aproxamly how many hours ?
Hi John – I haven’t added up the hours – but it was a lot of time spent each stage – forming the 500 leaves and 150 mushrooms, for example. I also spent a lot of hours trying different ways of adding color and patina to the metal – and then trying to preserve it. Overall, it was a few months start to finish.
Really fantastic work,an amazing project, great to see all the stages in the work and the result looks terrific, very well done indeed!
Thanks Neil – the clients love to see the progress – and this is the first time I’ve added so many videos (which the client really appreciated)
– Cin
I am enjoying watching the progress of this installation, truly amazing.
Thanks for watching Jennifer – It’s all done now! 😀